Hey, want to spruce up your outdoor space with some DIY garden decor? Start with handcrafted mosaic stepping stones to add a pop of color. Grab some concrete mix, a 12-inch mold, and broken tile pieces; then, pour the mix, arrange your tiles, and let it set for 24 hours. Curious about more easy projects like this to transform your yard? Stick around for the full lineup!
Contents
Handcrafted Mosaic Stepping Stones
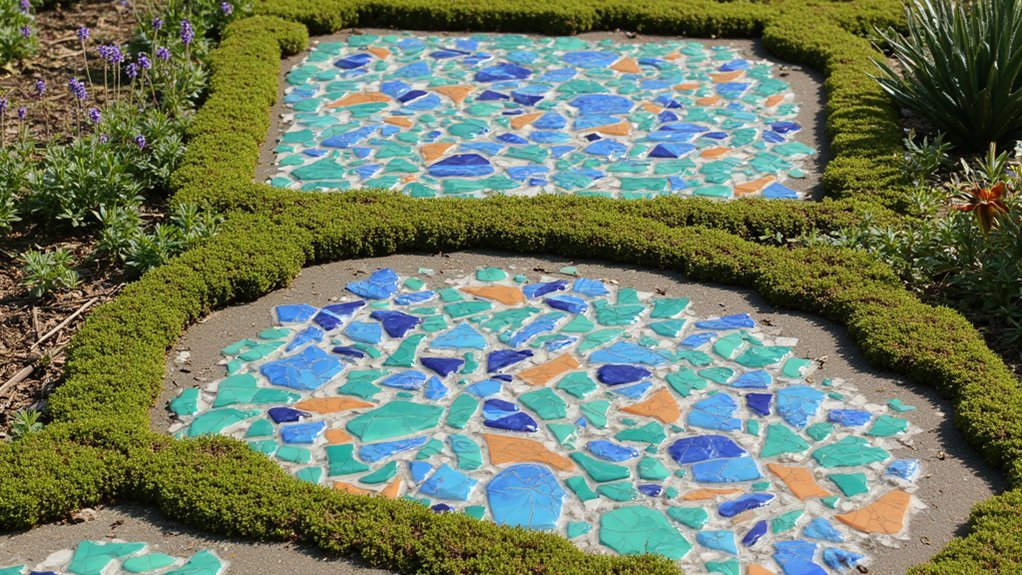
Hey, let’s kick off your garden decor journey with handcrafted mosaic stepping stones! You’ve got this, and I’m here to guide you. These stones add a personal touch to any path or garden bed.
First, gather your supplies: a 12-inch diameter mold, quick-set concrete, and colorful glass tiles or broken ceramics. Mix the concrete per package instructions, pour it into the mold, about 2 inches deep, and let it set for 30 minutes. While it’s still tacky, press your tiles into a unique pattern.
Wait 24 hours before popping the stone out of the mold. Place it along your walkway, spacing stones 18 inches apart for easy stepping. Repeat the process for more stones, and soon, you’ll have a custom path!
Unique Painted Plant Pots

While you’re sprucing up your garden, let’s plunge into creating unique painted plant pots. Don’t just settle for plain terracotta; jazz them up! Grab some acrylic paint, brushes, and a few old pots.
First, clean your pots thoroughly with soap and water, ensuring they’re dry before starting. Use a 1-inch brush to apply a base coat of paint, covering the entire exterior, and let it dry for 2 hours. Next, sketch designs like stripes or dots with a pencil, then paint over them using smaller brushes, maybe a 0.5-inch one, for precision.
Allow another 2 hours to dry, then seal with a clear, outdoor-safe varnish. Place them around your garden, showcasing your style with every vibrant pot!
Rustic Wooden Garden Signs
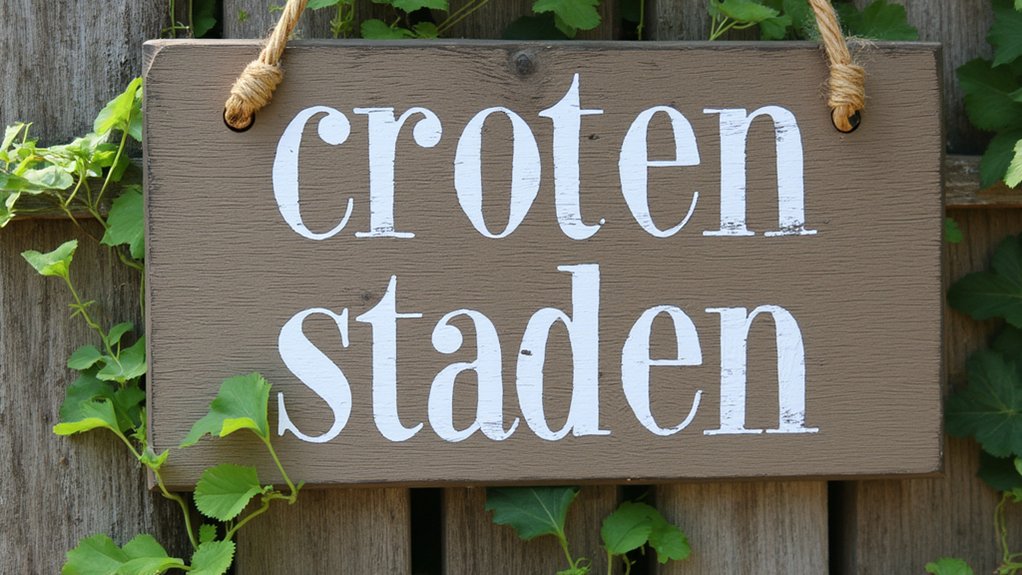
Let’s plunge into crafting some rustic wooden garden signs to add charm to your outdoor space. You’ll need basic materials, like reclaimed wood pieces, roughly 12×6 inches, and some outdoor paint. Grab sandpaper, a paintbrush, and twine for hanging, too.
Start by sanding the wood lightly to smooth rough edges, taking about 10 minutes per piece. Next, paint a base coat, let it dry for 2 hours, then add words like “Herb Garden” or “Welcome” using a stencil for neatness. Use a small brush for precision on those letters.
Finally, drill two small holes at the top, thread twine through, and hang your sign. It’s a quick project, done in a day, and adds a cozy, personal touch to any garden corner.
Creative Tire Swing Decor
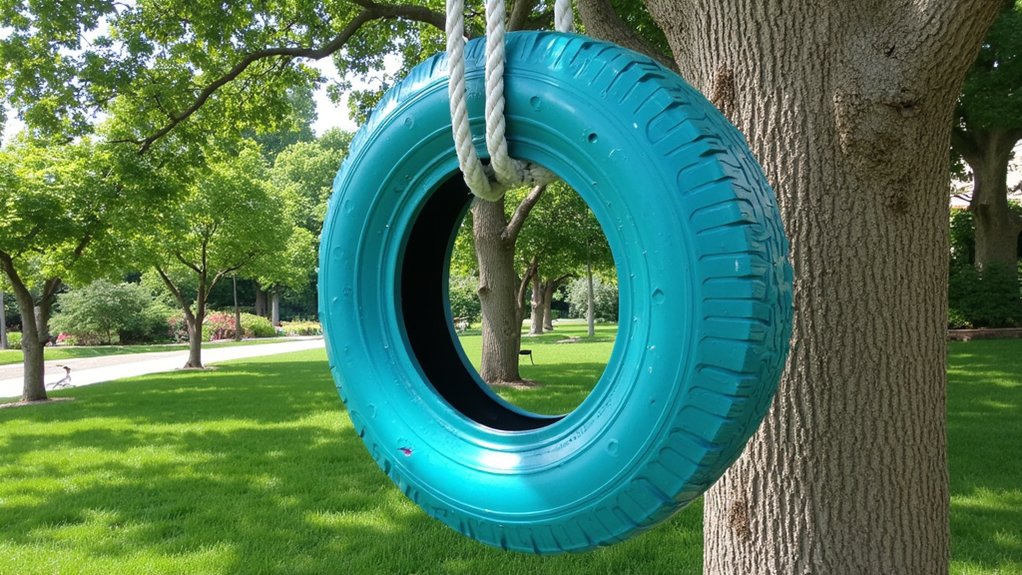
Ready for a fun twist in your garden? Let’s turn an old tire into a creative swing decor piece. It’s a simple project, and you’ve likely got a spare tire lying around somewhere.
Start by cleaning the tire thoroughly with soap and water, ensuring it’s free of dirt. Then, paint it a bright color, like teal or yellow, using outdoor latex paint for durability. Let it dry for 24 hours, checking it’s fully set before moving on.
Next, grab a strong rope, about 20 feet long, and secure it through the tire’s center with a sturdy knot. Hang it from a thick tree branch, testing the weight limit—up to 200 pounds should work. Now, enjoy your quirky, budget-friendly garden swing!
Charming Fairy Light Canopies
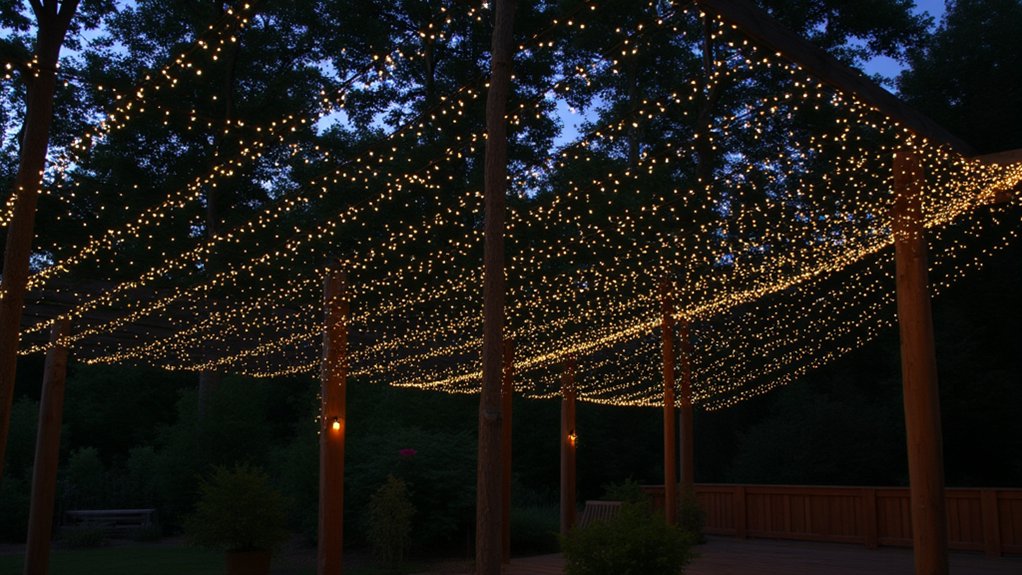
As you look to add a magical touch to your garden, consider crafting a charming fairy light canopy. It’s an easy, affordable project that transforms your outdoor space into a whimsical retreat.
First, grab some sturdy string or thin wire, about 50 feet, and a pack of battery-operated fairy lights. Measure and cut the string to span across a 10×10-foot area, securing it between trees or posts with tight knots. Next, drape the fairy lights over the string, spacing strands about 2 feet apart for even coverage.
Work in the late afternoon; it’ll take roughly 2 hours to set up. Test the lights as you go, ensuring they’re working. By evening, you’ll have a glowing canopy overhead!
Vintage Teacup Bird Feeders
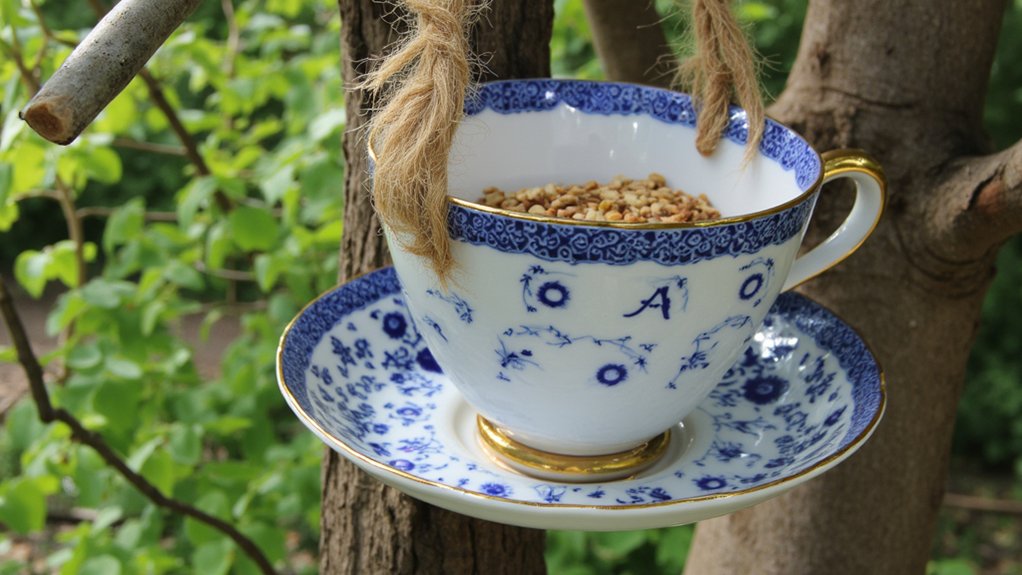
Crafting vintage teacup bird feeders can add a quirky, charming touch to your garden. You’ve likely got old teacups stashed away, so let’s repurpose them. Grab a teacup and saucer, some strong epoxy glue, and birdseed.
First, clean the teacup and saucer thoroughly, ensuring they’re free of dust or grease. Apply a small dab of epoxy, about a dime-sized amount, to the bottom of the teacup, then press it firmly onto the saucer’s center. Let it dry for 24 hours, checking the bond’s strength afterward.
Next, fill the teacup with ½ cup of birdseed, perfect for small birds. Hang it with twine through the handle, securing it to a sturdy branch. Watch feathered friends visit your whimsical feeder soon!
Repurposed Pallet Garden Bench
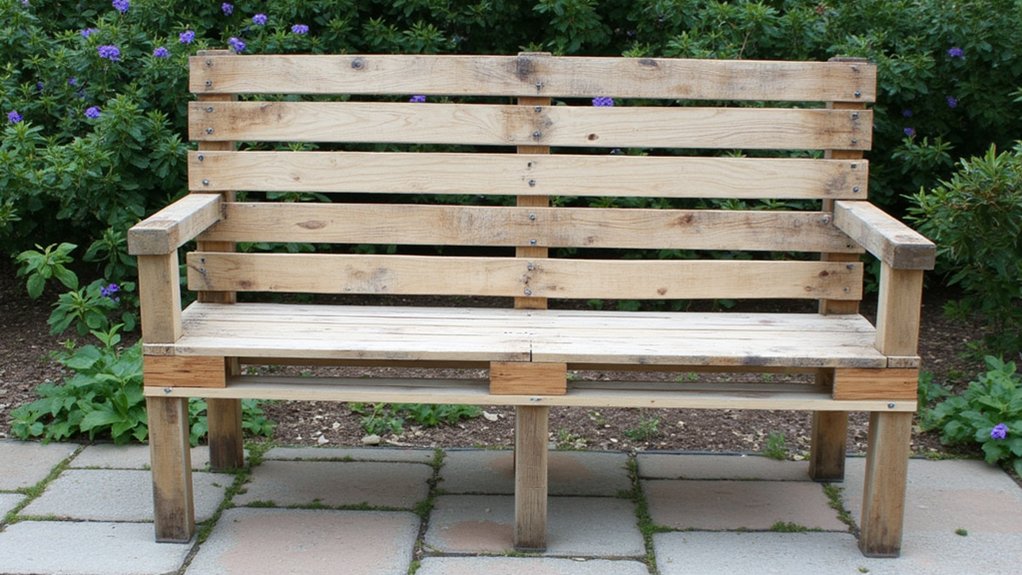
While transforming your garden space, why not create a sturdy seat with a repurposed pallet garden bench? It’s a practical project, and you’ve likely got old pallets lying around. This DIY takes about a weekend to complete.
Start by grabbing two standard pallets, roughly 48 by 40 inches each. Sand them down with medium-grit sandpaper, about 80-grit, to smooth rough edges, taking maybe an hour. Next, stack one pallet atop the other, securing them with heavy-duty screws, at least 3 inches long, in each corner.
Now, add a backrest by standing a third pallet vertically against the rear edge. Fasten it with L-brackets for stability, using a drill. Finally, paint or stain it for weather resistance, and place it in your garden spot. Easy, right?
Colorful Bottle Cap Art
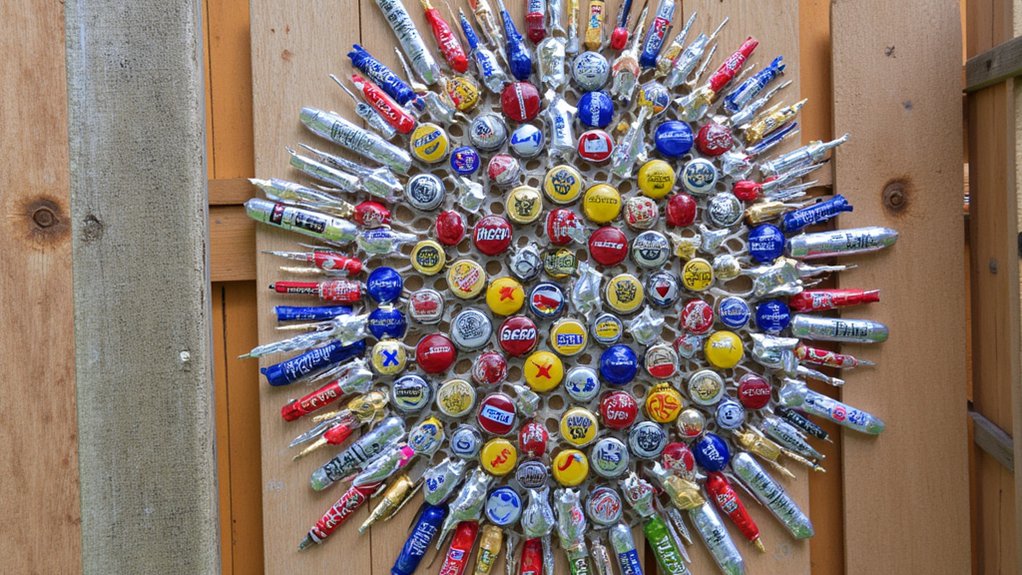
Hey, let’s switch gears and brighten up your garden with some colorful bottle cap art! You’ve probably got old bottle caps lying around, so why not transform them into eye-catching decor? This project’s super easy and budget-friendly.
Start by collecting at least 100 bottle caps, ideally in various colors, from soda or beer bottles. Next, grab a piece of plywood, about 2 feet by 2 feet, as your base. Sketch a simple design—like a flower or sun—directly on the wood, using a pencil for precision. Then, glue the caps onto your pattern with a hot glue gun, filling in shapes tightly.
Hang it on a fence or wall. In just a few hours, you’ll have a quirky, vibrant masterpiece!
Quirky Stone Garden Markers
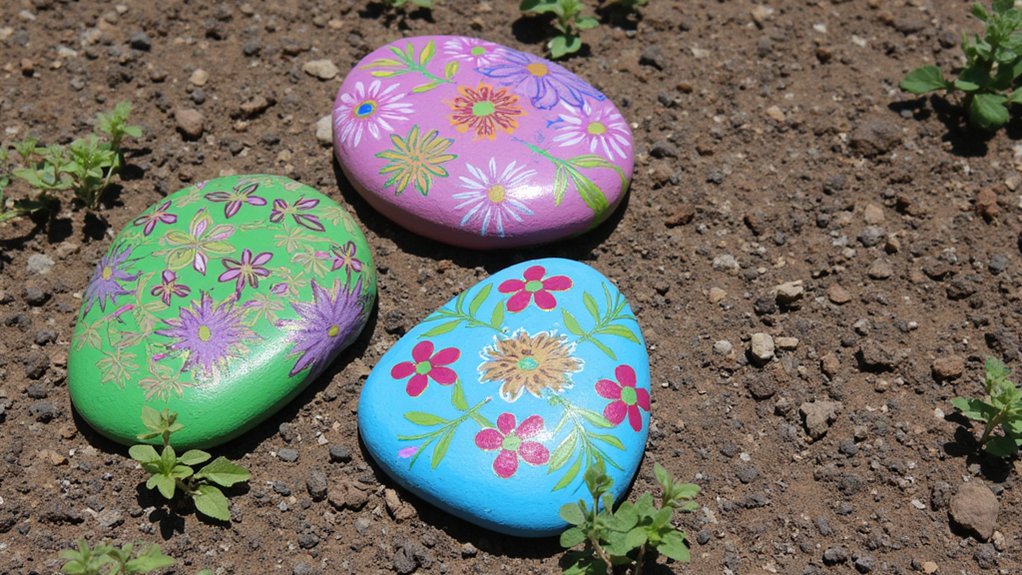
If you’re looking for a fun way to label your garden, let’s plunge into making quirky stone garden markers. You’ll need smooth, flat stones, about 3-5 inches wide, and some outdoor acrylic paint. Grab a fine-tip paintbrush and a sealant too.
Start by cleaning the stones with soap and water, ensuring they’re dirt-free. Dry them completely, which takes about an hour, before painting. Write plant names—like “Basil” or “Mint”—in bold letters, adding tiny doodles if you’d like a playful touch.
Once the paint dries, usually in 2 hours, apply a clear sealant to protect against rain. Place these markers near your plants, pushing them slightly into the soil. There you go, a simple, personalized way to organize your garden space!
Whimsical Wind Chime Creations
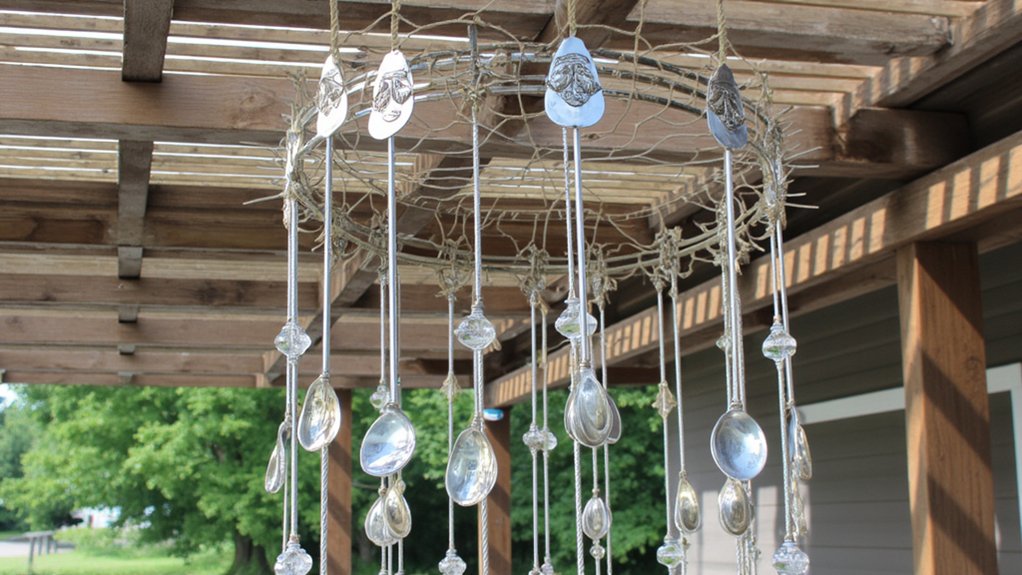
Let’s switch gears from stone markers to crafting whimsical wind chimes for your garden. You can create these charming pieces using simple materials, like old silverware or glass beads, to add a playful touch.
Start by gathering a sturdy base, say a 6-inch wooden hoop, and some durable string, about 3 feet long. Tie five or six strings to the hoop, spacing them evenly, then attach items like forks, spoons, or colorful beads to each string’s end. Make sure they hang at different lengths, between 8 and 12 inches, for varied sounds.
Hang your creation from a tree branch or hook using extra string. Test it out, adjust as needed, and enjoy the gentle tinkling in the breeze.