Like bringing Lazarus back from the dead, rescuing a dying orchid isn’t for the faint of heart. You’ll need to channel your inner plant detective to identify what’s gone wrong, as these delicate beauties can decline for various reasons – from root rot to improper lighting. Whether you’re facing yellowing leaves, mushy stems, or dropped buds, there’s still hope for your wilting wonder. Let’s explore the step-by-step process that’ll transform your struggling orchid back into the showstopper it’s meant to be.
Contents
- 1 Common Signs of a Struggling Orchid
- 2 Diagnosing Root Health and Rot Issues
- 3 Proper Watering Techniques for Recovery
- 4 Optimal Light Conditions for Revival
- 5 Essential Temperature and Humidity Requirements
- 6 Repotting Steps to Save Your Orchid
- 7 Fertilization Strategies During Recovery
- 8 Pruning and Maintenance for New Growth
- 9 Pest Control and Disease Management
- 10 Monitoring Progress and Adjusting Care
Common Signs of a Struggling Orchid
Before you can save your struggling orchid, you’ll need to identify the warning signs that indicate it’s in distress. Look for yellowing or wrinkled leaves, roots that appear brown and mushy, and flower buds that drop before opening.
Watch for stems that become soft or discolored, particularly near the base, which often suggests root rot. Your orchid’s leaves should be firm and bright green; if they’re limp or mottled, there’s likely a problem.
Check the potting medium – if it stays soggy for days or has broken down into a compacted mass, your orchid can’t properly absorb nutrients and water.
Diagnosing Root Health and Rot Issues
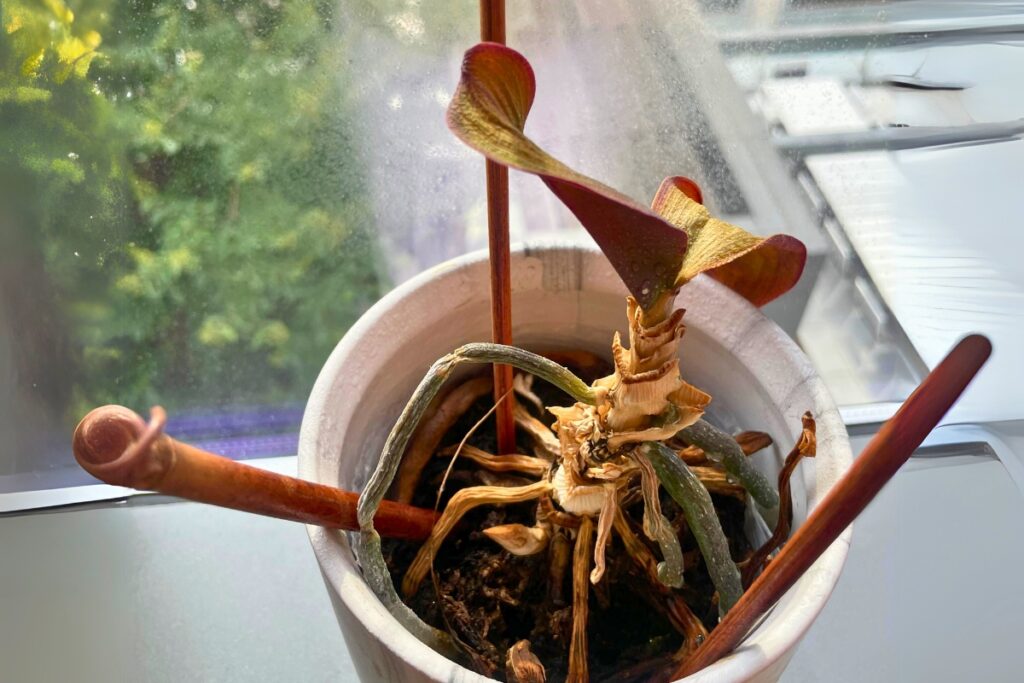
You’ll need to examine your orchid’s roots closely, as their color and texture reveal essential information about the plant’s health. Healthy orchid roots should appear firm and silvery-green when dry, turning bright green when watered, while rotting roots will be brown or black, mushy, and hollow when squeezed. When checking for root rot, pay special attention to any roots that feel soft or have a slimy coating, as these are telltale signs of decay that require immediate attention.
Root Color Assessment
Understanding root color serves as your primary diagnostic tool when evaluating orchid health. Healthy orchid roots display a silvery-green to bright green color when dry, turning vibrant emerald when watered. When inspecting your plant’s roots, you’ll want to look for these key indicators.
Pale yellow or white roots typically signal dehydration, while brown or black coloring suggests rot has set in. You’ll notice healthy roots feel firm and plump, not mushy or hollow. If you spot dark, mushy sections, trim them immediately with sterilized scissors, cutting 1/4 inch above the damaged area to prevent spread.
Rotting Root Warning Signs
Root rot presents several distinct warning signs that every orchid owner should monitor closely. You’ll notice affected roots become mushy, brown, or black, and they’ll easily slide out of their outer casing when gently squeezed. Unlike healthy roots that feel firm and show a green or silvery color, rotting roots emit an unpleasant, musty odor.
Watch for secondary symptoms in the plant’s upper portions, including yellowing leaves, dropping buds, and wilting stems. If you spot dark spots spreading up from the root area, you’re likely dealing with advanced rot that’s climbing the plant. Don’t ignore these indicators – early intervention is vital for saving your orchid.
Proper Watering Techniques for Recovery
Reviving a dehydrated orchid starts with implementing the right watering schedule. Water your orchid thoroughly once every 7-10 days, allowing water to flow through the drainage holes for 30 seconds. Don’t water again until the top inch of potting medium feels dry to the touch.
During recovery, mist the aerial roots daily with room-temperature water, but avoid spraying the leaves or flowers. Place ice cubes on the potting medium’s edge for slow-release hydration, using 3-4 cubes for standard-sized pots.
For severe dehydration cases, soak the entire pot in lukewarm water for 15 minutes, then let it drain completely before returning it to its display location.
Optimal Light Conditions for Revival
While proper watering sets the foundation for orchid recovery, light exposure serves as the powerhouse for photosynthesis and renewed growth. Place your orchid 3-5 feet from an east-facing window, where it’ll receive bright, indirect morning light for 4-6 hours daily.
If you’re using a north-facing window, move the plant closer (1-2 feet) to compensate for lower light intensity. Watch for telltale signs of incorrect lighting: dark green leaves signal too little light, while yellowing indicates excessive exposure.
During winter months, you can supplement natural light with a LED grow light positioned 12 inches above the plant for 12-14 hours daily.
Essential Temperature and Humidity Requirements
To successfully rehabilitate your struggling orchid, maintaining proper temperature and humidity levels is absolutely essential. Keep daytime temperatures between 65-80°F (18-27°C), with a 10-15°F drop at night.
You’ll need 40-70% humidity for most orchid varieties. Place a humidity tray filled with pebbles and water beneath your plant, but don’t let the pot touch the water. In dry climates, you might need a small humidifier nearby.
Monitor these conditions using a digital thermometer-hygrometer combo device. If you notice leaf wrinkles or dry pseudobulbs, your humidity’s too low. When temperatures fluctuate dramatically, move your orchid away from drafty windows or HVAC vents.
Repotting Steps to Save Your Orchid
Beyond proper temperature and humidity, your struggling orchid may need a fresh start in new potting material. Begin by gently removing the plant from its current pot, then trim away any dead or rotting roots with sterilized scissors.
Select a clean pot that’s 1-2 inches larger than the root mass, and fill it halfway with fresh orchid bark mix. Position your orchid so the crown sits slightly above the pot’s rim, then add more potting medium around the roots, pressing gently to secure the plant.
Water thoroughly until it drains freely, and don’t fertilize for at least four weeks while your orchid establishes itself in its new home.
Fertilization Strategies During Recovery
Once your orchid begins showing signs of new growth, you’ll need to implement a careful fertilization routine. Start with a balanced orchid fertilizer, diluted to quarter-strength, applying it every other week during the growing season.
When your orchid’s roots look plump and silvery-green, increase to half-strength fertilizer, but never exceed the recommended dosage on the package. During winter months, reduce feeding to once monthly, as your orchid’s growth naturally slows.
Always water thoroughly before fertilizing, and remember the adage “weekly, weakly” – frequent but diluted applications work best. Skip fertilization entirely if your orchid’s leaves appear yellow or wrinkled.
Pruning and Maintenance for New Growth
Proper pruning complements your fertilization routine by directing energy to the healthiest parts of your orchid. Using sterilized scissors, remove any yellowed or blackened leaves at their base, making clean 45-degree cuts to prevent water accumulation.
Inspect flower spikes carefully – if they’re brown and brittle, cut them down to 1 inch above the base. For green spikes, trim just above the nearest node below the spent blooms to encourage reblooming.
Don’t forget to remove dead roots, which appear papery and hollow. Healthy roots are firm and green or silvery-white. After pruning, keep your orchid in a humid environment at 65-80°F to promote new growth.
Pest Control and Disease Management
If you’re battling a dying orchid, you’ll need to watch for common pests like spider mites, mealybugs, and scale insects, which appear as tiny spots or cotton-like clusters on leaves and stems. Regular inspection of your orchid’s foliage, especially under leaves and near growth points, helps catch pest problems before they become severe. You can prevent many diseases naturally by maintaining proper air circulation, avoiding overwatering, and immediately isolating any infected plants from your healthy specimens.
Identifying Common Orchid Pests
Spotting unwanted pests on your orchid’s leaves, stems, or roots can signal serious trouble ahead. The most common invaders you’ll encounter are spider mites, mealybugs, scale insects, and aphids.
Spider mites appear as tiny red or brown specks, leaving fine webbing between leaves. Mealybugs look like small cotton balls, while scale insects form brownish bumps along stems. Aphids cluster as green, brown, or black dots, typically on new growth.
Use a magnifying glass to inspect your plant weekly, paying special attention to leaf joints and stem corners. You’ll often spot sticky residue or black sooty mold as early warning signs of an infestation.
Natural Disease Prevention Methods
Once you’ve mastered pest identification, implementing natural prevention methods will keep your orchid healthy without harsh chemicals. Start by mixing one part neem oil with ten parts water, then spray your plant’s leaves every two weeks during growing season.
Create a protective barrier by spreading a 1/2-inch layer of cinnamon powder around the base of your orchid, as it’s a natural fungicide. You’ll also want to boost air circulation by keeping plants 6-8 inches apart, and install a small fan nearby.
Mix 1 tablespoon of hydrogen peroxide per cup of water to naturally sterilize your growing medium when repotting, which helps prevent root rot.
Monitoring Progress and Adjusting Care
After implementing your rescue plan, carefully monitoring your orchid’s progress becomes essential for long-term success. Check the plant daily for the first two weeks, documenting any changes in leaf color, root firmness, and new growth.
Keep a simple care diary, noting watering dates and fertilizer applications. If you don’t see improvement within three weeks, adjust your care routine. You might need to modify light exposure, increase humidity, or change watering frequency.
Watch for specific signs of recovery: bright green leaf tips, firm white roots, and aerial root growth. Once you spot new growth, maintain your current care routine – you’ve found the sweet spot.