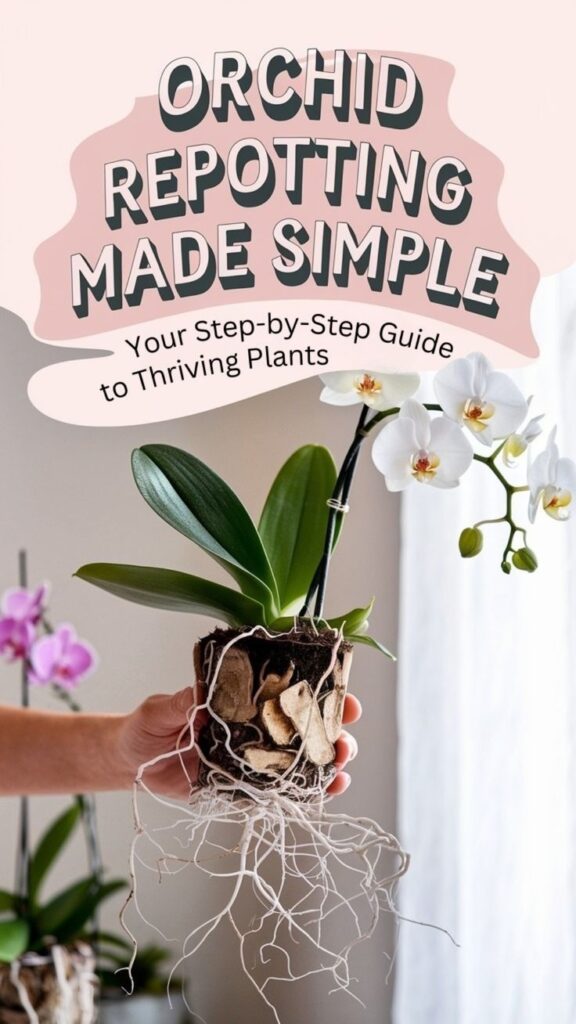
While most orchid enthusiasts focus on watering and light requirements, they often overlook the vital detail that root congestion can kill their plants within months. You’ll know it’s time to repot when you see roots crawling over the pot’s edge or your orchid’s growth has stalled despite proper care. As you learn the art of repotting, you’ll discover it’s not just about giving your orchid more space – it’s about creating an environment where it can thrive for years to come.
Contents
- 1 Signs Your Orchid Needs Repotting
- 2 Essential Tools and Materials for Repotting
- 3 Choosing the Right Potting Medium
- 4 Best Times of Year to Repot Your Orchid
- 5 Step-by-Step Guide to Removing Your Orchid
- 6 Examining and Trimming Orchid Roots
- 7 Proper Placement in the New Container
- 8 Post-Repotting Care and Recovery
- 9 Common Mistakes to Avoid When Repotting
- 10 Special Considerations for Different Orchid Species
Signs Your Orchid Needs Repotting
When it comes to orchid care, knowing the right time to repot is essential for your plant’s health and growth. You’ll notice several clear indicators that it’s time for a new home.
Watch for roots growing over the pot’s edge or through drainage holes, as this means your orchid’s outgrown its container. If you see the potting medium breaking down into small pieces, or it’s been 2-3 years since the last repotting, it’s time to act.
Check the root color – healthy roots are firm and silvery-green when dry, while mushy, brown roots signal poor drainage and urgent repotting needs. Don’t wait until your orchid shows signs of stress.
Essential Tools and Materials for Repotting
You’ll need several key items before starting the orchid repotting process, including clean pruning shears, a spray bottle, and protective gloves. When selecting your potting media, you’ll want to choose between bark-based mixes, sphagnum moss, or specialized orchid blends that match your specific orchid type. For proper drainage and root health, gather clear plastic pots with plenty of ventilation holes, humidity trays, and sterilized pot clips to secure your plant.
Basic Equipment Needed
Success in repotting orchids depends heavily on having the right tools and materials ready before you begin. You’ll need clean pruning shears or scissors, a fresh pot with drainage holes, and high-quality orchid potting mix. Don’t forget protective gloves to keep your hands clean.
Essential measuring tools include a ruler or tape measure to check root length and pot size. You’ll also want wooden stakes for support, plant clips, and sterilizing solution (70% rubbing alcohol works well) to clean your tools. Keep newspaper or a potting mat handy to catch debris, and have a spray bottle filled with water for misting roots.
Potting Media Selection
Choosing the right potting media stands as the cornerstone of successful orchid repotting. You’ll want a mix that provides both excellent drainage and proper air circulation for your orchid’s roots. Most orchids thrive in a blend of 70% bark chunks, 20% perlite, and 10% sphagnum moss.
For Phalaenopsis orchids, select medium-grade bark (½ to ¾ inch pieces), while Cattleyas prefer larger chunks (¾ to 1 inch). Don’t use regular potting soil, as it’ll suffocate your orchid’s roots. Instead, look for specialized orchid mixes that contain materials like charcoal, coconut husks, or tree fern fiber for enhanced aeration.
Containers and Drainage Supplies
Along with the right growing medium, proper containers make a world of difference in your orchid’s health. You’ll need a pot that’s 1-2 inches larger than your orchid’s root mass, with plenty of drainage holes in both the sides and bottom.
Clear plastic pots are ideal since they’ll let you monitor root health and moisture levels. Don’t forget to gather drainage materials like clay pellets or pebbles for the pot’s bottom. While terracotta pots work well, they’re not necessary if you’re using proper orchid mix.
For mounting supplies, you’ll want sterilized wire mesh screens or plastic grids to prevent media loss through drainage holes.
Choosing the Right Potting Medium
When you’re selecting a potting medium for your orchids, you’ll need to choose between bark-based mixes, which provide excellent drainage and air circulation, or sphagnum moss, which retains more moisture for humidity-loving varieties. You can purchase pre-made orchid mixes from garden centers, but creating your own blend allows you to customize the growing environment for your specific orchid types. The ideal mix often combines fir bark, perlite, and charcoal in a 5:1:1 ratio, though you’ll want to adjust these proportions based on your local climate and watering habits.
Best Materials for Orchids
The right potting medium can make or break your orchid’s health and growth potential. For most orchids, you’ll want to use a mix that includes fir bark, perlite, and sphagnum moss in a 5:2:1 ratio. These materials provide excellent drainage while retaining just enough moisture.
Don’t use regular potting soil, as it’ll suffocate your orchid’s roots. Instead, opt for chunky bark pieces (1/2 to 3/4 inch) for mature plants, or finer grade (1/4 inch) for smaller specimens. You can also add charcoal bits to keep the mix fresh and prevent bacterial growth.
Remember to pre-soak your chosen medium for 24 hours before use.
Bark Vs Moss Options
Both bark and moss serve unique purposes in orchid cultivation, and choosing between them often depends on your growing environment. Bark, available in fine (1/4 inch) to large (1 inch) sizes, provides excellent drainage and air circulation, making it ideal for warmer, drier climates.
Sphagnum moss retains more moisture and works well in low-humidity settings. You’ll find it’s particularly effective for orchids recovering from root loss or for mounting epiphytic varieties. While moss can last 1-2 years, bark typically needs replacement every 18-24 months as it decomposes.
For best results, match your medium to your watering habits – frequent waterers should choose bark, while busy growers might prefer moss’s moisture-retention properties.
Mix Your Own Medium
Creating your own orchid potting mix allows precise control over drainage, aeration, and moisture retention. Start with a base of 60% medium-grade fir or pine bark, then add 20% perlite for improved drainage and 10% charcoal to prevent bacterial growth.
For moisture retention, incorporate 10% sphagnum moss or coconut coir. If you’re growing indoors, you’ll want to adjust these ratios – increase moss to 15% and decrease bark to 55% to combat faster drying.
Mix ingredients in a clean container, breaking up any clumps. Soak your custom blend in warm water for 24 hours before use to guarantee proper moisture distribution throughout the medium.
Best Times of Year to Repot Your Orchid
When should you repot your orchid? The best time is right after it finishes blooming, typically in early spring or late summer. You’ll know it’s ready when the flowers have completely fallen off and new growth begins to appear.
If you’ve got a spring-blooming orchid, plan to repot between March and June. For winter bloomers, aim for July through September. Don’t repot while your orchid is flowering, as this can shock the plant and cause the blooms to drop prematurely.
Watch for signs like roots growing over the pot’s edge or decomposing potting medium – these are nature’s way of telling you it’s time to repot.
Step-by-Step Guide to Removing Your Orchid
Before you start removing your orchid, clear a clean workspace and gather essentials like fresh potting mix, sterile tools, and a new pot. You’ll find it easier to extract your orchid if you first tip the container sideways and gently squeeze its flexible sides to loosen the root mass. While supporting the plant’s base with one hand, carefully work your fingers between the pot’s edge and the roots, maintaining a steady but gentle pressure until the entire orchid slides free.
Prepare Your Workspace First
A clean, organized workspace serves as your foundation for successful orchid repotting. Clear a 3×3 foot area on a flat surface, and lay down newspapers or a plastic sheet to catch debris.
You’ll need to gather several essential items: sharp scissors, a sterilized cutting tool, fresh potting medium, a new pot (1-2 inches larger than current), and a spray bottle with water. Don’t forget protective gloves if you’re working with mossy materials.
Position your tools within arm’s reach, and verify you’ve got adequate lighting. A bright indoor space away from drafts works best, though you can work outdoors on a calm day.
Gentle Root Extraction Tips
Since your orchid’s roots have likely bonded with its current pot, you’ll need a systematic approach to minimize stress during extraction. Start by inserting a clean butter knife between the pot’s edge and root mass, gently working it around the perimeter to loosen the grip.
If the roots remain stubborn, soak the entire pot in lukewarm water for 15 minutes. This will soften the potting medium and make the roots more pliable. Once soaked, hold the orchid’s base firmly and squeeze the pot’s sides to further loosen the root ball.
Invert the pot at a 45-degree angle, then tap the bottom while supporting the plant’s crown. The orchid should slide out smoothly.
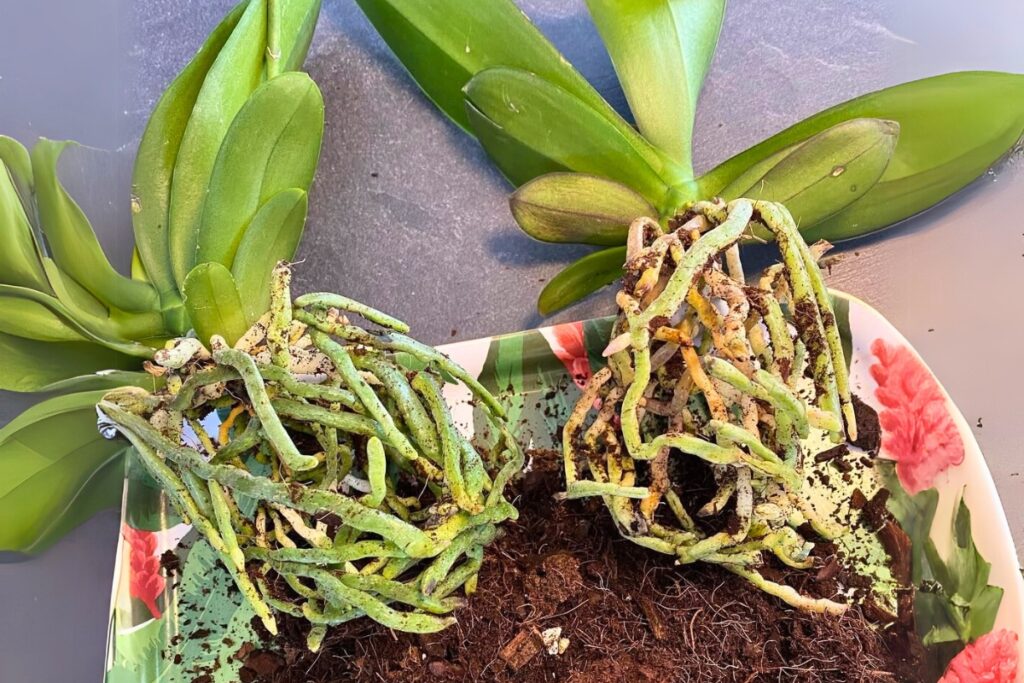
Examining and Trimming Orchid Roots
Proper examination of your orchid’s roots marks one of the most essential steps in successful repotting. After removing the plant, you’ll notice both healthy and unhealthy roots. Healthy roots appear firm and light green when dry, turning bright green when wet.
Look for soft, brown, or mushy roots – these need to go. Using sterilized scissors, trim away dead roots with clean, angled cuts about 1/4 inch above the damaged areas. Don’t worry if you need to remove up to 30% of the root system.
If you spot hollow roots with brown casings, they’re already dead. Remove these completely, as they won’t recover and could harbor harmful bacteria.
Proper Placement in the New Container
Once you’ve prepared your orchid’s roots, positioning the plant at the right height in its new container becomes essential for healthy growth. Place the plant so its crown sits 1-2 inches below the pot’s rim, ensuring the roots have enough space to spread naturally.
Center your orchid carefully, making sure it stands upright without leaning. You’ll want to position the oldest growth against the pot’s edge, allowing new shoots to grow toward the center. If you’re working with a clear pot, align the plant’s best side facing outward.
Add your potting medium gradually around the roots, gently tapping the container to eliminate air pockets.
Post-Repotting Care and Recovery
After repotting your orchid, you’ll need to provide special care for the next 2-3 weeks while it adjusts to its new home. Keep the plant in a shaded area with indirect light, and maintain temperatures between 65-75°F (18-24°C).
Don’t water your orchid for the first 5-7 days to allow any damaged roots to heal. When you resume watering, use a diluted fertilizer solution at quarter strength. Mist the leaves daily to maintain humidity levels around 50-60%.
Watch for new root growth and leaf development, which typically begins within 3-4 weeks. If you notice any yellowing leaves, trim them off with sterilized scissors to prevent potential disease spread.
Common Mistakes to Avoid When Repotting
While enthusiasm for repotting can be high, many orchid growers make several critical mistakes that can harm their plants. Don’t rush to repot healthy orchids that aren’t root-bound, as premature repotting can shock the plant unnecessarily.
Avoid using pots that are too large, as excess moisture retention can lead to root rot. Select containers only 1-2 inches wider than the current pot. You’ll also want to skip sterilizing your tools, which can introduce harmful bacteria to fresh cuts.
Never remove all the old growing medium, since orchid roots need some familiar substrate. Keep at least 30% of the previous medium intact.
Special Considerations for Different Orchid Species
Different orchid species require unique repotting approaches based on their natural growing habits and root structures. For Phalaenopsis orchids, you’ll want to use a clear plastic pot with plenty of drainage holes, while Cattleyas need clay pots to prevent root rot.
Vandas don’t typically need traditional pots at all – they’re best mounted on bark or hung in wooden baskets. If you’re working with Paphiopedilums, choose a pot just 1-2 inches larger than the root mass and use fine-grade bark mix.
Dendrobiums prefer to be slightly pot-bound, so don’t rush to repot them unless they’re bursting out of their container.