If you’ve noticed your Phalaenopsis orchid’s roots crawling over the pot’s edge or its potting mix breaking down, it’s time for a repotting adventure. While this task might seem intimidating, you’ll find it’s actually a straightforward process when you know the proper technique. Your orchid’s health depends on well-timed repotting, typically needed every 1-2 years, and there’s more to it than just moving your plant to a bigger home.
Contents
- 1 Signs Your Orchid Needs Repotting
- 2 Best Time of Year to Repot Your Phalaenopsis
- 3 Essential Tools and Materials for Repotting
- 4 Choosing the Right Potting Media
- 5 Selecting the Perfect Container Size
- 6 Step-by-Step Repotting Process
- 7 Post-Repotting Care and Maintenance
- 8 Common Repotting Mistakes to Avoid
- 9 Dealing With Root Problems During Repotting
- 10 Recovery Period and Growth Expectations
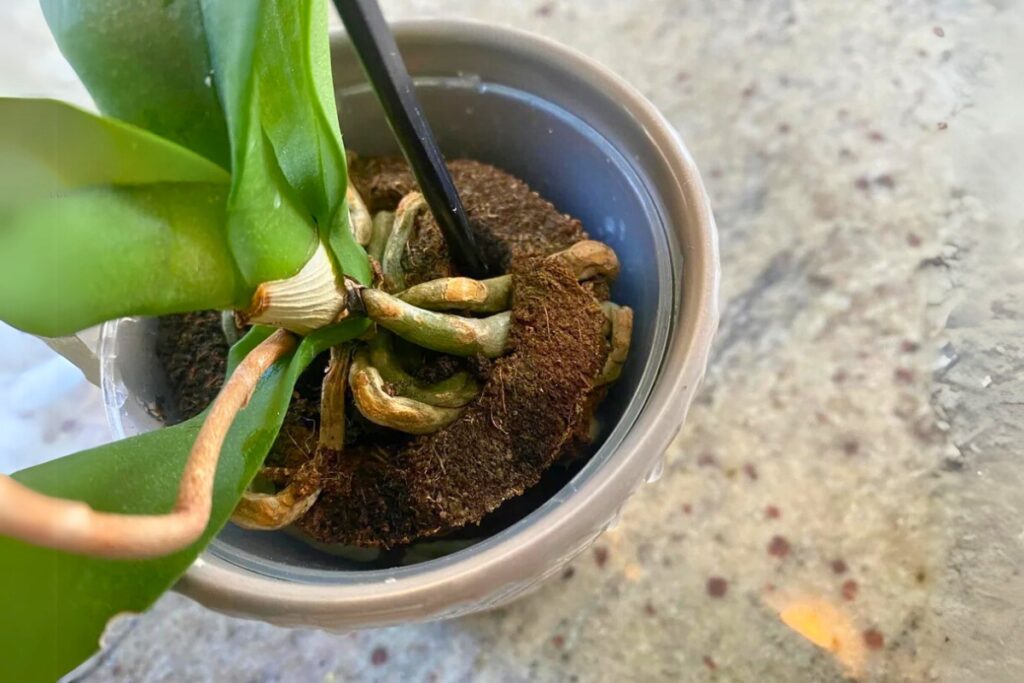
Signs Your Orchid Needs Repotting
While Phalaenopsis orchids don’t need frequent repotting, several clear signs indicate it’s time for a new home. If your orchid’s roots are climbing out of the pot or appear tightly cramped, that’s a definite signal. You’ll also notice the potting medium breaking down, becoming compacted and soggy.
Watch for roots that have turned brown or mushy, as this suggests the current medium isn’t providing proper air circulation. Another telltale sign is when your orchid’s leaves droop even after watering, or if the plant becomes unstable in its pot. Most Phalaenopsis orchids need repotting every 1-2 years, typically after blooming.
Best Time of Year to Repot Your Phalaenopsis
The ideal time to repot your Phalaenopsis orchid is after its blooming cycle ends, typically in late spring or early summer. During this period, your orchid’s focusing on root and leaf growth rather than producing flowers, making it more resilient to the stress of repotting.
You’ll want to avoid repotting during winter months when your orchid’s growth naturally slows down. If you notice new flower spikes emerging, wait until they’ve finished blooming before repotting. However, if your orchid shows urgent signs of distress, like rotting roots or severely compacted media, don’t wait for the ideal season – repot immediately to save your plant.
Essential Tools and Materials for Repotting
Before you begin repotting during that ideal spring-to-summer window, gathering the right tools and materials will make your orchid transplant smooth and successful. You’ll need clean pruning shears, rubbing alcohol for sterilization, and a new pot that’s 1-2 inches wider than the current one.
Essential materials include fresh orchid potting mix, wooden stakes for support, and plant clips. Don’t forget to have clean newspaper or a tarp to contain mess, plus clear plastic pots with ventilation holes. A spray bottle filled with water and a pencil for root separation will come in handy.
Keep a trash bin nearby for disposing of old media and any damaged roots.
Choosing the Right Potting Media
Selecting proper potting media ranks among three critical factors for successful orchid growth, alongside light and water. You’ll want to choose a mix that’s specifically designed for epiphytic orchids, typically containing chunky bark, perlite, and charcoal.
For Phalaenopsis orchids, opt for medium-grade bark (½ to ¾ inch pieces) mixed with 20% perlite and 10% horticultural charcoal. If you’re in a humid climate, add more bark; in drier conditions, increase the perlite ratio to 30%.
Don’t use regular potting soil or fine-grade mixes, as they’ll suffocate your orchid’s roots. The media should feel loose and airy when squeezed, allowing for proper air circulation and quick drainage.
Selecting the Perfect Container Size
Proper container sizing plays an essential role in your orchid’s health and growth potential. You’ll want to select a pot that’s just 1-2 inches larger in diameter than your orchid’s root mass, typically around 4-6 inches for mature plants.
Don’t make the mistake of choosing an oversized container, as this can lead to root rot and poor drainage. Instead, measure the width of your orchid’s current root system and add one inch for growing space. If you’ve got a smaller plant, a 3-inch pot might suffice, while larger specimens with extensive root systems could require up to 7 inches.
Step-by-Step Repotting Process
Once you’ve got your new container ready, the actual repotting process requires careful attention to detail and a gentle touch. Start by gently removing the orchid from its current pot, untangling any roots that might be clinging to the sides.
Trim away any dead, mushy, or blackened roots using sterilized scissors, leaving only firm, silvery-green roots intact. Place a layer of fresh orchid bark at the bottom of the new container, about 1 inch deep.
Position your orchid so the crown sits slightly above the pot’s rim, then fill around the roots with bark mix, tapping gently to eliminate air pockets without compacting too firmly.
Post-Repotting Care and Maintenance
After repotting your Phalaenopsis orchid, you’ll need to maintain specific care conditions for the next 2-3 weeks while the plant adjusts to its new home. Keep the temperature between 65-80°F and maintain humidity around 50-60% using a humidity tray or small humidifier.
Water sparingly during the first week, misting the leaves instead of saturating the potting medium. After week one, resume normal watering when the top inch of media feels dry. Don’t fertilize for the first month to avoid stressing the recovering root system.
Place your orchid in indirect light, avoiding direct sun exposure until you notice new root growth, typically within 3-4 weeks.
Common Repotting Mistakes to Avoid
Even with careful post-repotting care, your orchid’s success starts with avoiding common mistakes during the repotting process itself. Don’t rush to repot healthy orchids – wait until the blooms have fallen and new roots are emerging.
Never reuse old potting media or containers without sterilizing them first. You’ll risk transferring pathogens to your fresh transplant. Also, avoid planting too deeply – the crown should sit slightly above the media’s surface.
Don’t pack the potting mix too tightly; Phalaenopsis roots need airflow. A common error is using pots that are too large – choose containers only 1-2 inches wider than the root mass.
Dealing With Root Problems During Repotting
While inspecting your orchid’s roots during repotting, you’ll likely encounter some damaged or dead sections that need attention. Healthy roots appear firm and silvery-green when dry, turning bright green when watered, while problematic roots look brown, mushy, or hollow.
Using sterilized scissors, trim away any dead or rotting roots, cutting at a 45-degree angle about 1/4 inch above the damaged area. If you’re unsure about a root’s health, give it a gentle squeeze – healthy roots feel firm, while dead ones compress easily.
Don’t worry if you need to remove up to 30% of the root system; your orchid can recover with proper care and conditions.
Recovery Period and Growth Expectations
After repotting your phalaenopsis orchid, you’ll need to watch for signs of recovery during the first 4-6 weeks, including firm leaves and the emergence of new root tips. You can expect to see fresh, green root growth within 2-3 months if you’ve maintained proper humidity levels and avoided overwatering. Your orchid should return to its normal blooming cycle within 6-12 months post-repotting, though some plants may take up to 18 months to produce their first flower spike after the process.
Monitoring Post-Repotting Signs
Once you’ve repotted your Phalaenopsis orchid, you’ll need to monitor several key signs over the next 4-6 weeks to guarantee successful recovery. Watch for firm, green roots and new growth tips, which indicate healthy adaptation to the fresh medium.
Check the leaves weekly for signs of dehydration or stress. They should remain firm and slightly upward-pointing, not wilted or wrinkled. If you notice yellowing leaves, adjust your watering schedule accordingly.
Pay attention to any new root growth emerging from the crown, which typically appears as bright green tips. These fresh roots signal that your orchid has overcome transplant shock and is actively establishing itself in its new home.
New Root Development
The recovery period for new root development spans approximately 2-4 months after repotting your Phalaenopsis orchid. During this time, you’ll notice small, bright green root tips emerging from existing roots, signaling healthy adaptation to the new medium.
Look for silvery-white roots with lime-green tips that grow about 1/4 inch per week. If you’re seeing this growth pattern, you’ve successfully repotted your orchid. Keep the humidity between 50-70% and maintain temperatures between 65-80°F to encourage ideal root development.
Don’t worry if some older roots turn brown and die off – it’s natural. New roots will gradually establish themselves in the fresh potting medium.
Return to Blooming
While your orchid focuses on root development, you’ll need to wait 6-9 months before expecting new blooms. During this recovery period, maintain consistent care with weekly watering and monthly fertilizing at quarter strength.
You’ll know your orchid’s ready to bloom when new leaves emerge and reach full size, typically 4-6 inches long. Look for a flower spike emerging between the leaves, which appears as a pale green shoot with a mitten-shaped tip. Once you spot this growth, adjust your orchid’s location to a slightly cooler spot, around 65°F, to encourage ideal flower development.