Did you know that over 2 billion glass bottles end up in landfills each year? You can help reduce this waste by crafting DIY bottle terrariums for your home. Start with simple containers like Mason jars or old wine bottles, turning them into mini ecosystems. With just a few materials—pebbles, soil, and small plants—you’ll create sustainable decor. Stick around to explore 10 unique ideas for your next green project.
Contents
- 1 Classic Mason Jar Miniature Garden
- 2 Vintage Wine Bottle Forest Scene
- 3 Upcycled Soda Bottle Tropical Escape
- 4 Small Perfume Bottle Moss Haven
- 5 Recycled Jam Jar Desert Landscape
- 6 Old Light Bulb Hanging Terrarium
- 7 Repurposed Olive Oil Bottle Zen Retreat
- 8 Tiny Spice Jar Succulent Corner
- 9 Reused Pickle Jar Aquatic Illusion
- 10 Salvaged Glass Vial Fairy Woodland
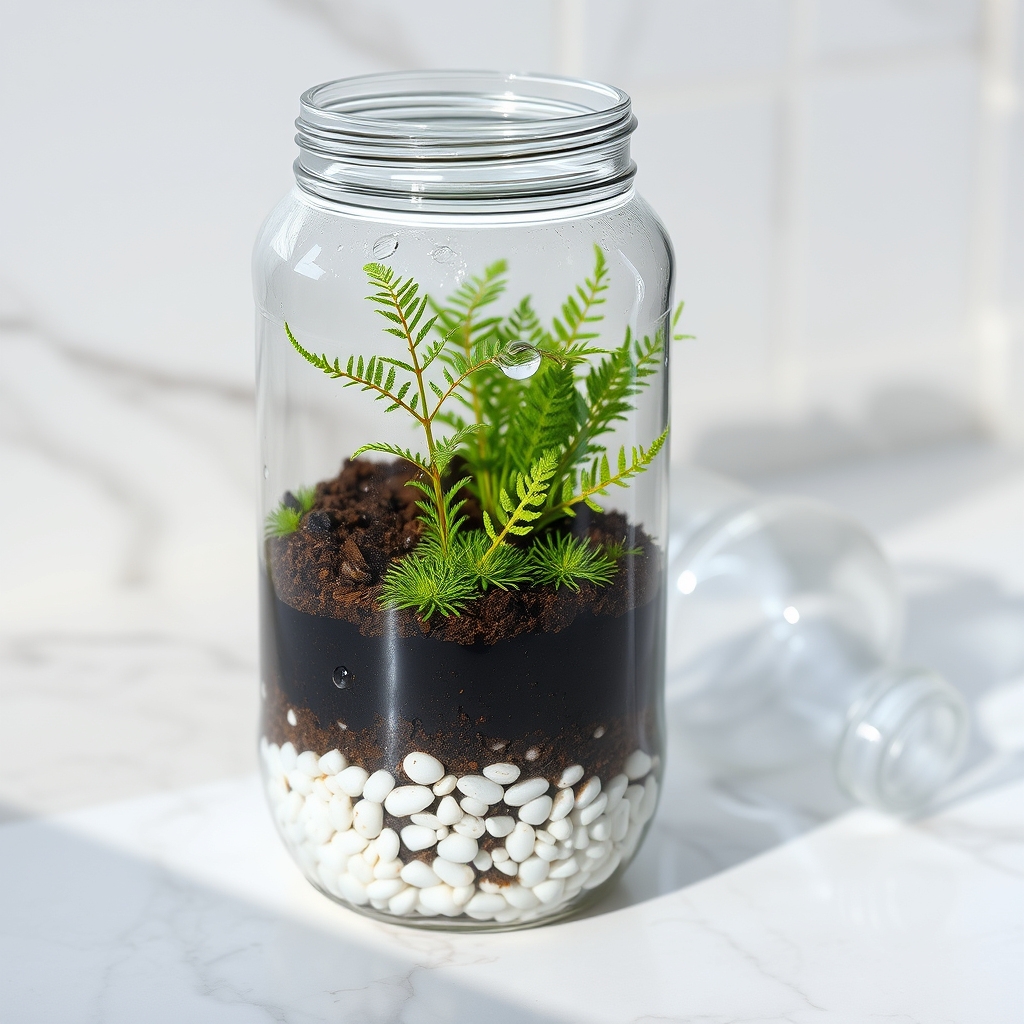
Classic Mason Jar Miniature Garden
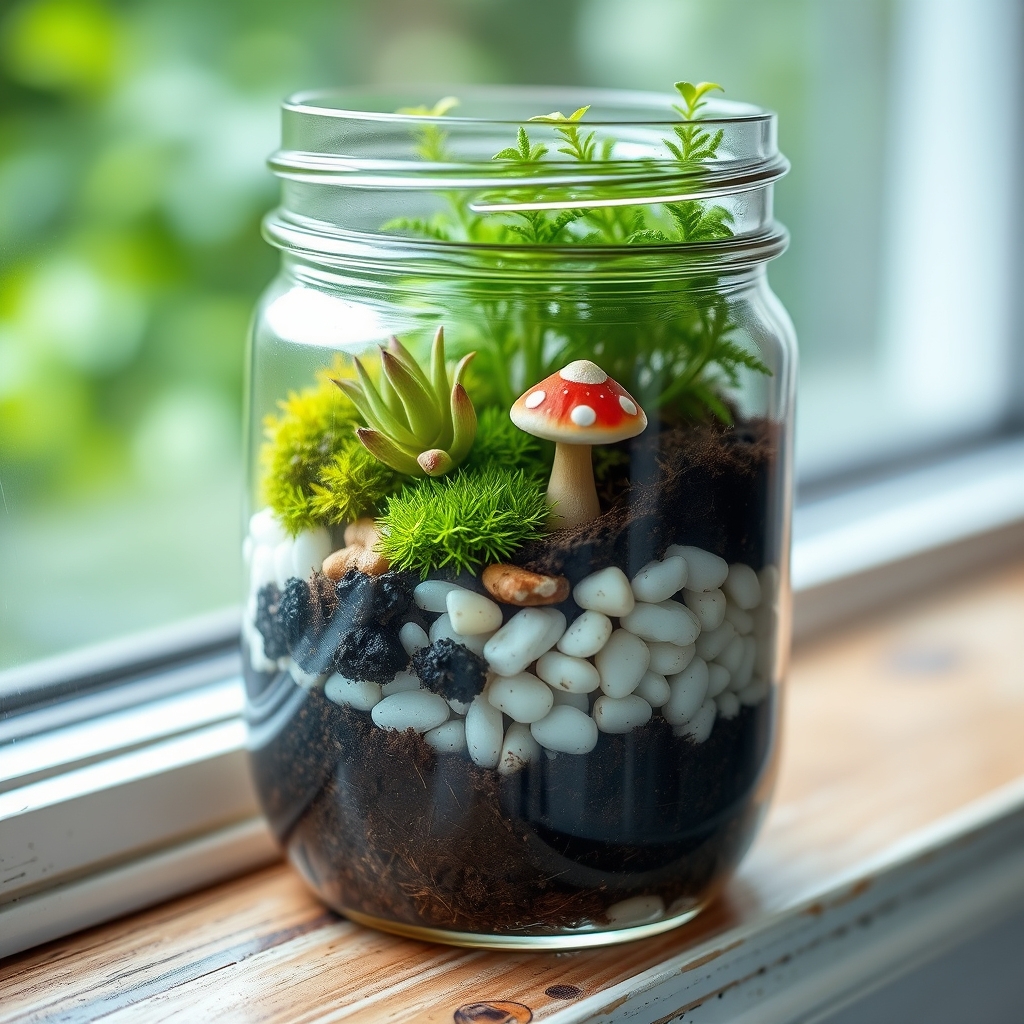
Creating a classic Mason jar miniature garden is a delightful and simple way to bring a piece of nature indoors. Mason jars, with their wide mouths and sturdy glass structure, make excellent containers for small terrariums. Their transparent design allows you to observe the layers of your miniature ecosystem, while the lid can help maintain humidity for tropical plants or be left off for succulents and other low-maintenance varieties.
To start, gather a clean Mason jar, small pebbles or gravel for drainage, activated charcoal to prevent mold, potting soil, and your choice of small plants like moss, ferns, or air plants. Begin by layering the bottom with pebbles, followed by a thin layer of charcoal, and then a few inches of soil. Plant your selections carefully, ensuring they have enough space to grow, and add decorative elements like tiny figurines or rocks for a personalized touch. Water lightly and place the jar in indirect sunlight to thrive.
This miniature garden is not only a charming decor piece but also an easy project for beginners. It requires minimal upkeep—just occasional watering and trimming to keep plants healthy. Whether placed on a windowsill, desk, or shelf, a Mason jar terrarium adds an invigorating green element to any space.
Vintage Wine Bottle Forest Scene

Creating a vintage wine bottle forest scene terrarium is a unique and charming way to repurpose old glass bottles while bringing a touch of nature indoors. Start by selecting a clean, dry wine bottle with a wide enough neck to allow for easy insertion of materials. Using a small spoon or funnel, carefully add a layer of pebbles or gravel at the bottom for drainage, followed by a thin layer of activated charcoal to keep the environment fresh. Then, add a layer of potting soil suitable for small plants or moss.
Next, use tweezers or a small stick to place tiny plants, such as ferns or air plants, into the soil, arranging them to mimic a miniature forest. Enhance the scene with small twigs, rocks, or even miniature figurines to create a whimsical woodland vibe. Seal the bottle with a cork if desired, or leave it open for easier maintenance. Place your terrarium in indirect sunlight and water sparingly with a dropper to maintain the delicate ecosystem, transforming the vintage bottle into an enchanting forest display.
Upcycled Soda Bottle Tropical Escape
Creating an upcycled soda bottle tropical escape is a fun and eco-friendly way to bring a slice of the tropics into your home. Start by thoroughly cleaning a large, clear plastic soda bottle and removing the label to guarantee maximum visibility for your mini ecosystem. Cut the bottle in half, keeping the bottom part as the base for your terrarium and the top as a lid if desired. This project not only repurposes plastic waste but also provides a unique container for a lush, tropical environment.
To build your tropical escape, layer the bottom of the bottle with small pebbles or gravel for drainage, followed by a thin layer of activated charcoal to keep the environment fresh. Add a layer of potting soil, then plant small tropical plants like ferns, mosses, or miniature orchids that thrive in humid conditions. Mist the plants with water to mimic a tropical climate and place the terrarium in indirect sunlight. If you’ve kept the top half of the bottle, you can place it over the base to trap humidity, creating a self-sustaining ecosystem.
This DIY project is perfect for small spaces and adds a vibrant, green touch to any room. It’s also a great way to teach kids about recycling and plant care while crafting a low-maintenance piece of living decor. With minimal effort, your soda bottle tropical escape will transport you to a lush, faraway paradise right at home.
Small Perfume Bottle Moss Haven
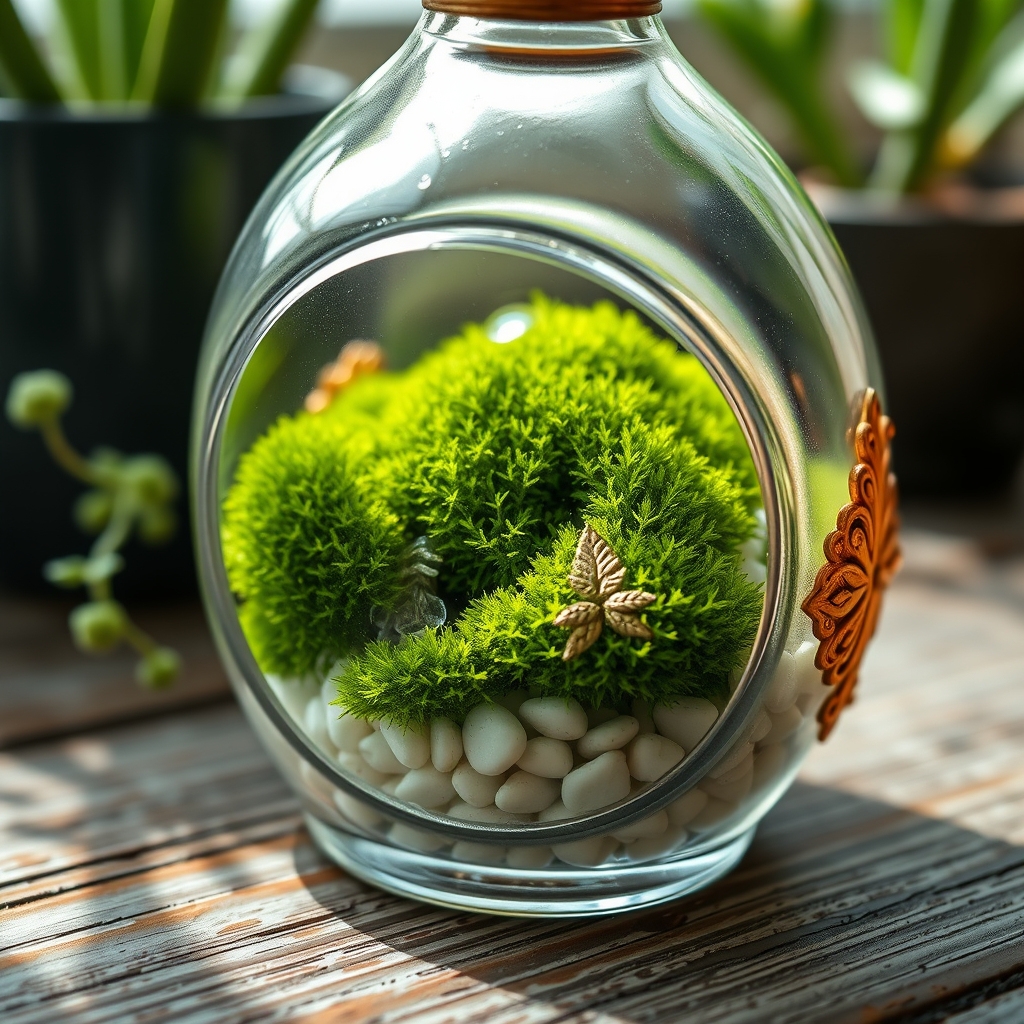
Creating a Small Perfume Bottle Moss Haven is a delightful way to repurpose tiny glass perfume bottles into miniature terrariums. These petite containers are perfect for housing small patches of moss, transforming them into charming, low-maintenance ecosystems. The clear glass allows you to observe the delicate beauty of the moss while adding a touch of greenery to small spaces like a desk, shelf, or windowsill.
To start, thoroughly clean and dry an empty perfume bottle, ensuring no residue remains. Add a thin layer of small pebbles or gravel at the bottom for drainage, followed by a sprinkle of activated charcoal to keep the environment fresh. Then, carefully place a small piece of moss—preferably a type like cushion moss or sheet moss—inside using tweezers, pressing it gently into place. Mist the moss lightly with water, and seal the bottle with its cap or a cork to maintain humidity, opening it occasionally for air circulation.
These tiny moss havens require minimal care, thriving in indirect sunlight and needing only occasional misting to stay hydrated. Their compact size makes them ideal for gifting or as a personal craft project, bringing a whimsical, natural element to any setting.
Recycled Jam Jar Desert Landscape
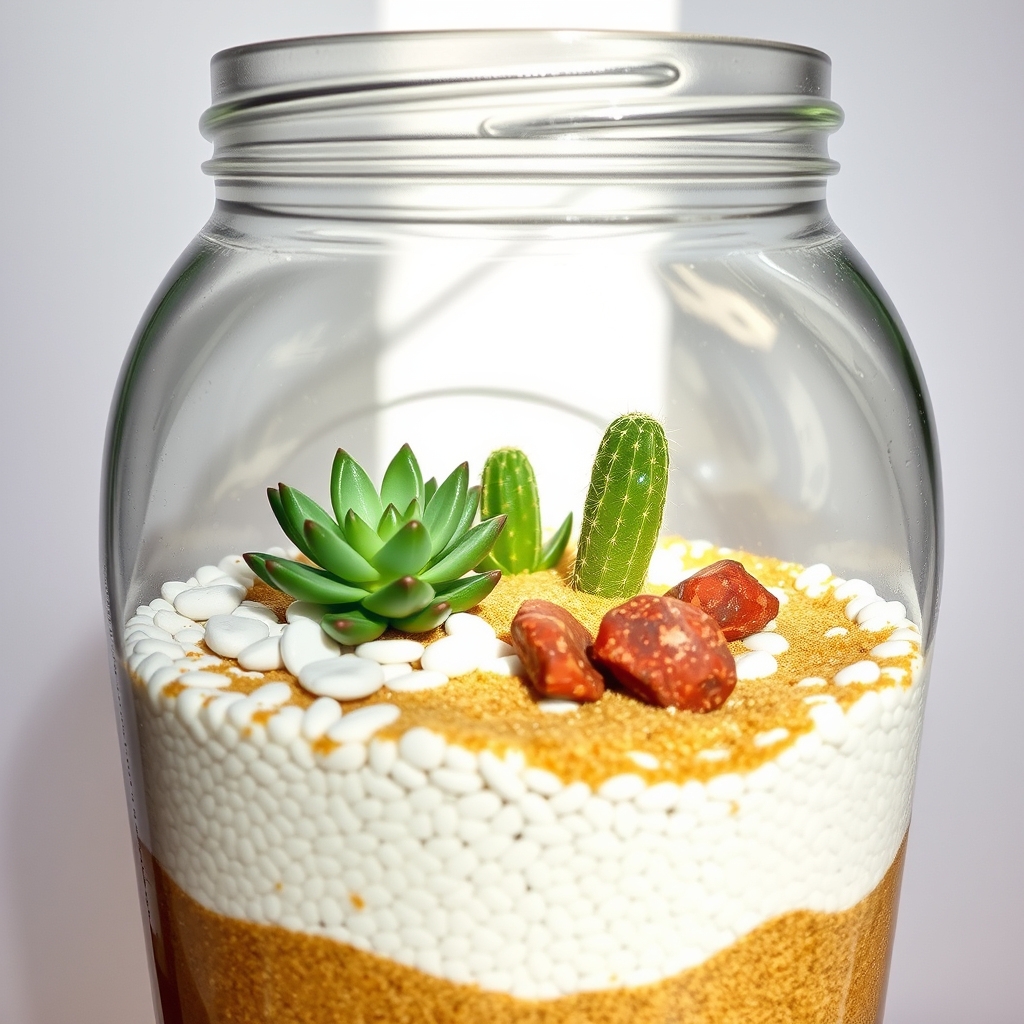
Creating a recycled jam jar desert landscape is a fun and sustainable way to craft a miniature terrarium using materials you likely already have at home. Start by thoroughly cleaning an empty jam jar, ensuring all residue is removed, and let it dry completely. Gather small pebbles or gravel for drainage, sand for the desert aesthetic, and a few small succulents or cacti that thrive in arid conditions. These plants are ideal as they require minimal watering and can adapt to the confined space of a jar.
To assemble your desert landscape, place a layer of pebbles at the bottom of the jar for drainage, followed by a layer of sand to mimic a desert floor. Carefully plant your succulents or cacti, arranging them to create a visually appealing scene—think of it as designing a tiny desert oasis. You can add small rocks or decorative elements like miniature figurines to enhance the theme. Place the jar in a spot with indirect sunlight, as direct sun through glass can overheat the plants, and water sparingly, only when the soil appears completely dry.
This DIY project not only recycles household items but also brings a touch of nature indoors with minimal maintenance. It’s a perfect activity for beginners or anyone looking to add a unique, low-effort green element to their space.
Old Light Bulb Hanging Terrarium
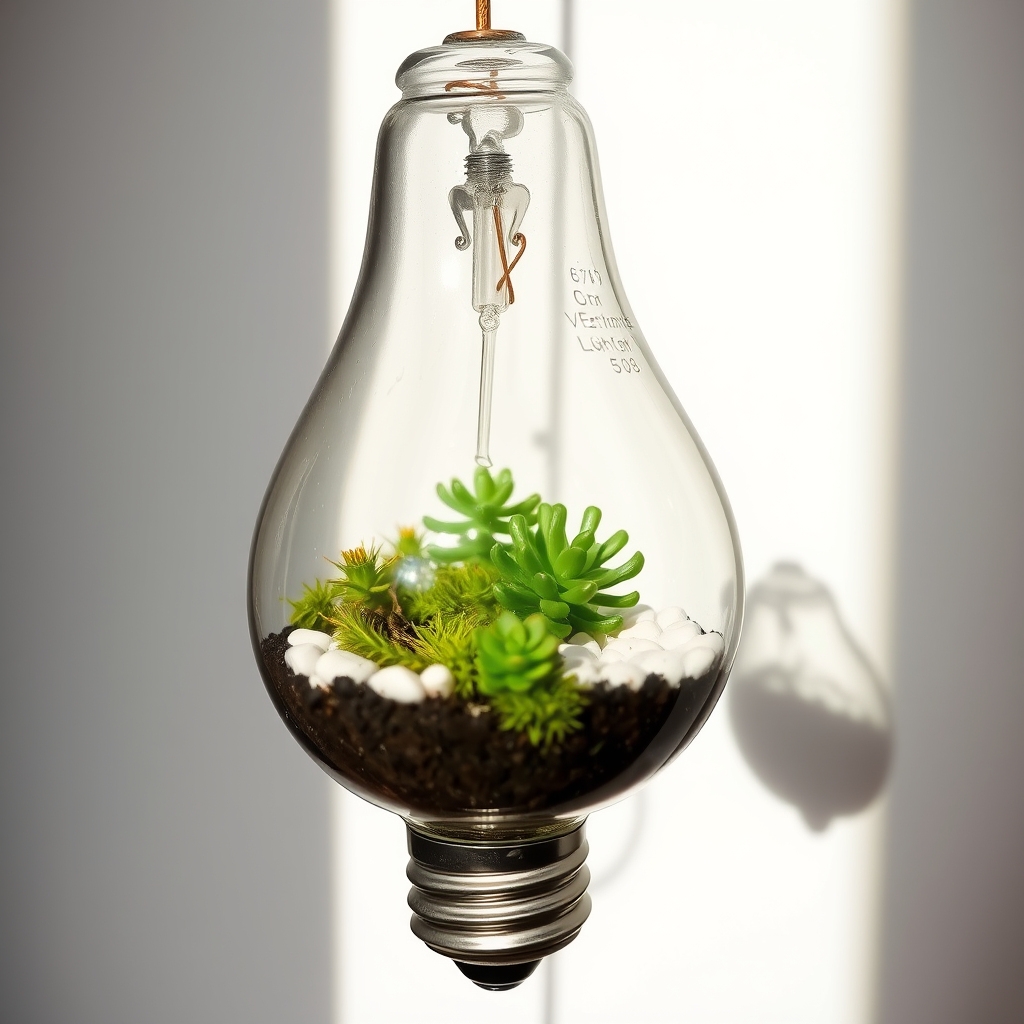
Creating an old light bulb hanging terrarium is a unique and creative way to repurpose burnt-out light bulbs into miniature ecosystems. Start by carefully hollowing out an old incandescent light bulb, removing the filament and inner components through the metal base with pliers or a screwdriver. Be cautious during this process to avoid breaking the glass, and wear protective gloves and eyewear for safety. Once the bulb is empty, clean the inside with a small brush or cloth to remove any debris.
Next, add a layer of small pebbles or gravel at the bottom for drainage, followed by a thin layer of activated charcoal to keep the environment fresh. Then, add a small amount of potting soil and carefully plant tiny succulents, moss, or air plants using tweezers for precision. Seal the opening with a small cork or create a loop with wire through the metal base to hang the terrarium. Hang it in a spot with indirect sunlight, and mist the plants lightly every few days to maintain humidity.
This DIY project not only recycles old materials but also adds a whimsical touch to your home decor. These hanging terrariums can be suspended in windows, on porches, or even grouped together for a stunning visual effect. With minimal maintenance, they bring a bit of nature indoors in an unexpected and artistic way.
Repurposed Olive Oil Bottle Zen Retreat
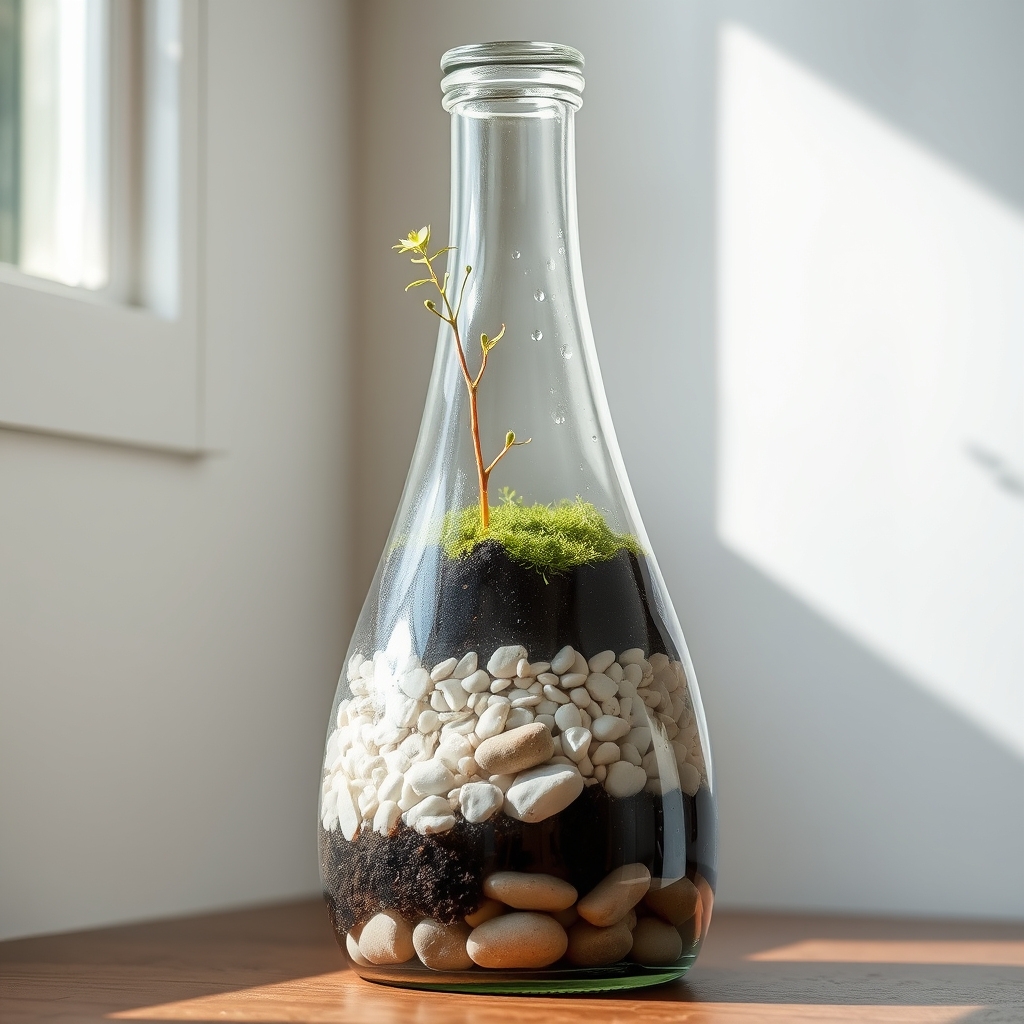
Creating a Zen retreat using a repurposed olive oil bottle is a simple and elegant way to bring a sense of calm and nature into your space. Olive oil bottles often have a sleek, elongated shape with a narrow neck, making them ideal for crafting a minimalist terrarium that evokes tranquility. This DIY project transforms an everyday item into a serene micro-landscape, perfect for a desk, shelf, or meditation corner.
Start by thoroughly cleaning and drying the olive oil bottle to remove any residue. Add a base layer of small pebbles or gravel for drainage, followed by a thin layer of activated charcoal to keep the environment fresh. Then, add a layer of potting soil and carefully plant small, low-maintenance plants like moss, air plants, or tiny ferns using a spoon or chopsticks to maneuver through the narrow opening. Finish with decorative elements like smooth stones or miniature figurines to enhance the Zen aesthetic.
Place your olive oil bottle terrarium in a spot with indirect sunlight, and water sparingly using a dropper or small syringe to avoid overwatering. This tiny retreat not only recycles a household item but also serves as a reminder to pause and appreciate the beauty of simplicity in your daily life.
Tiny Spice Jar Succulent Corner
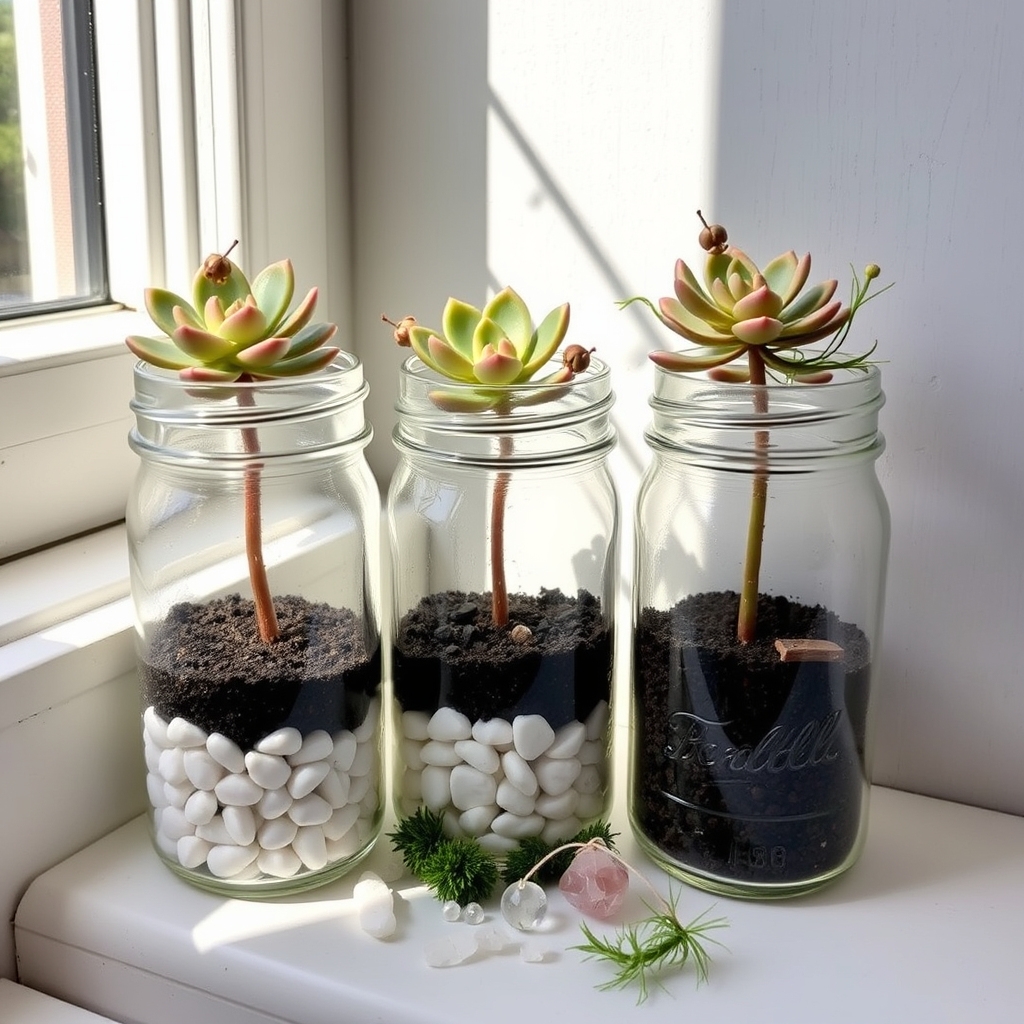
Creating a Tiny Spice Jar Succulent Corner is a charming and space-saving way to bring a touch of greenery into your home using everyday items. This mini terrarium project repurposes small spice jars, turning them into adorable homes for succulents. These tiny containers are perfect for crafting a compact, low-maintenance garden that can fit on a windowsill, desk, or any small nook in your space.
To start, thoroughly clean and dry an empty spice jar to guarantee no residue remains. Add a layer of small pebbles or gravel at the bottom for drainage, followed by a thin layer of activated charcoal to keep the environment fresh. Then, fill the jar with a suitable succulent potting mix, leaving enough room to plant a small succulent or cutting. Gently place the plant inside, press the soil around it, and add a few decorative pebbles or moss on top for a polished look.
These tiny spice jar terrariums are ideal for beginners, as succulents require minimal watering and care. Place them in a spot with indirect sunlight, and water sparingly—only when the soil is completely dry. This little succulent corner not only adds a burst of life to your space but also serves as a creative, budget-friendly DIY project that can be customized with different plants or jar designs.
Reused Pickle Jar Aquatic Illusion
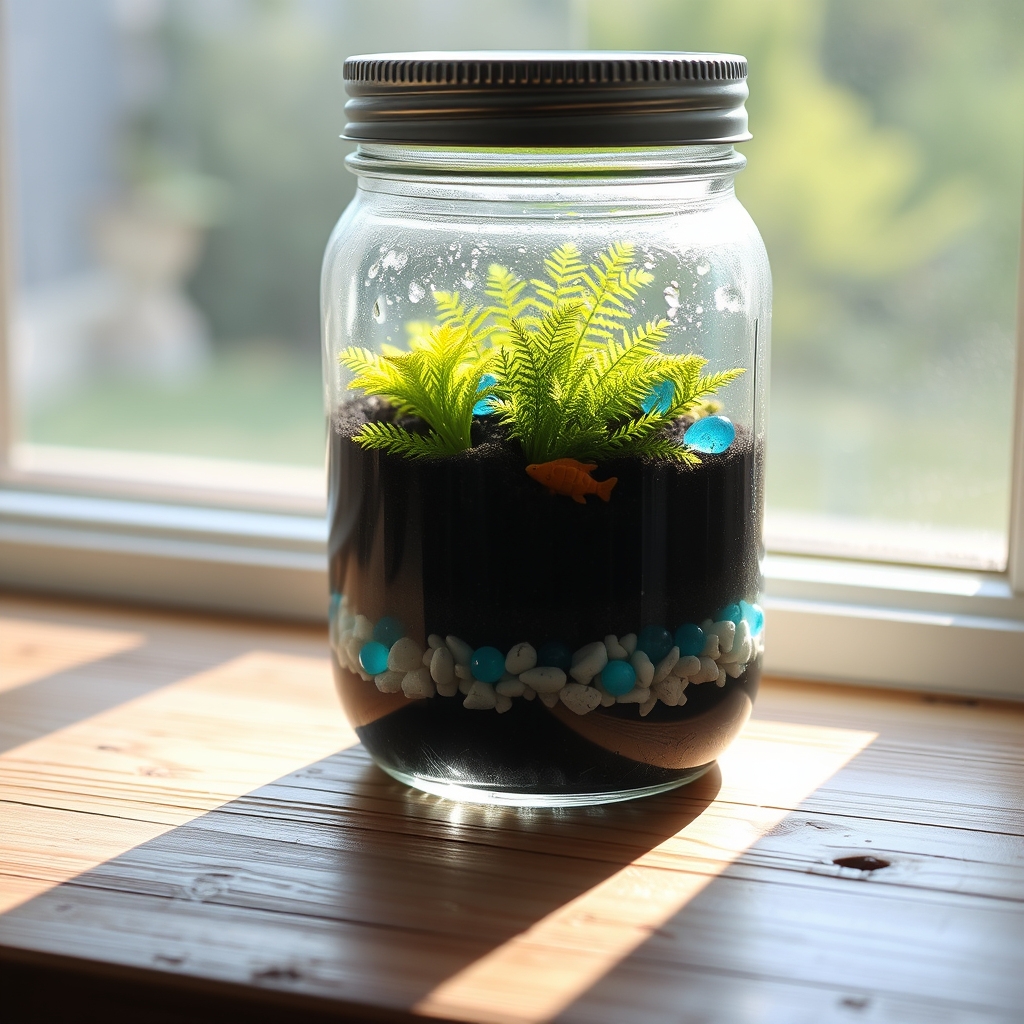
The Reused Pickle Jar Aquatic Illusion is a creative and sustainable way to craft a miniature aquatic-themed terrarium using an empty pickle jar. Start by thoroughly cleaning and drying the jar to remove any lingering odors or residue. Once prepared, add a layer of small pebbles or gravel at the bottom for drainage, followed by a thin layer of activated charcoal to keep the environment fresh. Then, add a layer of potting soil suitable for the plants you’ve chosen, such as small ferns or mosses that thrive in humid conditions.
To create the aquatic illusion, incorporate elements like blue glass beads or marbles to mimic water, placing them strategically around the base or in a small section of the jar. You can also add tiny figurines of fish, turtles, or aquatic plants to enhance the underwater effect. Choose low-maintenance, moisture-loving plants to guarantee the terrarium thrives in the enclosed, humid environment of the jar. Seal the lid tightly to maintain humidity, and place the terrarium in indirect sunlight to avoid overheating.
This project not only repurposes a common household item but also brings a unique, calming aquatic vibe to your space. It’s an ideal craft for beginners, requiring minimal materials and effort while offering a delightful visual impact. Experiment with different decorative elements to personalize your aquatic illusion, making each jar a one-of-a-kind creation.
Salvaged Glass Vial Fairy Woodland
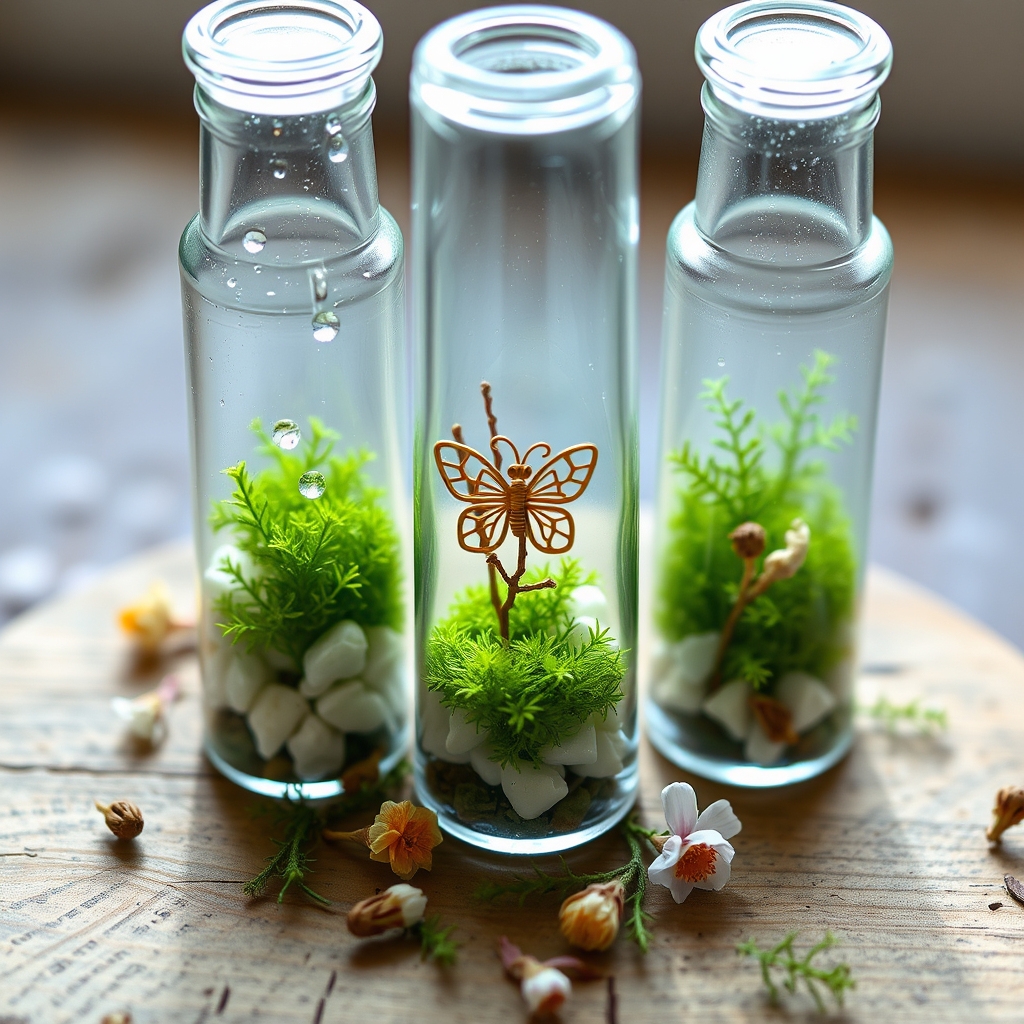
Creating a Salvaged Glass Vial Fairy Woodland is a charming way to repurpose small glass vials into a whimsical miniature terrarium. Start by collecting tiny glass vials, which can often be found at thrift stores, craft shops, or even salvaged from old perfume or essential oil bottles. Clean the vials thoroughly to guarantee a clear view of the magical scene you’ll create inside. This project is perfect for adding a touch of enchantment to your space, as the tiny size of the vials makes them ideal for crafting delicate fairy-like landscapes.
To build your fairy woodland, gather small natural elements like moss, pebbles, and miniature twigs to mimic a forest floor. You can also add tiny figurines or handmade fairy elements using polymer clay or wire to enhance the mystical vibe. Carefully layer the materials inside the vial using tweezers for precision, starting with a base of pebbles for drainage, followed by moss for greenery, and finally placing your decorative elements. Seal the vial with a cork or lid if desired, and display it on a shelf or hang it as a pendant for a unique, portable piece of nature.
This DIY project not only recycles glass vials but also allows for endless creativity in designing your own tiny woodland worlds. Experiment with different themes, such as adding glitter for a magical sparkle or tiny LED lights for a glowing effect at night. These miniature terrariums make thoughtful gifts or delightful personal keepsakes that bring a bit of fairy magic into everyday life.