Have you ever wondered why your orchids seem confined to mundane pots when they could be floating elegantly in mid-air? You’ll find that hanging orchids indoors isn’t just a space-saving solution—it’s a way to showcase these exotic plants as nature intended. By suspending your orchids, you’re mimicking their natural epiphytic growth habits while creating a stunning vertical display. Let’s explore how you can transform your living space into a cascading garden of botanical wonder.
Contents
- 1 Choosing the Right Orchid Species for Hanging Displays
- 2 Essential Tools and Materials for Hanging Orchid Gardens
- 3 Creative DIY Mounting Solutions for Orchids
- 4 Natural Bark and Cork Mounting Techniques
- 5 Modern Glass and Wire Hanging Systems
- 6 Repurposed Vintage Items as Orchid Displays
- 7 Optimal Light and Humidity for Suspended Orchids
- 8 Vertical Garden Design With Multiple Orchids
- 9 Maintenance Tips for Elevated Orchid Care
- 10 Seasonal Adjustments for Hanging Orchid Displays
Choosing the Right Orchid Species for Hanging Displays
When selecting orchids for hanging displays, certain species naturally adapt better to suspended growing conditions than others. You’ll want to focus on pendulous varieties like Dendrobium, Vanda, and Cattleya, which naturally grow downward or cascade over their containers.
For beginners, miniature Phalaenopsis hybrids are ideal, as they’ll only reach 6-8 inches in height and adapt well to hanging baskets. If you’re working with limited space, try compact Bulbophyllums or trailing Epidendrums, which typically spread 12-15 inches.
Look for orchids with naturally pendant flower spikes and flexible stems that’ll gracefully drape over the pot’s edge, creating that sought-after waterfall effect.
Essential Tools and Materials for Hanging Orchid Gardens
You’ll need several essential mounting supplies to create your hanging orchid display, including sturdy hooks, rust-resistant wire or chains, and specialized orchid hangers rated for at least 10 pounds. When selecting containers, you’ve got options ranging from traditional ceramic hanging pots to more creative choices like mounted cork slabs, woven baskets, or repurposed tea strainers. The mounting hardware must match your home’s architecture, so consider toggle bolts for drywall, beam clamps for exposed rafters, or decorative ceiling hooks that can support your chosen container’s weight plus water-saturated growing medium.
Basic Mounting Hardware Needed
Before mounting orchids indoors, gathering the right hardware and tools guarantees a secure setup that’ll protect both your plants and walls. You’ll need stainless steel mounting hooks rated for 25-50 pounds, wall anchors appropriate for your wall type, and galvanized mounting screws at least 2 inches long.
For hanging points, invest in S-hooks or carabiners with safety latches, plus coated wire or adjustable chains rated at 30 pounds minimum. Don’t forget a reliable stud finder, level, drill with appropriate bits, and measuring tape. You’ll also want wire cutters and needle-nose pliers for making adjustments to your hanging hardware.
Creative Container Options
Now that your mounting hardware’s ready to go, selecting the right containers adds both style and functionality to your hanging orchid display. Consider clear glass orbs (6-8 inches in diameter), which showcase your orchid’s root system while maintaining proper humidity levels.
Traditional clay pots with drainage holes work well when paired with decorative macramé hangers, while wire baskets lined with sphagnum moss offer excellent airflow. For a modern look, try mounting orchids in sleek ceramic wall pockets or repurposed tea tins with proper drainage modifications.
If you’re working with mini orchids, test tubes and hanging terrariums (4-5 inches wide) make perfect miniature environments.
Creative DIY Mounting Solutions for Orchids
Mounting orchids creatively at home opens up endless possibilities for unique indoor displays. You’ll need cork bark, untreated wood slabs, or bamboo poles as your base materials, along with fishing line or plant-safe wire for securing.
Start by soaking your chosen mount in water for 24 hours, then attach sphagnum moss using thin wire. Position your orchid’s roots against the moss, carefully wrapping them with fishing line in a crisscross pattern. Leave space for new growth.
For vertical displays, drill quarter-inch holes into your mount, 6 inches apart, creating anchor points for hanging. Secure with rust-resistant hooks or decorative chains.
Natural Bark and Cork Mounting Techniques
When mounting orchids naturally, you’ll want to select bark pieces that are at least 1 inch thick and have deep grooves for root attachment. Cedar, fir, and cork bark make excellent mounting materials since they’re naturally resistant to rot and provide plenty of surface texture for your orchid’s roots to grip. You can secure your plant using 24-gauge copper or stainless steel wire, wrapping it gently around the root mass and bark while leaving room for growth.
Choosing Suitable Bark Materials
Selecting the right bark material forms the foundation of successful orchid mounting. You’ll want to choose between cork bark, hardwood bark slabs, or tree fern panels, with cork being the most versatile for indoor growing.
For epiphytic orchids, look for bark that’s 1/2 to 3/4 inch thick, with a slightly rough texture that allows roots to attach easily. Cork bark’s natural resistance to rot makes it ideal for humid environments, and it’ll last 3-5 years before needing replacement.
If you’re mounting miniature orchids, break larger pieces into 4×6-inch sections. Avoid softwoods like pine, as they’ll decompose too quickly and may harbor harmful fungi.
Securing Plants With Wire
To properly anchor your orchid onto bark or cork, you’ll need 16-20 gauge green coated wire, available at most garden centers. Begin by wrapping the wire around the bark’s bottom third, creating a secure foundation for your plant.
Position your orchid’s roots against the mounting surface, then carefully thread the wire in a crisscross pattern around the root mass. Don’t pull too tight – you’ll want to leave room for growth while maintaining stability.
Finish by twisting the wire ends together at the back of your mount, tucking them neatly to prevent snags. The wire should hold your orchid firmly but won’t restrict its natural development.
Modern Glass and Wire Hanging Systems
Modern glass and wire hanging systems represent the perfect fusion of form and function for displaying orchids indoors. You’ll find these contemporary setups typically feature 1/8-inch stainless steel cables paired with clear glass vessels, creating an almost invisible support structure for your plants.
To install one, you’ll need to mount a ceiling anchor rated for 25 pounds, then thread the wire through your chosen glass container. Position the container’s drainage holes 2 inches above the orchid’s root mass. The system’s adjustable clasps, spaced every 6 inches, let you modify the height as your orchid grows.
Repurposed Vintage Items as Orchid Displays
Vintage treasures from antique shops and flea markets offer endless creative possibilities for displaying your orchids with character. You’ll find that Victorian-era birdcages, brass teapots, and copper kettles make stunning alternatives to traditional pots.
Transform old wrought-iron wall sconces into elegant orchid holders by lining them with sphagnum moss. Those rustic mason jars from the 1920s? Mount them on reclaimed wood with iron pipe clamps, spacing them 8 inches apart.
When repurposing metal items, drill at least three ¼-inch drainage holes and treat the interior with rust-resistant sealant. Don’t forget to sanitize vintage containers with a 10% bleach solution before use.
Optimal Light and Humidity for Suspended Orchids
When you’re hanging orchids indoors near windows, you’ll need to assess the intensity of sunlight throughout the day, as even bright indirect light through glass can scorch delicate leaves. Your suspended orchids require 40-60% humidity to thrive, which you can achieve by grouping plants together or using humidity trays filled with pebbles and water. While south-facing windows typically provide ideal light for most orchid varieties, you’ll want to diffuse harsh afternoon rays with a sheer curtain, especially during summer months.
Light Through Glass Windows
Although glass windows filter some natural sunlight, they still provide essential light for hanging orchids when positioned correctly. You’ll need to understand that standard window glass blocks about 25% of UV rays while reducing light intensity by 10-15%.
For best results, place your orchids within 3 feet of east-facing windows, where they’ll receive gentle morning sun. If you’re using south-facing windows, position plants 4-5 feet back to prevent leaf burn, or install sheer curtains to diffuse intense rays.
During winter months, when light’s scarce, you might need to supplement with grow lights, keeping them 12-18 inches above your orchids for 12-14 hours daily.
Managing Indoor Moisture Levels
Since hanging orchids thrive in environments mimicking their natural tropical habitats, maintaining proper indoor humidity levels is vital for their success. You’ll want to keep humidity between 40-70%, using a hygrometer to monitor levels accurately.
Create a moisture-rich microclimate by placing humidity trays filled with pebbles and water beneath your hanging orchids. During winter months, when indoor heating can dry the air, you’ll need to mist your orchids daily and run a humidifier nearby.
Don’t let excess moisture accumulate on leaves or in crown areas, as this can lead to rot. Instead, guarantee good air circulation with a small fan, especially if you’re grouping multiple orchids together.
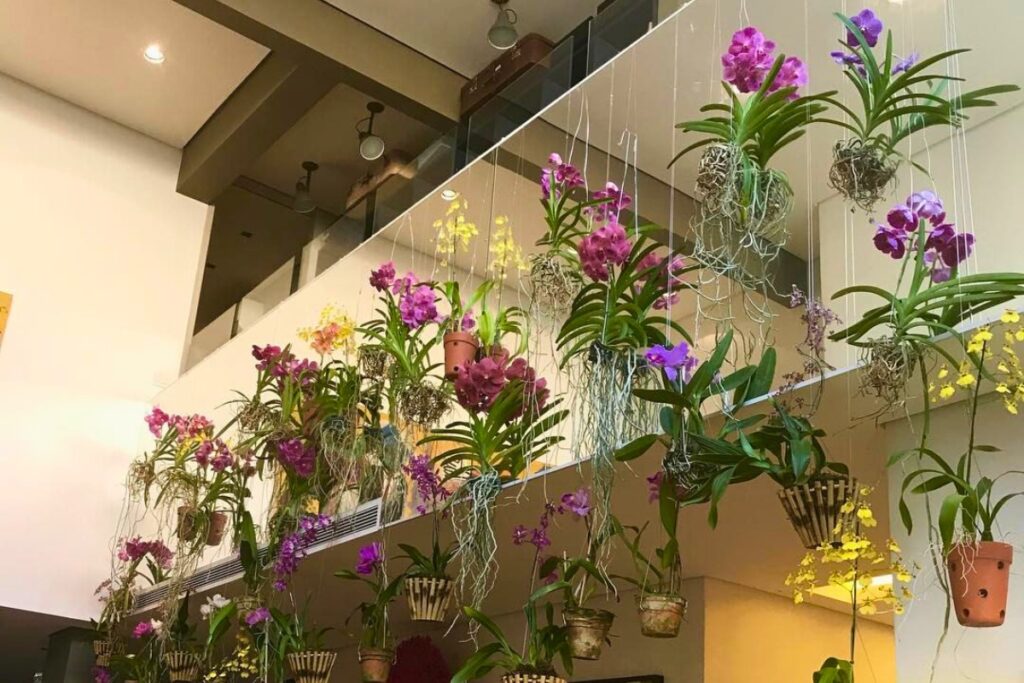
Vertical Garden Design With Multiple Orchids
A vertical orchid garden transforms ordinary wall space into a living masterpiece of cascading blooms and foliage. To create your display, mount a 24×36-inch moisture-resistant backing board, then attach small mounting brackets at 8-inch intervals.
You’ll want to position your strongest growers, like Vandas and Cattleyas, at the top where they’ll receive maximum light. Place smaller Phalaenopsis orchids in the middle section, and trailing varieties like Dendrobiums at the bottom.
Install a drip irrigation system using 1/4-inch tubing between rows. Space your orchids 12 inches apart to allow proper air circulation and future growth potential.
Maintenance Tips for Elevated Orchid Care
Maintaining elevated orchids requires specific attention to their unique growing conditions. You’ll need to check water levels every 3-4 days, as hanging plants tend to dry out faster than their tabletop counterparts.
When watering your suspended orchids, remove them from their hooks and soak the roots for 10-15 minutes in room-temperature water. Let them drain completely before rehanging to prevent root rot.
Check light exposure bi-weekly, as seasonal changes can affect hanging plants differently. Rotate your orchids 45 degrees each week to guarantee even growth, and dust leaves monthly with a damp microfiber cloth to maintain ideal photosynthesis.
Seasonal Adjustments for Hanging Orchid Displays
While outdoor orchids naturally adapt to changing seasons, hanging orchids indoors need your help to simulate these seasonal shifts. You’ll need to adjust their care routine every three months to mimic nature’s cycles.
In winter, move your orchids 6-8 inches away from windows to protect them from cold drafts, and reduce watering to once every 10-14 days. During spring and summer, they’ll thrive closer to the window, but use sheer curtains to filter intense sunlight.
For fall preparation, gradually decrease fertilizer strength by half and maintain temperatures between 65-75°F. Don’t forget to rotate hanging baskets 45 degrees weekly, regardless of season.