Your Cattleya orchid’s health reveals itself through subtle signals that you can’t afford to miss. When these prized plants experience stress, they’ll communicate through visible changes like yellowing leaves, shriveled pseudobulbs, or stubbornly closed buds. As a grower, you’ll need to decode these distress signals quickly to prevent lasting damage. Understanding the specific signs of trouble, from root rot to pest infestations, will help you maintain your orchid’s vibrant beauty and guarantee it thrives year after year.
Contents
Common Visual Signs of Orchid Stress
A vigilant orchid grower needs to recognize distress signals before problems become severe. You’ll spot trouble first in your Cattleya’s leaves – they might turn yellow, develop brown spots, or appear wrinkled and dehydrated. Keep an eye on the roots, too, as they’ll tell you a lot about your plant’s health.
Healthy roots should be firm and green when wet, silvery-white when dry. If you’re seeing black, mushy roots or dried, hollow ones, you’ve got issues. Watch for changes in the pseudobulbs – shriveling indicates dehydration, while soft, dark spots suggest bacterial rot.
Don’t ignore flower buds that yellow and drop prematurely – it’s often a cry for help.
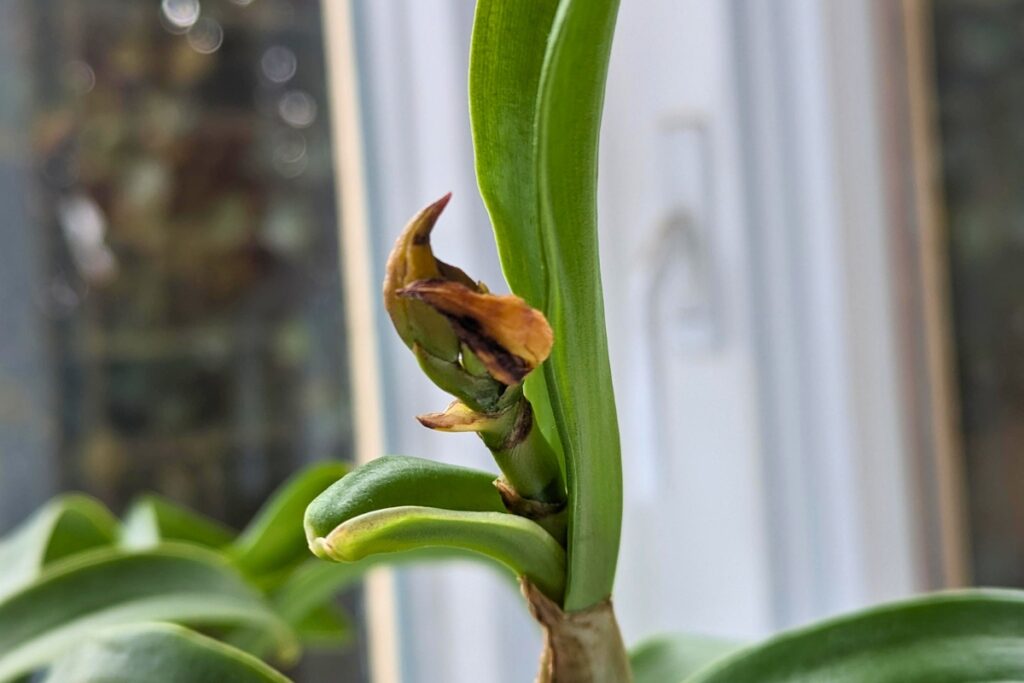
Beyond visible signs of distress, many orchid problems stem directly from improper temperature and lighting conditions. If you’re noticing yellowed or reddish leaves, your Cattleya’s likely getting too much light, while dark green foliage suggests insufficient brightness.
Watch for leaf temperature by touching them midday – they shouldn’t feel hot. Your orchids prefer temperatures between 65-80°F during the day and a 10-15°F drop at night. When leaves feel warm, you’ll need to adjust light exposure or add shading.
Temperature fluctuations can cause bud blast, where flower buds drop before opening. Keep your orchids away from drafty windows and air vents to prevent this issue.
Watering and Humidity Issues
You’ll need to watch carefully for signs of overwatering in your Cattleya orchids, as their roots can quickly succumb to rot when kept too wet. While these orchids love humidity, you’ll want to maintain levels between 40-60% without letting water collect on leaves or in the crown. Your orchid’s roots will tell you when it’s time to water – they should turn silvery-green when dry and bright green after watering, with wrinkled leaves indicating you’ve waited too long.
Overwatering and Root Rot
Root rot poses one of the most serious threats to Cattleya orchids, typically stemming from overwatering and poor drainage conditions. You’ll notice the first signs when roots turn brown or black, feel mushy to the touch, and emit an unpleasant odor.
To prevent root rot, only water your Cattleya when the potting medium feels dry 1-2 inches below the surface. If you spot infected roots, you’ll need to act quickly by removing the plant, trimming away diseased tissue with sterilized tools, and repotting in fresh medium.
Ensure your pot has adequate drainage holes and never let your orchid sit in standing water for more than 15 minutes after watering.
Humidity Balance for Growth
While proper watering helps prevent root issues, maintaining ideal humidity levels plays an equally important role in your Cattleya’s health. You’ll want to keep humidity between 40-70%, with 50-60% being the sweet spot for most varieties.
Watch for telltale signs of humidity problems: wrinkled pseudobulbs indicate it’s too dry, while black spots on leaves suggest it’s too damp. If you’re growing indoors, use a humidity tray or small humidifier to maintain proper levels.
During winter months, when indoor heating reduces moisture, mist the air around your orchids in the morning, but don’t spray the leaves directly – this can lead to fungal issues.
Root Health and Potting Medium Concerns
You’ll find that root health and potting medium issues are among the most telling signs of stress in your Cattleya orchid. When inspecting your plant’s roots, watch for color changes from healthy silvery-green to brown or black, which often indicates rot from poor drainage or decomposing media. Your potting medium should be changed every 18-24 months, as breakdown of bark, moss, or other materials can suffocate roots and create dangerous pockets of moisture that lead to decline.
Root Color Changes
When healthy Cattleya orchid roots display a silvery-green color, they’re sending you clear signals about their well-being. This silvery sheen comes from the velamen, a specialized tissue that absorbs water and nutrients.
Watch for roots turning yellow or brown, as these changes often indicate overwatering or root rot. Dark brown or black roots need immediate attention – they’re likely dead and should be trimmed with sterilized tools.
Bright white roots typically mean they’re dehydrated, while green roots indicate they’ve just been watered. If you notice reddish tips on your orchid’s roots, don’t worry – it’s usually a sign of healthy new growth.
Poor Drainage Signs
Poor drainage manifests through several telltale signs in your Cattleya’s potting medium and root system. You’ll notice the medium stays consistently wet for more than 5-7 days after watering, and it may develop a musty, stagnant smell. When you lift the pot, it feels unusually heavy.
Check the drainage holes – they should never be blocked. If you spot green algae growth on the medium’s surface or notice water pooling for more than 30 minutes after irrigation, your orchid’s facing serious drainage issues. The potting mix might also appear compacted or decomposed, breaking down into smaller particles that clog water flow.
Media Decomposition Problems
As organic potting media gradually break down over time, Cattleya orchids face increasing risks of root suffocation and disease. You’ll notice the bark mix becoming dark brown, soft, and compacted, instead of maintaining its original reddish-brown, firm texture.
Watch for signs that your media’s breaking down: slower drainage, mushy texture when squeezed, and a sour or moldy smell. Your orchid’s roots will often turn brown or black in decomposing media, rather than displaying their healthy silvery-green color.
Replace your potting mix every 18-24 months, or sooner if you’re seeing these warning signs. Don’t wait until root rot sets in – prevention’s much easier than recovery.
Pest and Disease Identification
Successful pest and disease identification in Cattleya orchids starts with knowing the telltale signs of common invaders. You’ll need to look for yellow or brown spots on leaves, which often indicate fungal infections, while sticky residue points to scale insects or mealybugs.
Check the undersides of leaves weekly for spider mites, which leave characteristic webbing and tiny dots. If you notice black, mushy areas at the base of pseudobulbs, you’re likely dealing with root rot, which requires immediate removal of affected tissue.
Bacterial infections show up as watery, dark lesions that spread rapidly within 48-72 hours. Don’t mistake natural leaf aging, which starts at the tips, for disease symptoms.
Nutrient Deficiency Symptoms
Beyond pests and diseases, your Cattleya orchid’s health can be compromised by inadequate nutrition. Watch for yellowing leaves with green veins, which signals nitrogen deficiency, while purple-tinted foliage indicates phosphorus shortage.
If you notice stunted growth and brown leaf tips, your orchid’s likely lacking potassium. Calcium deficiency shows up as twisted new growth and black spots on leaves. Meanwhile, magnesium problems appear as yellowing between leaf veins, starting from the leaf tips.
You’ll often spot these issues during active growth periods, especially in spring and summer. Regular fertilizing with a balanced 20-20-20 orchid formula can prevent most nutrient deficiencies.
Recovery Strategies and Prevention Tips
When your Cattleya orchid shows signs of stress, quick intervention with proper recovery techniques can prevent long-term damage. Start by moving your plant to a location with 40-60% humidity and temperatures between 65-80°F, adjusting light exposure gradually over 3-4 days.
Mix a balanced 20-20-20 fertilizer at quarter strength, applying it every two weeks during recovery. Remove affected leaves or roots with sterilized tools, and treat cuts with cinnamon powder as a natural fungicide.
To prevent future stress, maintain a regular watering schedule, checking moisture levels with a wooden skewer. Don’t repot more than every 2-3 years, and always use fresh, sterile orchid mix.