Like a master gardener crafting new life from a single treasured plant, you’ll find that propagating Oncidium orchids opens up endless possibilities for expanding your collection. You don’t need advanced botanical skills to succeed, but you’ll want to understand the basic principles and timing before making that first cut. With the right tools and technique, you can transform one healthy parent plant into several thriving offspring – and there’s a specific method that’ll maximize your chances of success.
Contents
- 1 Understanding Oncidium Orchid Growth Patterns
- 2 Best Time to Divide Your Oncidium
- 3 Essential Tools and Materials for Propagation
- 4 Identifying Healthy Pseudobulbs for Division
- 5 Step-by-Step Division Technique
- 6 Proper Potting Media Selection
- 7 Aftercare for Newly Divided Plants
- 8 Common Propagation Challenges
- 9 Signs of Successful Division
- 10 Growing Multiple Plants From Back Bulbs
Understanding Oncidium Orchid Growth Patterns
Before you can successfully propagate Oncidium orchids, you’ll need to understand their distinctive growth pattern. These orchids grow from pseudobulbs, which are swollen stem bases that store water and nutrients, connected by a horizontal stem called a rhizome.
Each pseudobulb typically produces 2-6 leaves and can develop flower spikes under proper conditions. As your orchid matures, new pseudobulbs emerge from the base of existing ones, forming clusters or clumps. You’ll notice that newer growths are usually larger than their predecessors.
The rhizome grows in a forward direction, with new shoots emerging every 4-6 months when conditions are favorable.
Best Time to Divide Your Oncidium
The ideal time to divide your Oncidium orchid is during its active growth phase, typically in early spring just as new roots begin emerging. You’ll know it’s ready when you spot fresh root tips appearing white or green and the plant has at least 4-6 healthy pseudobulbs.
If you’ve missed the spring window, don’t worry – you can also divide your orchid after flowering has finished, usually in late summer or early fall. However, avoid dividing during winter months when the plant’s growing process naturally slows down, as this can stress your orchid and reduce its chances of successful propagation.
Essential Tools and Materials for Propagation
Successfully propagating your Oncidium orchid requires a specific set of sterilized tools and quality materials. You’ll need sharp pruning shears, a sterile razor blade, and isopropyl alcohol for disinfection. Don’t forget protective gloves to keep both you and your orchid safe during the process.
For potting materials, gather fresh orchid bark mix, clean plastic pots with drainage holes, and sterilized stakes for support. You’ll also want fungicide powder to prevent infection at cut sites. Keep paper towels handy and prepare a clean work surface that’s well-lit and spacious enough to organize your tools and materials.
Identifying Healthy Pseudobulbs for Division
When selecting pseudobulbs for Oncidium orchid propagation, you’ll want to identify mature growth points that have produced at least three healthy bulbs with leaves. Look for plump, firm pseudobulbs with a bright green color and no signs of wrinkles, spots, or damage. You can guarantee the best propagation success by choosing pseudobulbs that are part of a cluster showing active growth, with visible roots at the base and fresh leaf development at the top.
Selecting Mature Growth Points
Selecting healthy pseudobulbs starts with identifying three to four mature growths that show signs of vigor and robust development. Look for plump, firm bulbs that are at least 4-5 inches tall with dark green coloring and no wrinkles or soft spots.
You’ll want to choose growth points that have produced at least one flowering spike in the past season, indicating they’re mature enough for division. The pseudobulbs should have visible “eyes” or dormant buds at their base, which will develop into new shoots.
Check that each selected section has strong roots, preferably white or green in color, attached to the rhizome between the pseudobulbs.
Signs of Healthy Pseudobulbs
Before attempting division, you’ll need to identify truly healthy pseudobulbs through careful visual inspection. Look for firm, plump bulbs with a light green to yellow-green color, and verify they’re free from soft spots, wrinkles, or discoloration.
The best pseudobulbs will have at least 3-4 mature leaves attached and should feel solid when gently squeezed. They’ll typically measure 2-4 inches in height, depending on the Oncidium variety.
Avoid selecting pseudobulbs that show any signs of damage, disease, or pest infestation. The connecting rhizome between bulbs should be thick and light-colored, with visible growth nodes.
Step-by-Step Division Technique
Before starting division, you’ll need a healthy, mature Oncidium with at least four pseudobulbs and sterilized cutting tools. Examine your parent plant carefully, looking for natural divisions between pseudobulbs where rhizomes connect them. Once you’ve gathered your supplies and identified division points, you’re ready to separate your orchid into sections, with each new division requiring at least three healthy pseudobulbs for the best chance of survival.
Identify Healthy Parent Plant
A thriving parent Oncidium orchid holds the key to successful propagation through division. When selecting your parent plant, look for multiple healthy pseudobulbs, vibrant green leaves, and a robust root system that’s firm and light green or white in color.
Your chosen orchid should be at least three years old and have a minimum of six pseudobulbs. Examine the plant closely for signs of disease, such as black spots, yellowing leaves, or mushy areas. The pseudobulbs should be plump, not wrinkled or dehydrated.
Check that the plant’s most recent growth cycle has produced flowers, indicating it’s mature enough for division. The ideal time to divide is right after flowering, when new growth begins.
Prepare Division Tools First
Successful orchid division requires three essential tools properly sanitized and laid out before you begin. You’ll need sharp pruning shears, a sterile knife with a 4-6 inch blade, and a spray bottle filled with isopropyl alcohol (70% concentration).
Clean your tools by wiping them with alcohol-soaked paper towels, letting them air dry for 30 seconds. Keep extra paper towels nearby for wiping blades between cuts. Don’t forget to put on clean gardening gloves to protect both you and your orchid.
Place a clean cutting mat or newspaper on your work surface, and you’re ready to start dividing your Oncidium orchid.
Separate and Pot Divisions
Start your division process by identifying the natural break points between your orchid’s pseudobulbs, gently feeling for the rhizome connections that link them together. Using sterilized shears, make clean cuts through the rhizome, ensuring each division has 3-4 healthy pseudobulbs and at least one active growth lead.
Dust the cut surfaces with ground cinnamon to prevent infection, then let them callus for 24 hours. Plant each division in a fresh pot filled with orchid bark mix, positioning the newest growth toward the pot’s center. Water sparingly for the first two weeks while new roots establish.
Proper Potting Media Selection
Selecting the right potting media for Oncidium orchids directly impacts their growth and survival. You’ll want to use a mix that’s well-draining yet moisture-retentive, typically combining fir bark, perlite, and sphagnum moss in a 3:1:1 ratio.
For best results, choose medium-grade bark chunks (1/2 to 3/4 inch) as your base. Don’t use regular potting soil, as it’ll suffocate your orchid’s roots. If you’re growing in high humidity, reduce the moss content to prevent root rot.
Pre-soak your bark mix for 24 hours before potting, and consider adding a handful of charcoal to keep the media fresh longer.
Aftercare for Newly Divided Plants
Once you’ve divided your Oncidium orchid, proper aftercare during the first 4-6 weeks is essential for survival. Place the newly divided plants in a shaded area with indirect light, maintaining temperatures between 65-80°F and humidity around 60%.
Water sparingly at first, misting the leaves daily but avoiding saturation of the growing medium. Don’t fertilize for the first two weeks to prevent root burn. After that, apply a quarter-strength orchid fertilizer every other watering.
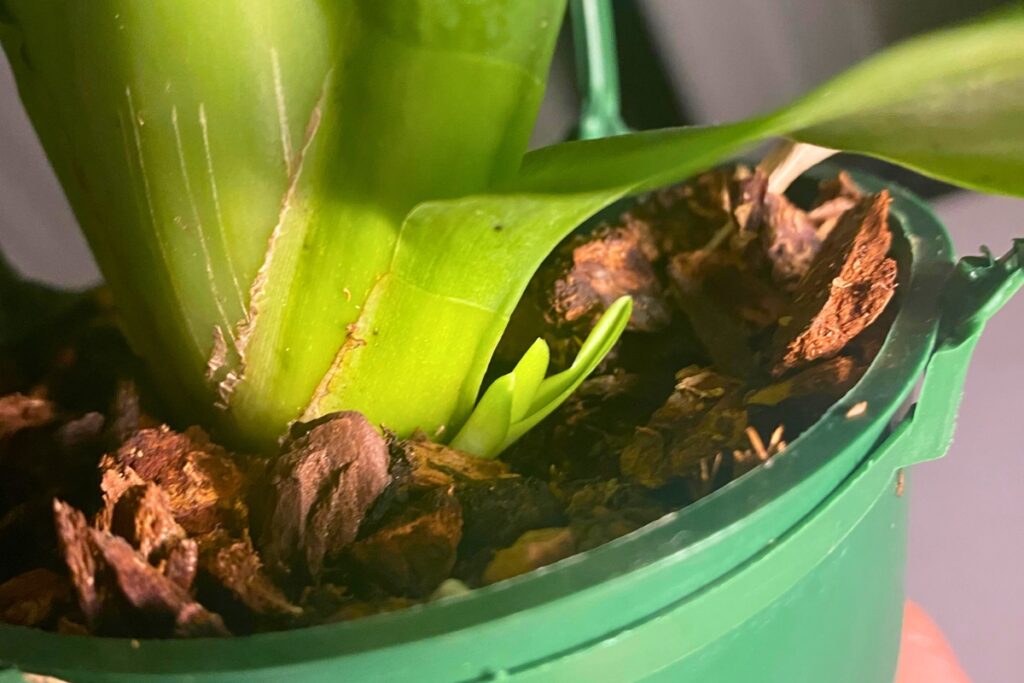
Watch for new root growth, which typically emerges within 3-4 weeks. When you spot fresh green root tips, you’ll know your division has succeeded. Move plants to their permanent growing location gradually over 7-10 days.
Common Propagation Challenges
Despite careful technique, propagating Oncidium orchids can present several common obstacles that’ll test your patience. Root rot often strikes newly divided plants when the potting medium retains too much moisture, while bacterial infections can develop if your cutting tools aren’t properly sterilized.
You’ll frequently encounter slow growth in divided plants, taking 6-8 weeks to see new roots emerge. Temperature fluctuations below 65°F or above 85°F can stall growth completely. Another challenge is pseudobulb dieback, where divisions with fewer than three healthy bulbs fail to thrive.
Watch for dehydration in smaller divisions, which need 80-85% humidity during their recovery period.
Signs of Successful Division
You’ll know your Oncidium orchid division has succeeded when fresh root tips emerge as small, bright green points from the pseudobulbs within 3-4 weeks.
Watch for new leaf growth starting at the base of the divided sections, which should appear within 6-8 weeks. The leaves will unfurl gradually, reaching about 2-3 inches in length before hardening off.
A successfully divided plant will maintain firm, plump pseudobulbs without any shriveling or discoloration. You’ll also notice aerial roots beginning to anchor themselves to the growing medium, and after 12 weeks, your divided orchid should be stable enough to gently wiggle without toppling over.
Growing Multiple Plants From Back Bulbs
Back bulbs, which are the older pseudobulbs without leaves, can produce multiple new orchid plants through careful cultivation. You’ll find these bulbs at the base of your orchid, often looking dried and dormant.
To activate back bulbs, place them in a propagation tray filled with damp sphagnum moss, maintaining temperatures between 70-80°F. Within 8-12 weeks, you’ll notice tiny growth points, called “eyes,” emerging from the nodes.
Once the eyes develop into 2-inch shoots, carefully separate each growing point with a sterile blade. Plant these individual sections in small pots using fine-grade orchid bark, and maintain 70% humidity until established.