Like tending to a living puzzle, propagating Phalaenopsis orchids lets you multiply your collection through nature’s own design. You’ll discover that these elegant plants offer two main paths to expansion: keiki development and crown division. While you might think orchid propagation requires expert-level skills, you’ll find it’s actually quite manageable with the right knowledge and tools at hand. Let’s explore how you can turn one healthy orchid into several thriving specimens.
Contents
- 1 Understanding Phalaenopsis Orchid Biology
- 2 Essential Tools and Materials for Propagation
- 3 Keiki Growth and Development
- 4 Crown Division Methods
- 5 Tissue Culture Techniques
- 6 Caring for Newly Propagated Plants
- 7 Common Propagation Challenges
- 8 Best Time of Year for Propagation
- 9 Signs of Successful Propagation
Understanding Phalaenopsis Orchid Biology
Phalaenopsis orchids, commonly known as moth orchids, are monopodial plants that grow from a single stem. Unlike other orchid varieties, they don’t develop pseudobulbs for water storage, instead relying on thick, fleshy leaves and aerial roots to gather moisture and nutrients.
These tropical beauties typically produce 1-2 flower spikes annually from nodes along their central stem. You’ll find these nodes, which are essential for propagation, appearing as small bumps between the leaves. Each mature plant usually maintains 4-6 leaves at a time, with new growth emerging from the crown while older leaves gradually yellow and drop.
Essential Tools and Materials for Propagation
Successful orchid propagation requires a specific set of sterile tools and quality materials to guarantee the best results. You’ll need sharp scissors, pruning shears, a sterilized razor blade, and isopropyl alcohol (70%) for disinfecting your tools between cuts.
Essential materials include sphagnum moss, orchid potting mix, clear plastic pots (4-6 inches), and fungicide powder. Don’t forget horticultural-grade rooting hormone and clean water. For keiki propagation, you’ll also need bamboo stakes and clips.
Keep hydrogen peroxide (3%) on hand to treat any accidental cuts in the plant tissue, and wear disposable nitrile gloves to maintain sterility throughout the process.
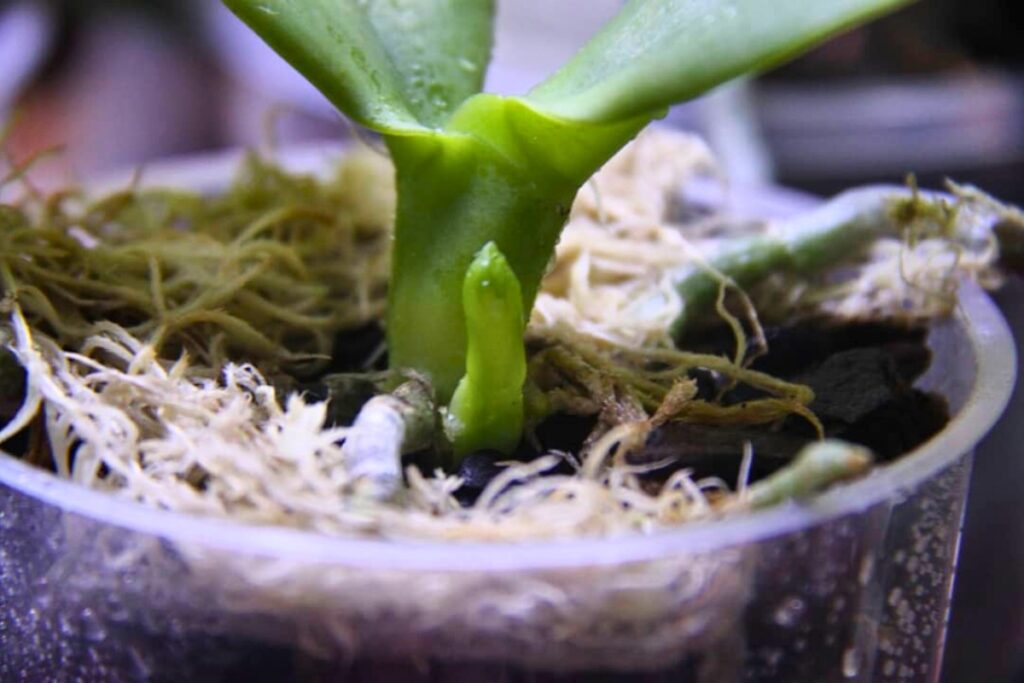
Keiki Growth and Development
When you spot a small plantlet growing along your orchid’s flower spike or at the base of the plant, you’ve discovered a keiki – the Hawaiian word for “baby.” These naturally occurring offshoots typically emerge when environmental conditions are favorable, appearing as small green nubs that develop leaves and aerial roots over time.
Watch your keiki’s growth closely; it’ll need to develop at least three leaves and three robust roots, each 2-3 inches long, before removal. This development process usually takes 3-6 months. While the keiki grows, don’t remove any part of the mother plant’s spike or leaves, as the baby orchid relies on these nutrients for healthy development.
Crown Division Methods
Dividing an orchid’s crown requires careful precision and proper timing to be successful. You’ll need to wait until your Phalaenopsis has developed multiple healthy crowns, each with at least three leaves and several established roots.
Using a sterile, sharp blade, locate the point where the crowns connect at the base. Make a clean cut through the stem, ensuring each division retains adequate roots. Dust the cut surfaces with ground cinnamon to prevent infection.
Pot each division in fresh orchid medium, securing them firmly. Keep the newly divided plants in high humidity (60-70%) and avoid direct sunlight for two weeks while they establish themselves.
Tissue Culture Techniques
Tissue culture of Phalaenopsis orchids requires specialized laboratory equipment, including an autoclave, laminar flow hood, and precision measuring tools. You’ll need to maintain completely sterile conditions throughout the process, which means working in a controlled environment and sterilizing all surfaces, instruments, and growing media. The growing media preparation involves mixing specific ratios of nutrients, hormones, and agar, then adjusting the pH to precisely 5.8 before autoclaving at 121°C for 20 minutes.
Laboratory Equipment Required
Professional propagation of Phalaenopsis orchids through tissue culture requires specialized laboratory equipment and sterile conditions. You’ll need an autoclave for sterilizing tools, a laminar flow hood to maintain sterile air flow, and precision scales for measuring growth media components.
Essential items include sterile petri dishes, test tubes, scalpels, forceps, and a pH meter for solution testing. You’ll also require a growth chamber with temperature controls (20-25°C), LED lighting systems, and micropipettes for precise measurements.
Don’t forget basic supplies like sterilized gloves, face masks, and lab coats to prevent contamination. A microscope helps monitor tissue development and identify potential issues during the culture process.
Sterile Growing Conditions Needed
Since successful tissue culture relies on completely sterile conditions, you’ll need to create a contaminant-free workspace before beginning any orchid propagation. Start by disinfecting your work surface with a 10% bleach solution, and maintain positive air pressure in your workspace to prevent airborne particles from entering.
You’ll want to perform all tissue culture work inside a laminar flow hood or DIY clean box. Sterilize all tools by autoclaving at 121°C for 20 minutes, or use a pressure cooker at 15 psi. Keep 70% isopropyl alcohol nearby for frequent hand sanitizing and tool cleaning between steps.
Always wear nitrile gloves and a clean lab coat to prevent contamination from skin particles or clothing.
Media Preparation Steps
Three key components form the foundation of your orchid tissue culture media: MS (Murashige and Skoog) basal salts, plant hormones, and a gelling agent.
Start by mixing 4.4 grams of MS powder with 30 grams of sucrose in 1 liter of distilled water. You’ll need to adjust the pH to 5.8 using either KOH or HCl drops. Add 2mg/L of cytokinin and 0.5mg/L of auxin hormones, stirring until fully dissolved.
Finally, mix in 8 grams of agar powder while heating the solution to 121°C. Once it’s clear, pour the warm media into sterilized culture vessels and let it solidify. Don’t forget to autoclave everything at 15 psi for 20 minutes.
Caring for Newly Propagated Plants
Once you’ve successfully propagated your Phalaenopsis orchid, maintaining proper care becomes essential for its survival. Keep the temperature between 70-80°F during the day and 60-65°F at night, while maintaining 50-70% humidity.
Water your newly propagated orchid when the top inch of media feels dry, typically every 7-10 days. Don’t let water collect in the crown, as this can lead to rot. Place the plant in bright, indirect light, about 3 feet from an east-facing window.
Feed your orchid with a quarter-strength orchid fertilizer every other watering, and don’t repot for at least 6-8 months to allow root establishment.
Common Propagation Challenges
While propagating Phalaenopsis orchids can be rewarding, you’ll likely encounter several common obstacles along the way. Root rot is a frequent issue, often caused by overwatering or poor drainage in your propagation medium. You’ll notice black, mushy roots that need immediate removal with sterilized tools.
Keiki failure occurs when baby plants don’t develop strong enough root systems before separation. Wait until you see at least three healthy roots, 2-3 inches long, before attempting removal. Another challenge is bacterial infection, which can spread quickly through cuts and wounds during propagation. Always use sterile equipment and apply cinnamon powder to cut surfaces as a natural fungicide.
Best Time of Year for Propagation
You’ll find spring to be the ideal time for propagating your Phalaenopsis orchids, as the natural growth cycle supports vigorous root and leaf development. While winter’s shorter days and cooler temperatures make propagation more challenging, you can still achieve success by providing supplemental lighting and maintaining consistent warmth. For the best results, plan your propagation efforts shortly after your orchid’s blooming cycle has finished, typically 2-3 weeks after the last flower has dropped.
Spring Growth Period
Spring provides the ideal conditions for propagating Phalaenopsis orchids, as temperatures reach 65-75°F and natural light cycles lengthen. During this growth period, you’ll notice new roots emerging and leaf development accelerating, signaling the perfect time to begin propagation.
Your orchid’s metabolism increases greatly in spring, making it more resilient to the stress of division or keiki removal. You’ll want to watch for baby shoots forming along the flower spike, which typically appear 2-3 weeks after blooming ends.
Wait until these keikis develop at least three leaves and 2-inch roots before separating them from the mother plant. This usually takes 8-12 weeks of spring growth.
Winter Dormancy Challenges
Because Phalaenopsis orchids enter a natural dormancy cycle during winter months, propagation attempts during this period face considerable challenges. Your plants’ metabolic processes slow down considerably, and root development becomes minimal.
You’ll notice reduced success rates if you try propagating between November and February, when temperatures drop below 65°F. During this time, keiki growth slows to nearly a standstill, and tissue healing takes twice as long.
To overcome these challenges, maintain temperatures between 70-75°F in your growing area. You’ll also need to provide 12-14 hours of supplemental lighting and reduce watering to once every 10-12 days to prevent root rot.
Post-Blooming Division Timing
While winter dormancy presents propagation challenges, the post-blooming period offers ideal conditions for dividing and propagating Phalaenopsis orchids. You’ll find the best timing is 2-3 weeks after the last flower has fallen, when your orchid’s energy shifts from flowering to growth.
Watch for new root development and wait until daytime temperatures reach 70-75°F consistently. Spring months, particularly March through May, provide the perfect window for division. During this time, your orchid’s metabolism increases naturally, and the plant can recover more quickly from the stress of division.
Check that your orchid has at least 3-4 healthy pseudobulbs before attempting division.
Signs of Successful Propagation
A thriving orchid keiki shows several unmistakable signs of successful propagation. You’ll notice healthy, firm roots extending 2-3 inches from the growth point, displaying a silvery-green color when dry and bright green when wet. The leaves should be thick, upright, and deeply colored.
Watch for new leaf growth every 4-6 weeks, with leaves reaching at least 2 inches in length before considering separation. The keiki’s stem should feel firm, not soft or mushy, and maintain a consistent green color. When you spot 3-4 healthy roots and at least two mature leaves, your keiki’s ready for independent potting.