Gardeners often assume bare root roses require mysterious techniques, but successful planting follows straightforward principles. These dormant plants, stripped of soil and containers, actually establish faster than potted varieties when handled correctly. The key lies in timing, preparation, and understanding that roses planted bare root typically cost 40-50% less than container plants. Most novice gardeners make three critical errors during installation, yet avoiding these mistakes transforms struggling plants into vigorous bloomers within the first growing season.
Contents
- 1 Understanding Bare Root Roses and Their Advantages
- 2 Identifying Quality Plants and Optimal Planting Times
- 3 Essential Pre-Planting Preparation Steps
- 4 Step-by-Step Planting Process for Success
- 5 Proper Backfilling Techniques and Initial Watering
- 6 Post-Planting Care and Monitoring Guidelines
- 7 Establishing Watering Routines and Fertilization Schedules
- 8 Long-Term Maintenance and Pruning Practices
Understanding Bare Root Roses and Their Advantages
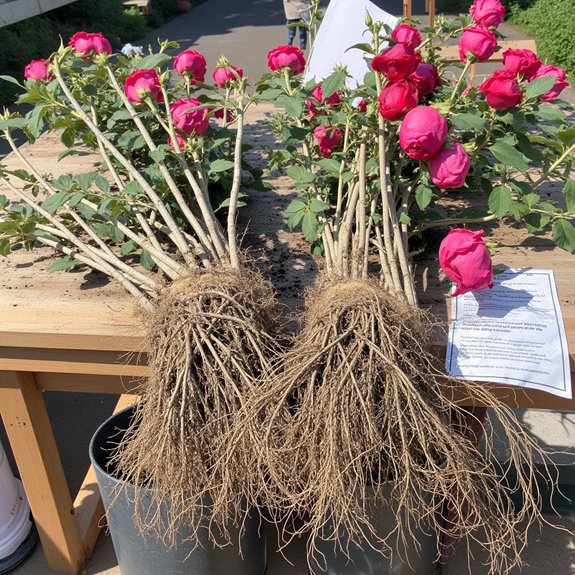
Bare root roses arrive at garden centers looking deceptively simple, stripped of soil and packed in basic wood shavings or sawdust. These dormant plants are actually mature specimens that nurseries dig up during winter months, trim back, and store for spring sales. The bare root format offers significant advantages over potted alternatives. Shipping costs remain lower without heavy soil, making these rose varieties more affordable for gardeners. Additionally, bare root plants typically feature more developed root systems and mature canes than their potted counterparts. This maturity translates to faster establishment and quicker growth once planted in the garden.
Identifying Quality Plants and Optimal Planting Times
How does one distinguish between a premium bare root rose and a potential garden disappointment? Look for Grade 1 roses, which feature at least three strong canes and mature root systems. Quality plant characteristics include thick canes without discoloration, mold, or fungus. Avoid roses sprouting new leaves, focusing instead on dormant specimens.
Timing matters considerably for successful establishment. Plant when soil warms and frost danger passes, typically January in warm climates, March or April in colder zones. Ideal planting conditions require matching varieties to local USDA Hardiness zones. Purchase only when ready to plant immediately, preventing root dehydration.
Essential Pre-Planting Preparation Steps
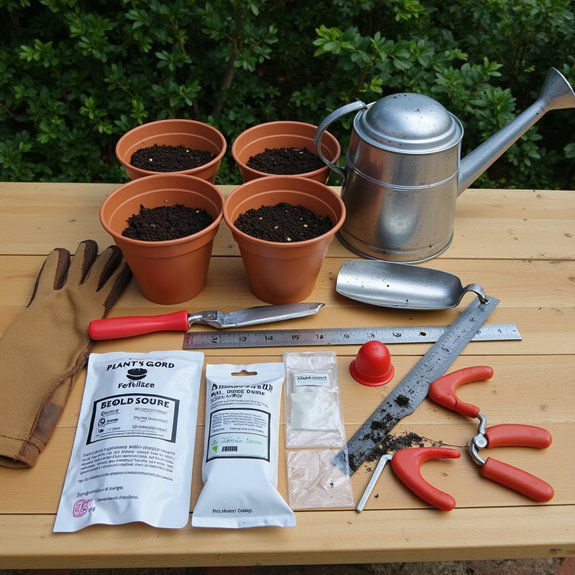
Three critical steps transform a dormant bare root rose into a planting-ready specimen. First, carefully unwrap the rose and remove rubber bands, then wipe away sawdust or wood shavings from roots. Gather pre planting tools including sharp pruning shears to trim black, brittle, or broken canes back to healthy growth.
Next, examine roots closely, removing any diseased or damaged portions with clean cuts. Soak roots in water for 2-12 hours to rehydrate thoroughly.
Meanwhile, begin soil preparation by selecting a sunny location with 6-8 hours daily sunlight, ensuring proper drainage for ideal growing conditions.
Step-by-Step Planting Process for Success
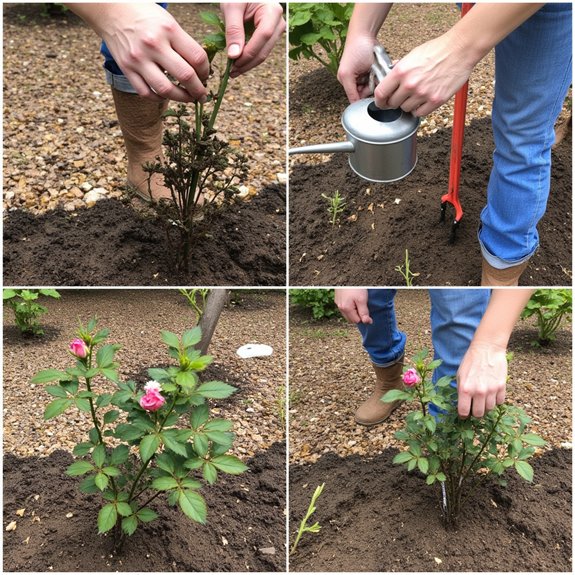
Proper planting technique determines whether a bare root rose thrives or struggles in its new home. Choose a sunny location receiving 6-8 hours of daily sunlight, then dig a hole 8 inches deeper than the root depth and wide enough for complete root spread. Create small cracks in the hole walls to encourage root expansion, add mycorrhizal fungi, and avoid synthetic fertilizers initially.
Position the rose carefully, ensuring the bud union sits 1-2 inches below soil level. Different rose varieties may require slight adjustments to this depth. These fundamental planting techniques establish the foundation for vigorous growth and abundant blooming seasons ahead.
Proper Backfilling Techniques and Initial Watering
Backfilling begins immediately after positioning the rose, using a carefully balanced soil mixture that promotes healthy root establishment. Mix native soil with organic compost in equal parts, avoiding rich purchased soils that can shock the plant. These proper backfilling techniques guarantee roots adapt gradually to their new environment.
Fill the hole halfway, then water thoroughly to eliminate air pockets. Complete the backfilling process, leaving no exposed roots. Initial watering should be profuse, saturating the entire root zone completely. This critical step helps settle soil around delicate roots, creating essential contact for nutrient absorption and preventing transplant shock.
Post-Planting Care and Monitoring Guidelines
Once the initial watering settles, the rose enters a critical establishment phase where vigilant monitoring determines long-term success. Focus energy on root development rather than expecting immediate blooms. Deep watering becomes essential when soil feels dry two inches down, typically every few days initially. Growth monitoring involves checking for emerging leaves and healthy cane color. Pest management starts early by inspecting for aphids, spider mites, or fungal issues weekly. Avoid fertilizing until new leaves appear, then apply organic options like kelp or compost. Regular sunshine and consistent moisture support this vulnerable period before the rose becomes self-sufficient.
Establishing Watering Routines and Fertilization Schedules
While bare-root roses establish their foundation, developing consistent watering and feeding schedules becomes the cornerstone of successful cultivation. Proper watering frequency depends on soil moisture checks, inserting fingers knuckle-deep to assess dryness. Water deeply when the top two inches feel dry, typically every few days initially.
Fertilizer types matter greatly during establishment. Organic options like kelp and compost work best for new plantings, while synthetic fertilizers should wait until plants are well-established. Apply organic boosters after new leaves appear, then wait until after first bloom for rose-specific fertilizers. This patient approach guarantees strong root development before vigorous growth.
Long-Term Maintenance and Pruning Practices
After roses establish their root systems and begin regular growth cycles, gardeners must shift focus toward long-term care strategies that preserve plant health for years ahead. Long term care begins with patience, as bare-root roses require at least one full year before any significant pruning. During this waiting period, observe for pest damage or fungal diseases that might require immediate intervention. Once the initial year passes, proper pruning techniques become essential for maintaining shape and removing damaged growth. Regular monitoring, consistent watering schedules, and organic fertilization after blooming cycles guarantee vigorous development and beautiful flowering for seasons to come.