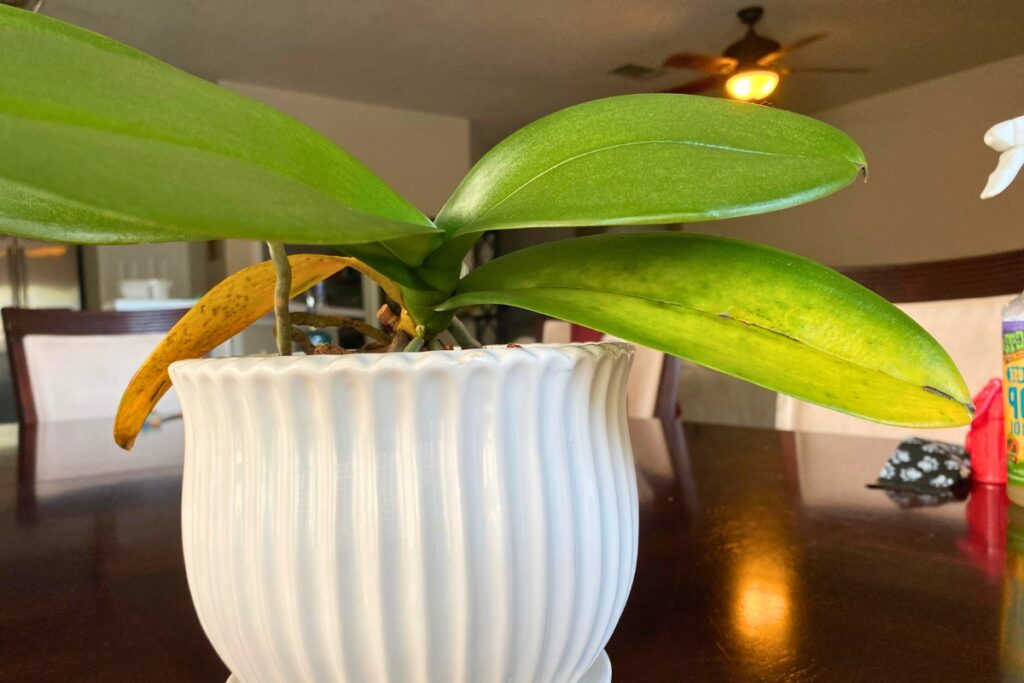
When Sarah noticed tiny webs and yellow spots on her prized Phalaenopsis orchid, she didn’t realize she was facing one of the most common yet destructive orchid pests: spider mites. You’ll encounter various unwanted visitors in your orchid collection, from microscopic mites to visible crawlers, but don’t worry – identifying these pests early makes all the difference. Let’s explore how you can spot these troublemakers before they turn your beautiful blooms into their next meal.
Contents
- 1 Spider Mites: The Invisible Threat
- 2 Scale Insects and Their Control Methods
- 3 Mealybugs: Detection and Treatment
- 4 Thrips Management in Orchid Collections
- 5 Dealing With Aphids on Orchids
- 6 Root Rot Nematodes: Prevention and Care
- 7 Natural Predators and Beneficial Insects
- 8 Chemical vs. Organic Pest Control Options
- 9 Creating a Pest-Resistant Growing Environment
- 10 Regular Inspection and Maintenance Routines
Spider Mites: The Invisible Threat
Although spider mites are nearly invisible to the naked eye, these tiny arachnids can quickly devastate your prized orchids. You’ll first notice their presence when fine webbing appears between leaves, along with tiny yellow or brown spots on the foliage.
These pests, measuring just 1/50th of an inch, thrive in warm, dry conditions and can complete their lifecycle in just 5-7 days. They’ll pierce plant cells to feed, causing stippled patterns on leaves that eventually turn brown and fall off.
To detect an infestation early, hold a white paper under suspicious leaves and tap gently. If tiny red dots scatter and move, you’ve got spider mites.
Scale Insects and Their Control Methods
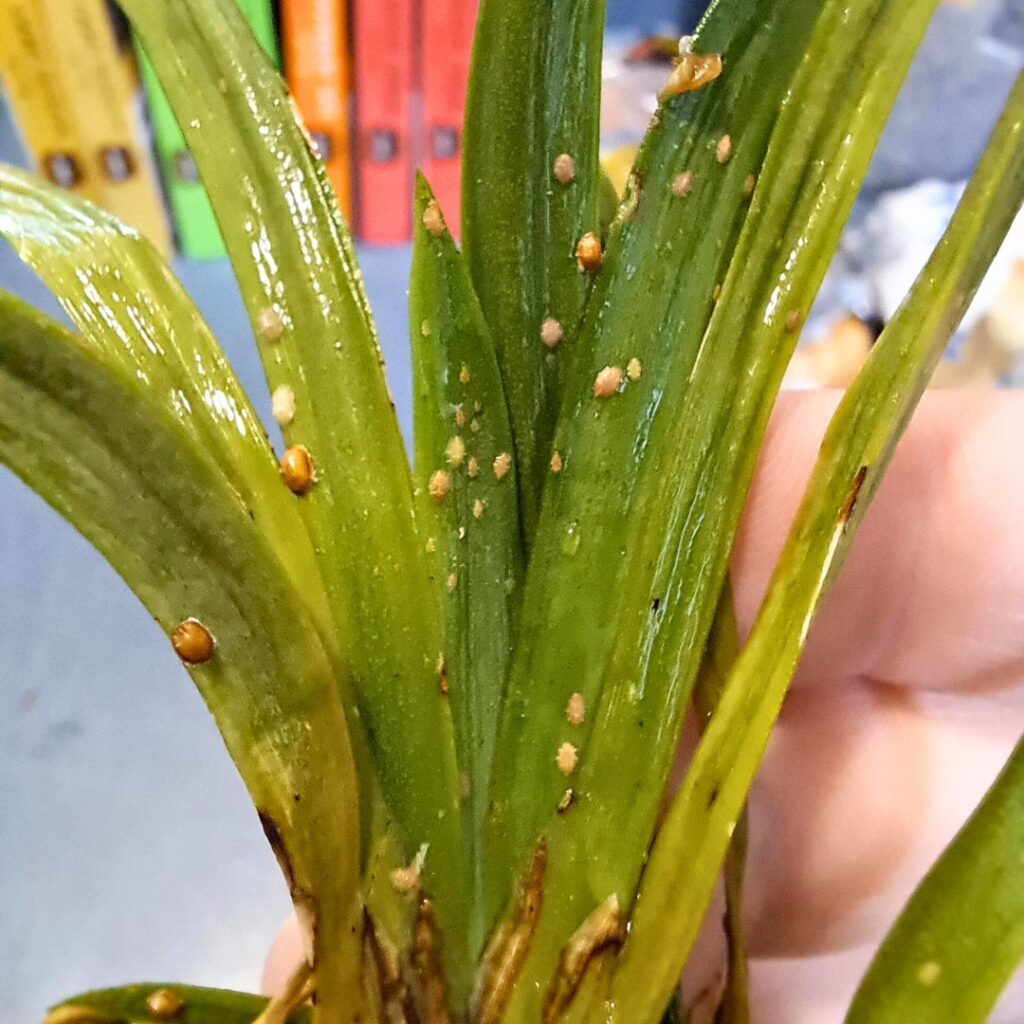
When you spot small, brownish bumps that look like shells attached to your orchid’s leaves and stems, you’re likely dealing with scale insects. These stubborn pests feed on your plant’s sap and can quickly multiply if left untreated.
To control scale insects, first isolate your infected orchid. You’ll need to remove adult scales manually using a cotton swab dipped in 70% isopropyl alcohol. For severe infestations, apply neem oil solution (2 teaspoons per quart of water) every 7-10 days.
Prevention is key – inspect your orchids weekly and maintain good air circulation. Don’t forget to check under leaves and along stem joints where scales often hide.
Mealybugs: Detection and Treatment
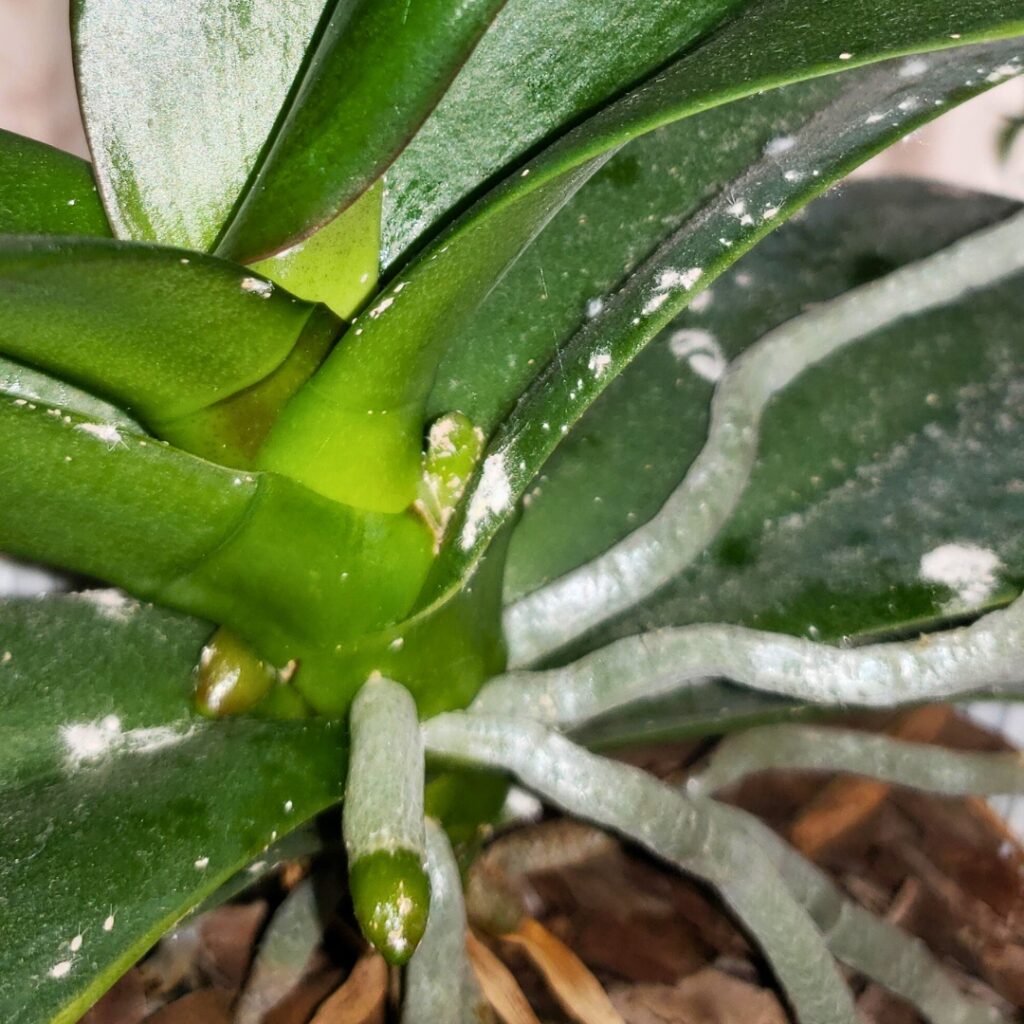
You’ll spot mealybugs on your orchids as small, white, cotton-like clusters that tend to gather in leaf joints and on flower stems. These persistent pests can quickly multiply if left unchecked, so it’s vital to inspect your plants weekly, paying special attention to hidden areas under leaves and between pseudobulbs. While chemical treatments work, you can start with gentler options like dabbing the bugs with alcohol-soaked cotton swabs or applying neem oil every 7-10 days until they’re gone.
Identifying Mealybug Infestations
Since mealybugs rank among the most destructive orchid pests, spotting them early is essential for your plant’s survival. You’ll find these tiny, cotton-like insects clustered in leaf joints, under leaves, and along your orchid’s crown or roots. They’re usually no larger than 1/8 inch long.
Look for white, fuzzy masses that resemble bits of cotton or small patches of mold. You’ll often notice sticky honeydew residue or yellowish plant tissue where they’ve been feeding. During your weekly orchid inspection, gently probe any suspicious white spots with a cotton swab – if they’re mealybugs, they’ll smear and leave a pinkish-brown stain.
Natural Treatment Methods
Before reaching for harsh chemical pesticides, several natural remedies can effectively combat mealybug infestations in your orchids. Start with a cotton swab dipped in 70% isopropyl alcohol, gently dabbing each visible mealybug to dissolve their waxy coating.
Mix one tablespoon of neem oil with a quart of water and a drop of dish soap for a natural spray solution. Apply this mixture weekly, covering all plant surfaces, including leaf undersides and crown areas.
You can also introduce beneficial insects like ladybugs or lacewings, which naturally prey on mealybugs. For severe cases, prune heavily infected leaves and isolate the plant until you’ve controlled the infestation.
Prevention and Future Protection
While treating active mealybug infestations is important, implementing strong preventive measures will protect your orchids from future outbreaks. Start by quarantining new plants for 14 days, checking them thoroughly for signs of pests before adding them to your collection.
Keep your growing area clean by removing dead leaves, spent blooms, and debris weekly. You’ll want to maintain proper air circulation with fans and space plants 6-8 inches apart. For extra protection, apply neem oil every 30 days as a preventive spray.
Monitor your orchids weekly using a magnifying glass, paying special attention to leaf joints and crown areas where pests often hide.
Thrips Management in Orchid Collections
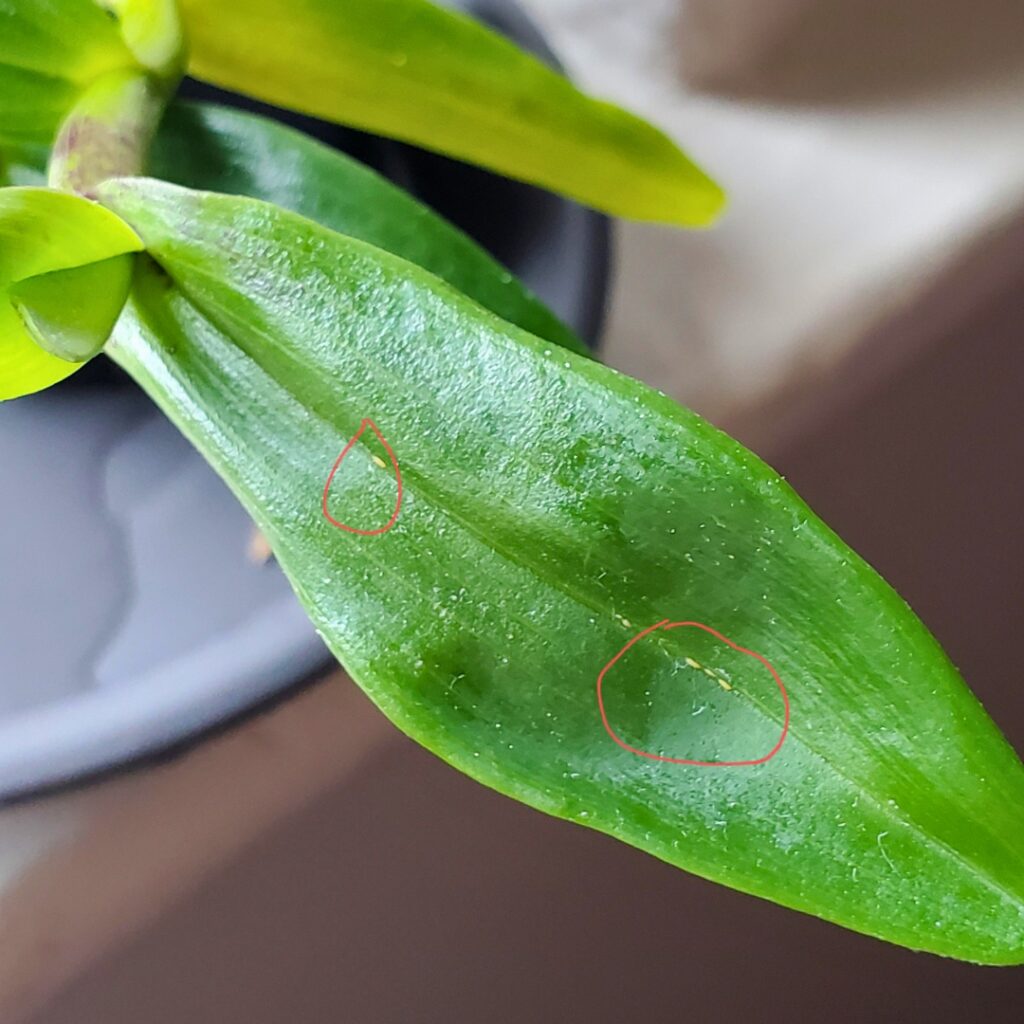
Thrips, those tiny winged insects that plague orchid collections, leave distinctive silvery streaks and speckled damage on leaves and flowers when they feed. You’ll spot these destructive pests, measuring just 1-2mm long, by gently shaking your orchid’s blooms over a white piece of paper to see if any slender, straw-colored insects fall out. While chemical treatments work quickly, you can start with natural controls like sticky blue traps, predatory mites, or weekly applications of neem oil mixed at 2 teaspoons per quart of water.
Identifying Thrips on Orchids
Successfully identifying these minuscule pests requires careful observation of your orchid’s leaves and flowers. Look for tiny, elongated insects about 1-2mm long, ranging from pale yellow to dark brown. You’ll often spot them scurrying along leaf surfaces or hiding in flower buds.
Check for silvery streaks or stippling on leaves, which indicate thrips’ feeding damage. You can tap affected flowers over white paper – if you see small, thread-like creatures falling, they’re likely thrips. For a clearer view, use a 10x magnifying glass to examine suspicious areas, particularly where petals meet and along leaf veins.
Natural Thrips Control Methods
Once you’ve confirmed a thrips infestation in your orchid collection, several natural control methods can help eliminate these persistent pests. Start by isolating affected plants and pruning damaged foliage, disposing of it in sealed bags away from your growing area.
Introduce beneficial predators like predatory mites or lacewings, which you can purchase from garden suppliers. These natural enemies will hunt and consume thrips without harming your orchids. You can also use sticky blue traps to capture adult thrips, placing one trap per 50 square feet of growing space.
Weekly applications of neem oil, mixed at 2 teaspoons per quart of water, will help control thrips populations naturally.
Preventive Treatment Strategies
To protect your orchid collection from thrips before they become a problem, implementing preventive measures can save you significant time and effort later. Start by quarantining new plants for 14 days, keeping them at least 3 feet from your existing collection.
Maintain ideal humidity between 40-60% and good air circulation using small fans positioned 18 inches from your plants. You’ll want to inspect leaves weekly, especially around the base and crown, using a 10x magnifying glass.
Apply preventive neem oil sprays every 14-21 days, mixing 2 teaspoons per quart of water. Don’t forget to treat the potting medium’s surface, where thrips often hide.
Dealing With Aphids on Orchids
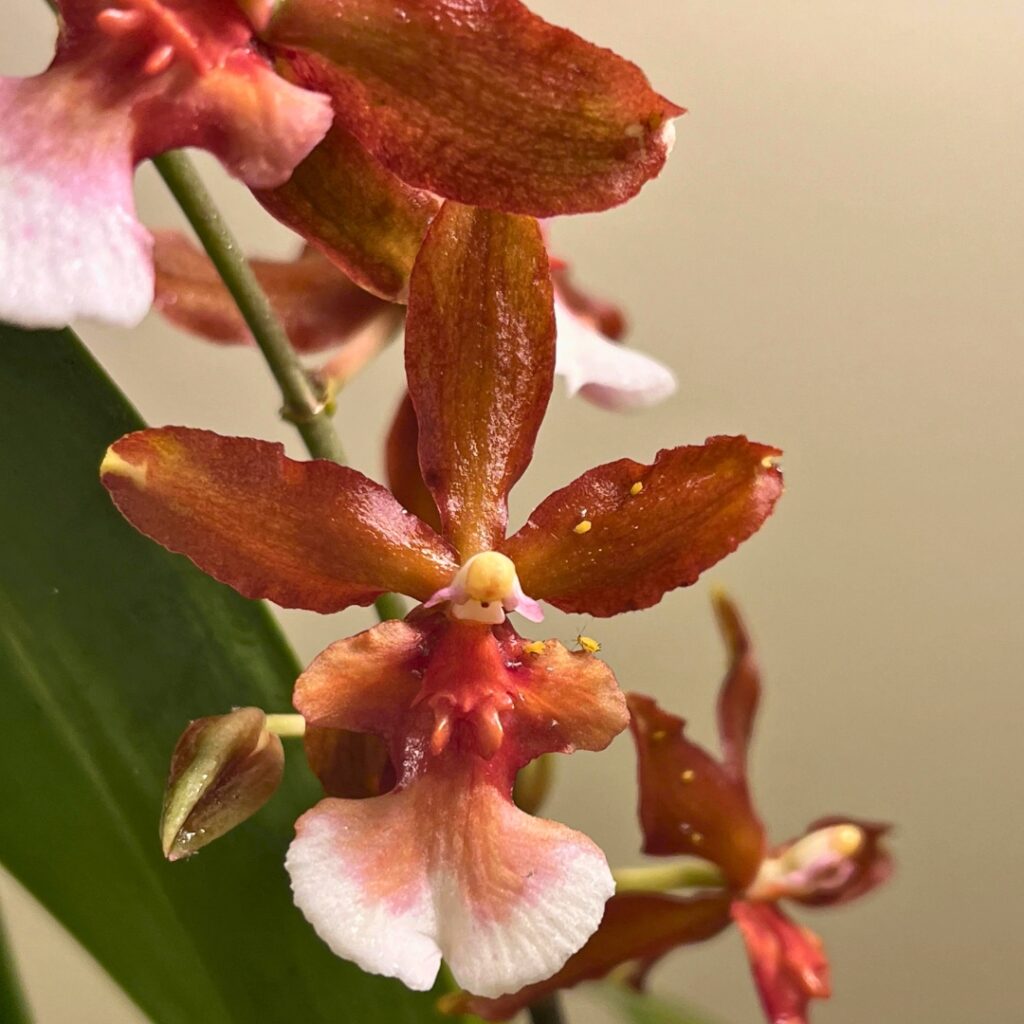
While aphids may be tiny, these persistent pests can quickly overtake your orchids if left unchecked. You’ll typically find these soft-bodied insects clustered on new growth, flower spikes, and the undersides of leaves, where they feed on your plant’s sap.
To eliminate aphids, start by isolating the affected orchid. Mix 1 tablespoon of mild liquid soap with 1 quart of water, then spray this solution directly on the pests. After 15 minutes, rinse thoroughly with clean water to prevent leaf damage.
For stubborn infestations, you’ll need to repeat this treatment every 3-4 days until you don’t see any aphids for two consecutive weeks.
Root Rot Nematodes: Prevention and Care
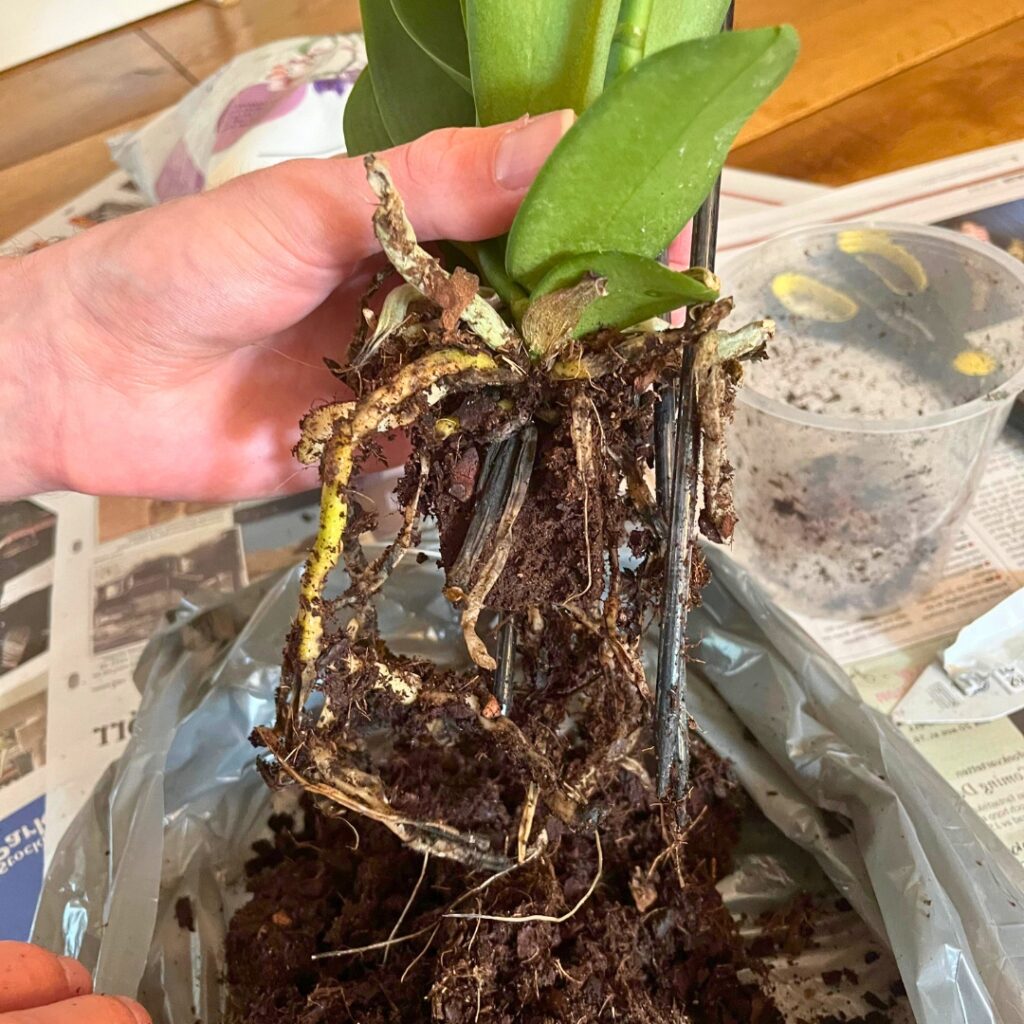
Although microscopic in size, root rot nematodes rank among the most devastating orchid pests you’ll encounter in your growing journey. These tiny worms penetrate root tissue, causing brown lesions and eventual decay that’ll spread throughout your plant’s root system.
To prevent nematode infestations, start with sterile potting media and never reuse old growing materials. If you spot infected roots, trim them 1 inch above the damage and treat remaining roots with a 3% hydrogen peroxide solution.
For severe cases, you’ll need to unpot the orchid, remove all media, and soak bare roots in a nematicide solution for 15 minutes before repotting in fresh, sterile media.
Natural Predators and Beneficial Insects
Since many orchid pests can be naturally controlled without chemicals, introducing beneficial insects offers an eco-friendly solution for your growing space. Ladybugs, lacewings, and praying mantises will gladly feast on aphids, mealybugs, and spider mites that plague your orchids.
You’ll find parasitic wasps particularly effective against caterpillars and beetles, while predatory mites target thrips and spider mites. Release these helpful insects during evening hours, when they’re less likely to fly away, and mist your growing area lightly to encourage them to stay.
Keep your beneficial insects happy by avoiding pesticides and providing shallow water sources nearby.
Chemical vs. Organic Pest Control Options
When faced with persistent orchid pests, you’ll need to choose between chemical and organic control methods based on your situation’s severity. Chemical pesticides offer quick results but can harm beneficial insects and require careful handling with gloves and masks.
Organic options, like neem oil and insecticidal soaps, work more gradually but are safer for you and your plants. Mix 2 tablespoons of neem oil per gallon of water, or use pre-made organic sprays every 7-10 days until pests disappear.
For severe infestations, systemic chemical pesticides provide long-lasting protection, but they’ll stay in your orchid’s tissue for 6-8 weeks. Always test any treatment on a small leaf area first.
Creating a Pest-Resistant Growing Environment
To create a pest-resistant environment for your orchids, you’ll need to master three key growing conditions: humidity, ventilation, and proper drainage. You can maintain ideal humidity levels between 40-70% and guarantee consistent airflow by using oscillating fans, while simultaneously monitoring temperatures to stay within 60-85°F (15-29°C). Setting up your containers with fast-draining media and adequate drainage holes will prevent the root rot that often attracts pests, especially fungus gnats and mealybugs.
Ideal Humidity and Ventilation
Maintaining proper humidity and airflow creates an environment where orchids thrive and pests struggle to establish themselves. You’ll want to keep humidity between 40-70%, using a humidity tray or small humidifier to achieve these levels.
Good air circulation is essential, so position a small fan to create gentle movement around your plants. Set it on low speed and aim it slightly above the orchids, running it for 8-12 hours daily. This prevents water from stagnating on leaves and helps maintain even temperatures.
When positioning your ventilation, make certain there aren’t any cold drafts directly hitting the plants, as this can stress them and make them more susceptible to pests.
Proper Container Drainage Setup
Because orchids are highly susceptible to root rot, proper container drainage serves as your first line of defense against pest infestations. You’ll need drainage holes that measure at least 1/4 inch in diameter, spaced 2-3 inches apart along the container’s bottom.
Layer your pot’s base with a 1-inch bed of clean, medium-sized bark chips, followed by a thin layer of sphagnum moss. Don’t forget to elevate your container using pot feet or a humidity tray with pebbles, ensuring it’s raised at least 1/2 inch above any collected water.
Remember to check your drainage holes monthly for blockages, clearing them with a wooden skewer if needed.
Light and Temperature Control
While orchids thrive in bright, indirect sunlight, balanced lighting and temperature control form the foundation of a pest-resistant environment. You’ll want to maintain temperatures between 65-80°F during the day and 60-65°F at night, as extreme fluctuations can stress your plants and attract pests.
Position your orchids 3-4 feet from east or west-facing windows, using sheer curtains to filter harsh rays. If you’re using grow lights, keep them 12-18 inches above the plants for 12-14 hours daily.
Monitor leaf temperature by touch – they shouldn’t feel hot. During winter, keep plants away from drafty windows and heating vents to prevent temperature stress.
Regular Inspection and Maintenance Routines
To prevent pest infestations before they start, you’ll need to establish a consistent orchid inspection routine. Check your plants weekly, examining both sides of leaves, stem joints, and the potting medium’s surface for signs of trouble.
Make it a habit to remove dead leaves and spent blooms promptly, as these can harbor pests and diseases. When you water, take time to inspect the crown and root system, looking for any discoloration or unusual spots.
Keep a magnifying glass handy for closer examination of suspicious areas, and maintain a log of your observations. Note any changes in leaf texture, color, or growth patterns.