If you’ve ever admired your mature orchid and wished you could multiply its beauty, you’re in luck. Orchid propagation isn’t just for professional growers – it’s a practical skill you can master with basic tools and know-how. While the process requires patience and attention to detail, you’ll discover that techniques like division and keiki cultivation can transform one healthy plant into several thriving specimens. Let’s explore the methods that’ll help you expand your collection without breaking the bank.
Contents
- 1 Understanding Basic Orchid Biology and Growth Patterns
- 2 Essential Tools and Materials for Orchid Propagation
- 3 Division Method: Separating Mature Orchid Plants
- 4 Propagating Through Keikis: Nature’s Baby Orchids
- 5 Back Bulb and Pseudobulb Propagation Techniques
- 6 Growing Orchids From Seeds: Advanced Methods
- 7 Common Challenges and Solutions in Orchid Propagation
Understanding Basic Orchid Biology and Growth Patterns
Before you can successfully propagate orchids, you’ll need to understand their unique biological structure and growth cycles. Unlike typical house plants, orchids grow from pseudobulbs – thickened stems that store water and nutrients. These bulbs produce new growth through “eyes,” small nodes that develop into shoots.
Most orchids follow a distinct seasonal pattern, with active growth periods in spring and summer. You’ll notice your orchid’s roots are different too, featuring a spongy outer layer called velamen that absorbs moisture and helps anchor the plant. The growth pattern typically involves a new pseudobulb developing annually, gradually forming a clump that’s perfect for division.
Essential Tools and Materials for Orchid Propagation
Success in orchid propagation depends on having the right tools and materials ready before you begin. You’ll need sterilized cutting tools, including pruning shears and a sharp knife, plus 70% isopropyl alcohol for sanitizing between cuts.
Essential materials include sphagnum moss, orchid potting medium, clear plastic pots with drainage holes, and hormone rooting powder. Don’t forget protective gear – disposable gloves and safety glasses are must-haves when handling chemicals and plant materials.
For advanced propagation, you’ll want sterile growing containers, agar medium, and a pressure cooker if you’re planning tissue culture. Keep everything organized in a clean workspace with good lighting and ventilation.
Division Method: Separating Mature Orchid Plants
With your tools and workspace prepared, let’s put them to use on one of the most straightforward propagation methods. Division involves separating a mature orchid into multiple sections, each with at least three healthy pseudobulbs and an active growth point.
Start by removing the orchid from its pot and gently clearing away old potting media. Locate natural division points where pseudobulbs connect, then use sterilized pruning shears to make clean cuts through the rhizome between growth segments.
Dust each cut surface with ground cinnamon as a natural fungicide. Allow divisions to dry for 24 hours before repotting them in fresh media, ensuring each new plant has adequate room for root development.
Propagating Through Keikis: Nature’s Baby Orchids
While mature orchids require division for propagation, nature sometimes offers a simpler method through keikis – small plantlets that develop spontaneously on the mother plant’s flower spike or stem.
You’ll know a keiki is ready for removal when it has at least three leaves and 2-3 inches of roots. Using sterilized scissors, cut the stem 1 inch above and below the keiki’s attachment point. Plant your keiki in moistened sphagnum moss within a 2-inch pot.
For the first month, mist the keiki daily and maintain 70-80% humidity. Don’t fertilize until you see new growth, usually within 4-6 weeks. Keep temperatures between 65-80°F for ideal development.
Back Bulb and Pseudobulb Propagation Techniques
Back bulbs and pseudobulbs represent two powerful propagation methods that experienced orchid growers regularly employ. You’ll find these fleshy, swollen stems behind the plant’s active growth, storing water and nutrients for future use.
To propagate using back bulbs, cut them from the mother plant with a sterile blade, leaving at least one node intact. Dust the cut with cinnamon powder, then plant in moist sphagnum moss at 75°F.
For pseudobulbs, select healthy ones with visible “eyes” or growth points. Cut between bulbs, leaving 2-3 inches of rhizome attached. Place them in a humidity dome until you spot new growth, typically within 4-6 weeks.
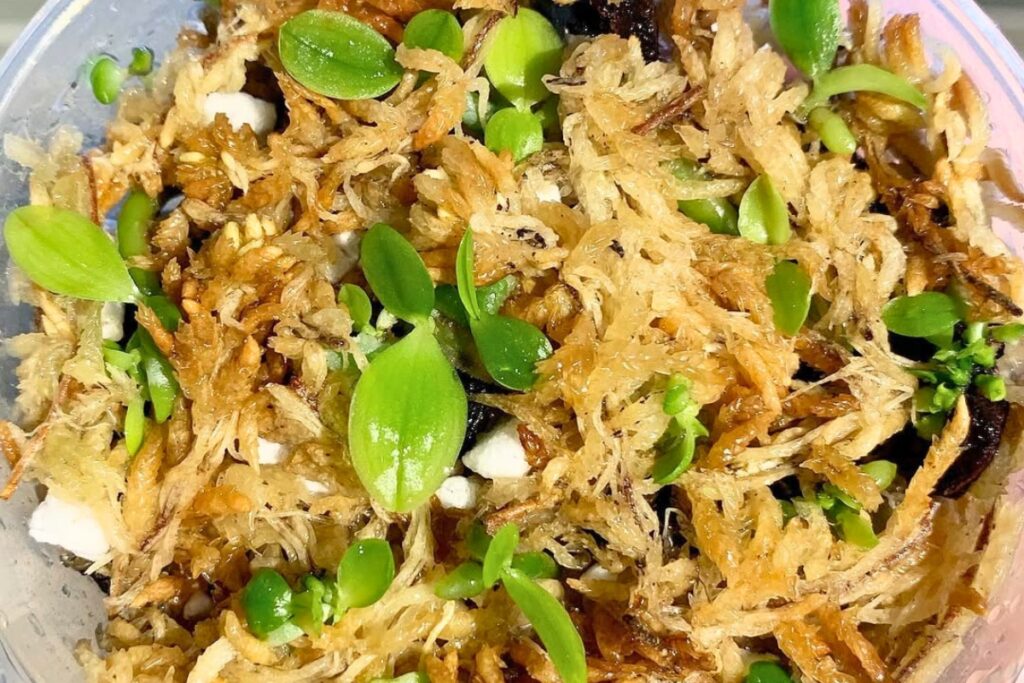
Growing Orchids From Seeds: Advanced Methods
Growing orchids from seeds requires a completely sterile environment, as each tiny seed contains no stored food and must rely on external nutrients to survive. You’ll need specialized flasking equipment, including sterilized glass containers, nutrient media, and tools that have been thoroughly cleaned and sanitized in an autoclave or pressure cooker. With seeds smaller than a speck of dust, even the slightest contamination from bacteria or fungi can destroy your entire culture, making a proper sterile setup absolutely essential for success.
Sterile Growth Environments Required
Since orchid seeds lack the nutritional reserves found in most other plant seeds, they require a completely sterile environment to successfully germinate and develop. You’ll need to create a laboratory-like setup with sterilized flasks, nutrient media, and tools to prevent contamination.
Start by thoroughly cleaning your workspace with a 10% bleach solution. You’ll use a laminar flow hood or DIY sterile box to maintain pristine conditions. Your growing media must be autoclaved at 121°C for 20 minutes to eliminate all microorganisms.
Handle everything with sterilized tools, and always work near a flame source to maintain sterility. Even minor contamination can destroy your entire culture.
Essential Flasking Equipment Needed
Four core pieces of equipment form the foundation of any orchid flasking setup. You’ll need a pressure cooker or autoclave for sterilization, a HEPA-filtered laminar flow hood to maintain sterile conditions, clear glass flasks with autoclavable lids, and precision measuring tools for media preparation.
Your pressure cooker should reach at least 15 PSI and maintain 121°C for proper sterilization. The laminar flow hood’s HEPA filter must be rated at 99.99% efficiency for particles 0.3 microns or larger. Choose flasks that are 8-16 oz in size with wide mouths, and don’t forget digital scales that measure to 0.1g accuracy.
Common Challenges and Solutions in Orchid Propagation
Successful orchid propagation comes with its fair share of obstacles that can challenge even experienced growers. You’ll often face contamination issues, where fungi or bacteria invade your sterile culture, requiring meticulous cleaning protocols and possibly starting over.
Temperature fluctuations can stall growth or kill seedlings. Keep your growing area between 70-80°F (21-27°C), using heat mats if needed. Poor germination rates typically stem from non-viable seeds or incorrect media pH levels.
If your protocorms aren’t developing, check your nutrient ratios. A common fix is adjusting to quarter-strength MS media. For stubborn seeds, try pre-treating them with a 10% bleach solution for 10 minutes.