Like a skilled surgeon performing a precise operation, you’ll find that air layering is one of the most reliable ways to clone your rubber plant. You’re fundamentally encouraging roots to form along a healthy branch while it’s still attached to the parent plant, which gives you a much higher success rate than traditional cuttings. If you’ve ever wanted to multiply your prized rubber plant without the usual propagation headaches, you’ll want to master this fascinating technique.
Contents
Understanding the Science Behind Air Layering
Air layering is a propagation technique that encourages root development on a stem while it’s still attached to the parent plant. The science behind this method relies on manipulating the plant’s natural hormone production and nutrient flow, specifically by interrupting the downward movement of auxins and carbohydrates in the plant’s vascular system.
When a section of bark is removed and the area is wrapped with moist growing medium, the plant responds to this wound by increasing its production of rooting hormones. The accumulated auxins above the wound site stimulate cell division and differentiation, leading to the formation of root primordia. The presence of moisture and darkness provided by the wrapping creates an ideal environment for new root development, while the continued connection to the parent plant guarantees the developing section receives water and nutrients through the xylem tissue.
Essential Tools and Materials Required
The essential tools and materials for air layering rubber plants include sharp, sterilized pruning shears or a knife, sphagnum moss, clear plastic wrap, twine or plant tape, rooting hormone powder, and a small paintbrush for applying the hormone. Additionally, you’ll need aluminum foil to wrap around the plastic, creating a dark environment for root development. A clean workspace and rubbing alcohol for sterilizing tools are also necessary.
All materials should be gathered before starting the process to guarantee smooth execution. The sphagnum moss must be thoroughly moistened but not waterlogged, as excess moisture can lead to rotting. Quality rooting hormone and sharp tools are particularly vital for success, as dull implements can damage the plant tissue and reduce the chances of successful propagation.
Selecting the Perfect Branch and Location
The ideal branch for air layering a rubber plant should be healthy, mature, and at least pencil-thick in diameter. Select a stem that’s woody rather than green and tender, typically around 12-18 months old, as these branches have the best potential for developing roots. The chosen branch should also have several leaves above the intended layering site to guarantee continued photosynthesis and growth.
The best location for air layering should be 12-15 inches below the tip of the branch and just below a leaf node or aerial root. The selected spot needs to be easily accessible for wrapping and monitoring, and the branch should be strong enough to support the weight of the rooting medium that will be added. Avoid damaged, diseased, or thin sections of the branch, as these areas are less likely to produce successful results.
Step-by-Step Air Layering Process
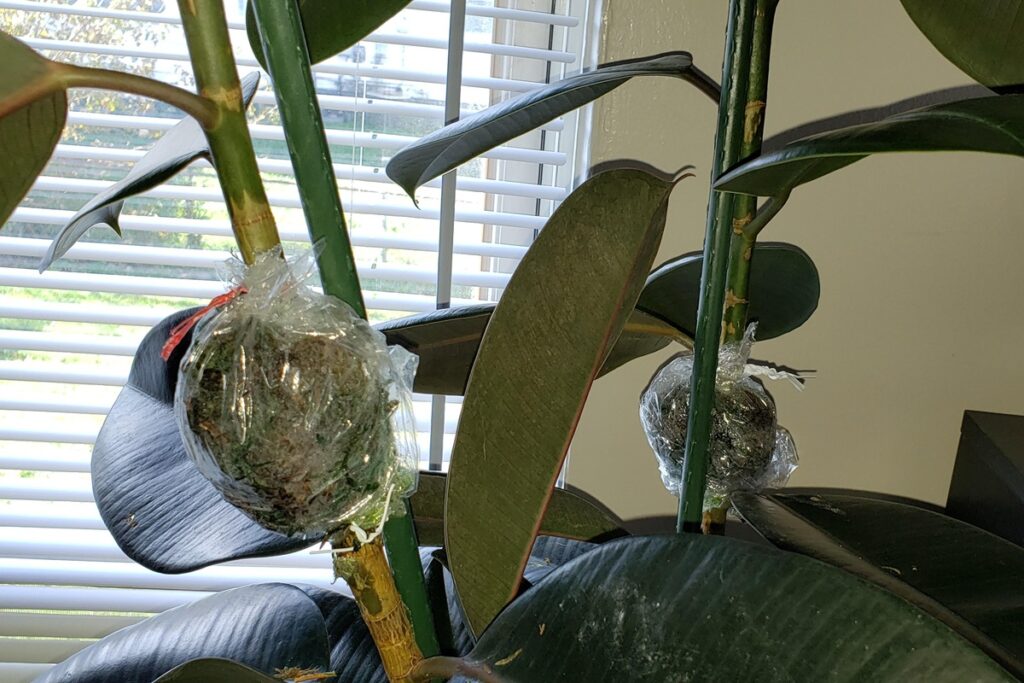
The air layering process for rubber plants begins by selecting a healthy stem that’s at least pencil-thick and making two parallel cuts about 1-1.5 inches apart, completely removing the bark to expose the inner wood. The exposed area should be dusted with rooting hormone powder to stimulate root growth. This area is then wrapped with damp sphagnum moss, ensuring the moss completely surrounds the exposed section.
The moss-covered area must be securely wrapped with plastic wrap or a similar waterproof material, making sure both ends are tightly sealed to maintain moisture. The plastic should be dark-colored or covered with aluminum foil to block light. The wrapped section needs to be monitored for several weeks, keeping the moss moist and watching for root development through the clear plastic. When substantial roots are visible through the moss (typically after 6-8 weeks), the stem can be cut below the rooted area and planted in appropriate potting soil.
Caring for Your Air Layered Section
The air layered section requires careful attention during the rooting process, which typically takes 3-8 weeks. Keep the sphagnum moss consistently moist but not waterlogged by misting through the small holes in the plastic wrap every few days. The area should remain humid, and you’ll know it’s working when you see roots beginning to develop through the clear plastic.
Monitor the air layered section for any signs of rot, fungal growth, or drying out. If the moss appears too dry, increase misting frequency. If condensation becomes excessive inside the plastic, make a few additional small holes for ventilation. Once roots are visible and have grown to 2-3 inches in length, the new plant section is ready for removal and transplanting into its own pot with well-draining potting soil.
Separating and Transplanting the New Plant
When the air-layered section shows a good network of roots visible through the plastic wrap (usually after 2-3 months), it’s time to separate the new plant from the parent. Make a clean cut just below the rooted area using sharp, sterilized pruning shears. Remove the plastic wrap and rooting medium carefully to avoid damaging the new roots.
Immediately plant the rooted cutting in a pot filled with well-draining potting soil. Choose a container that’s slightly larger than the root ball and guarantee it has drainage holes. Water thoroughly after planting and place the new plant in a location with bright, indirect light. Maintain higher humidity around the plant for the first few weeks by misting or using a humidity tray to help it establish in its new environment.