Propagating Alocasia Corms is like planting the seeds of success. Growing these beautiful plants can be a rewarding experience, making them an excellent addition to any home or garden. With proper care and some patience, you’ll soon have lush foliage in your living space. This guide will take you through the steps on how to propagate Alocasia corms so that you can enjoy their beauty for years to come.
Propagation may seem intimidating at first glance, but with this article, it doesn’t need to be! By following our simple instructions, you’ll find yourself on the path to cultivating healthy alocasia corms with ease. You don’t need to be a green thumb either—anyone can propagate these tropical beauties from the comfort of their own homes.
From selecting quality corms to providing adequate moisture and light, we’ve got all of the tips and tricks needed for successful propagation. So put away those gardening gloves and get ready; let’s discover how easy it is to grow your own alocasias!
What Are Alocasia Corms?
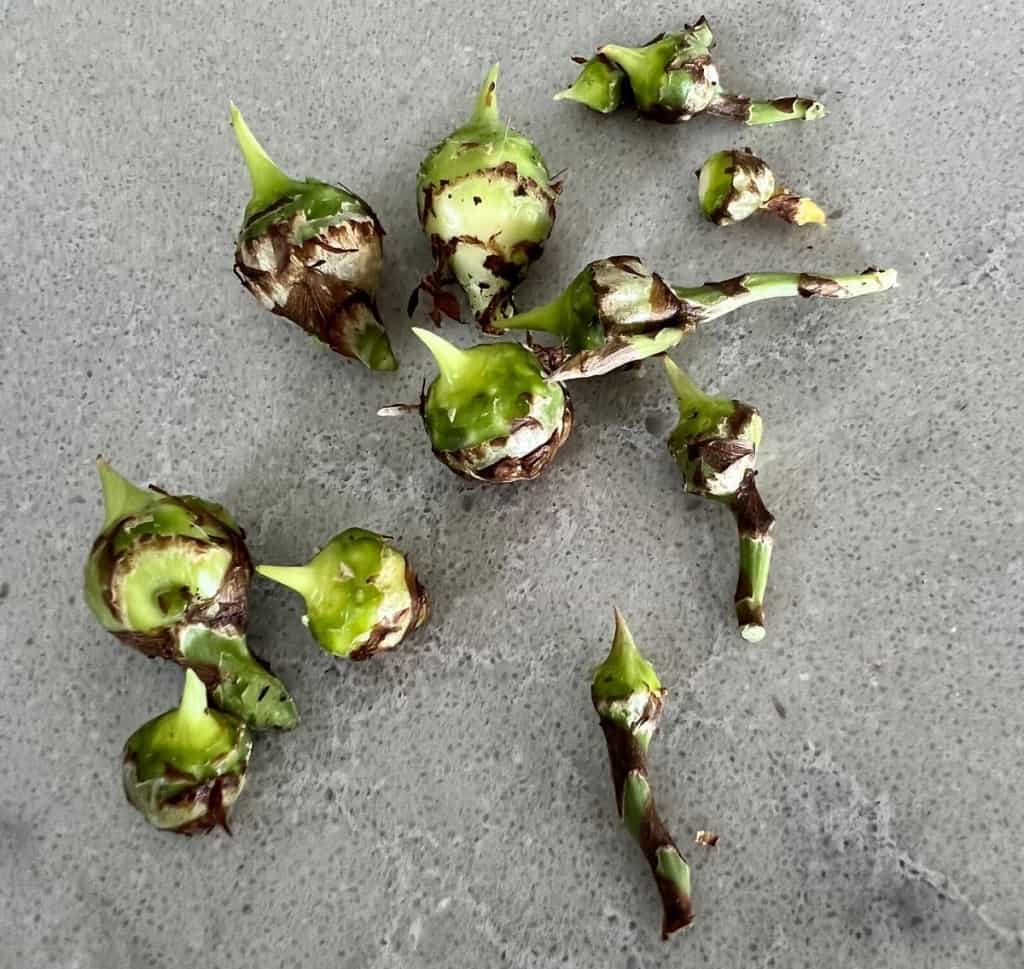
The Alocasia corm is like an exotic, hidden treasure—a single bulb waiting to be uncovered and nurtured. Its beauty has been said to stir the soul of any gardener with its lush green foliage, bold veins, and round shape that’s surprisingly satisfying to behold. But what exactly are Alocasia corms?
Alocasia corms are tubers formed by certain species of plants in the genus Alocasia. These tropical plants produce swollen underground stems known as corms which can store energy for years until they’re ready to sprout new growth when conditions become favorable. Corm propagation is one of the most common ways gardeners propagate these beautiful alocasia plants at home.
How To Propagate Alocasia Corms
Propagating Alocasia corms is a simple and rewarding process that can quickly add beautiful foliage to any home. To get started, one must first understand the nature of these special plants. An Alocasia corm is essentially an underground stem; it stores energy from photosynthesis and provides nourishment for new growth. These fascinating root bulbs are surprisingly easy to propagate in the right conditions—so let’s dive into how!
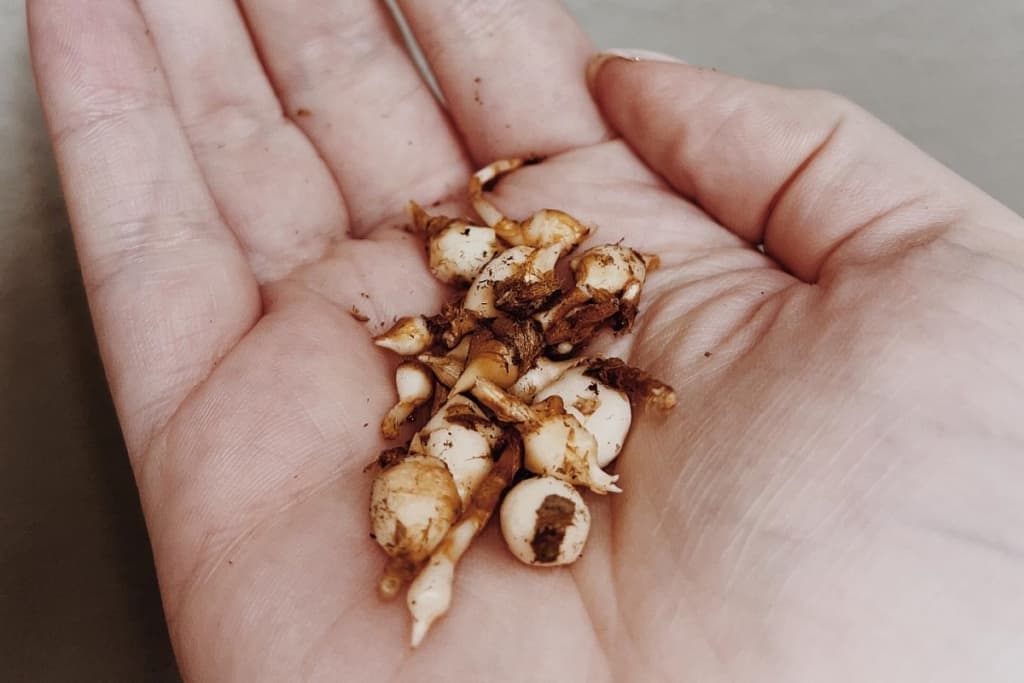
First, you’ll need to separate the individual root balls when handling your Alocasia corms. This will allow each plantlet its own space to grow without competition or overcrowding. Make sure you’re gentle while doing this, as breaking off too much of the roots could damage them irreparably. After separating all your plants, it’s time to give them their new home!
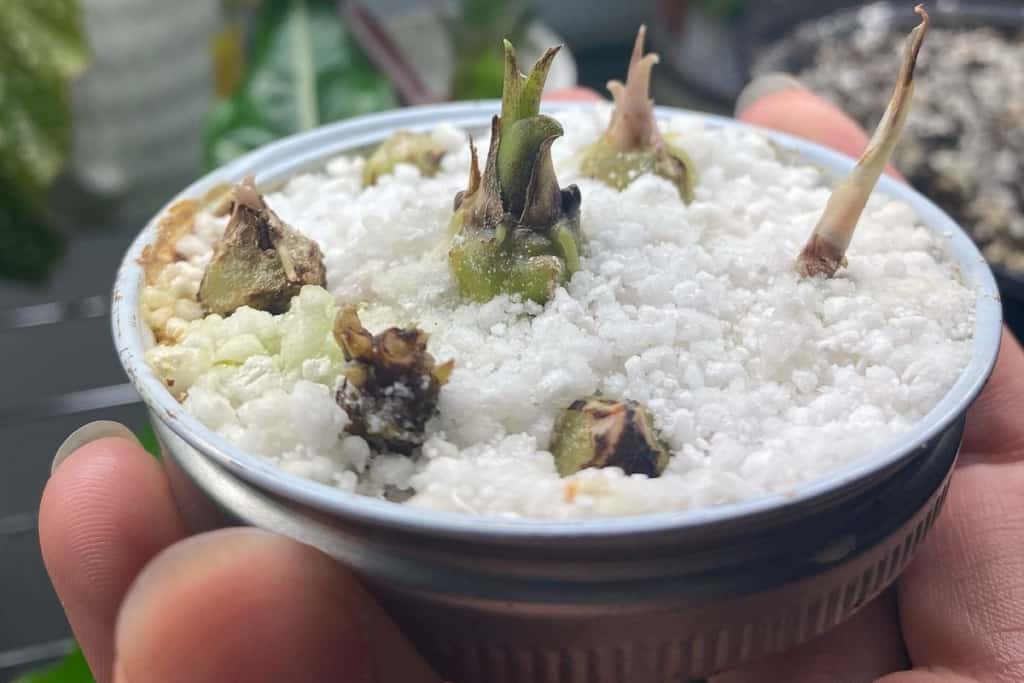
Find a medium-sized pot with plenty of drainage holes at the bottom. Fill it up with a soil mix containing enough organic matter for proper aeration and water retention—we recommend adding some perlite for best results. Plant your Alocasia corms about 3 inches deep in the soil, making sure not to cover up more than half of the bulb itself. Then gently firm down the surrounding soil around them before watering with tepid tap water until moistened throughout.
Now comes maintaining those perfect humidity levels: keep your newly propagated Alocasias near indirect sunlight (preferably near an east-facing window) and mist regularly using filtered water if needed—but be careful not to overdo it as this might cause rot! You should start seeing growth within 4–6 weeks—just make sure you don’t forget regular care & maintenance alongside occasional repotting once they outgrow their current homes. Voila—with just a few steps you’ve successfully propagated beautiful Alocasia Corms!
How Long Do Alocasia Corms Take To Grow?
It’s exciting to think about cultivating something new in your garden, and Alocasia corms are an excellent choice. Growing these exotic-looking plants is a fun hobby that yields beautiful results—but how long do they take to grow? On average, it takes around two months for the root growth of Alocasia corms to become visible. This can vary widely depending on climate conditions and other factors, though.
When planting Alocasia corms, you’ll want to make sure they’re placed in moist soil with plenty of humid air nearby. If you live in a dryer area, misting them regularly will help give them the moisture they need as well as encourage their roots to develop quicker. It’s also important to note that once planted, the corm won’t show signs of life for several weeks—so don’t be alarmed if you don’t see any progress right away!
Caring for an Alocasia corm requires patience and some basic knowledge of gardening techniques such as proper watering schedules and drainage methods. You should water your plant often enough to keep its soil damp without overdoing it since too much water can cause root rot or lead to stunted growth. Additionally, you shouldn’t forget about providing adequate sunlight either; these plants love bright light and may not thrive in overly shaded areas.
Overall, growing Alocasia corms isn’t terribly difficult but does require attention and dedication from the gardener. With regular care and maintenance paired with the right environment (humid conditions), most people find success within two months’ time when it comes to seeing visible root growth on their newly planted corms!
Frequently Asked Questions
How do Alocasia produce corms?
Alocasia produces corms through a process called vegetative propagation. In this process, a piece of the stem is cut off and planted in the soil. The piece of the stem is called a cormel. As the cormel grows, it forms a new corm. The corm is an underground structure that stores food and energy for the plant. When conditions are favorable, the corm will sprout new leaves and stems.
Vegetative propagation is a common way for alocasia to produce corms. While the process is simple, it is important for gardeners to take the proper steps to ensure successful propagation. The cormels should be planted in well-draining soil and kept moist but not wet. The soil should also be rich in nutrients and free of weeds. Once the cormels have grown, they can be separated and transplanted into larger pots or into the ground. With the right care and conditions, the alocasia corms will continue to propagate and provide a beautiful addition to any garden.
When do Alocasia produce corms?
Alocasia corms are typically produced in the spring and summer months. During this time, the plant will begin to store energy in the form of carbohydrates in its root structure, which will then be used to produce new growth and corms. Corms are typically produced in the late summer, although some plants may produce them earlier in the season.
As the corms begin to form, they will typically be found near the base of the plant and can be harvested for replanting. When harvesting corms, it is important to leave some of the corms in the ground, as they will help to ensure the future health of the plant. Once harvested, corms should be planted in well-draining soil and should be watered regularly to ensure proper growth.
How do you separate Alocasia corms?
Alocasia corms can be separated by gently shaking the soil off of them and then carefully digging the corms out of the ground with a trowel or hand trowel. Be sure to be mindful when digging up the corms, as they are quite delicate and can be easily damaged. Once you have the corms out of the ground, you can then use your hands to gently separate them. If the corms are still attached to the root system, you can use a sharp knife or pruners to carefully cut them apart. It is important to be gentle and take your time when separating the corms to prevent any unnecessary damage.
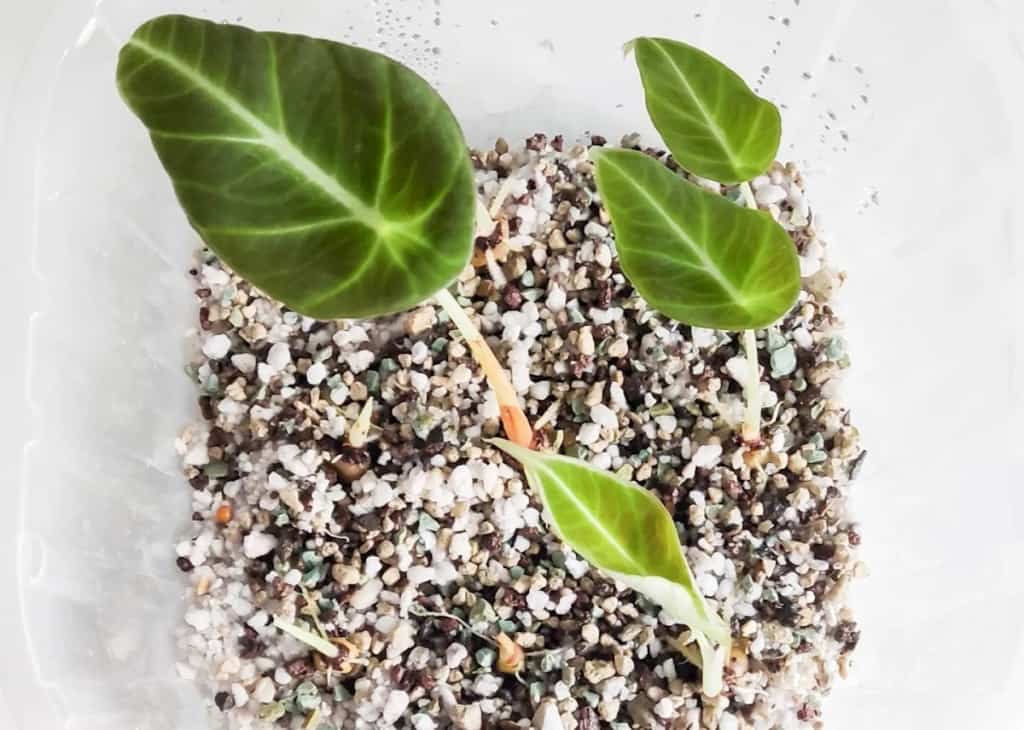
Once you have separated the Alocasia corms, you should place them in a container with loose, moist soil and cover them with a thin layer of soil. This will help protect the corms from drying out and help them start to form new roots. Place the container in a warm, bright location and keep the soil moist. The corms should begin to sprout within a few weeks.
Can you cut Alocasia tubers?
Alocasia tubers can be cut, but it is not recommended. The tubers contain a milky sap that can be an irritant to the skin, so it’s best to wear gloves if you plan to cut them. Also, it is important to make sure the cut surfaces are dry before replanting them, since they can rot if exposed to moisture for too long.
Alocasia tubers typically need to be divided when they become overcrowded or when you want to propagate more plants from a single tuber. The best time to divide them is in the spring after the new growth has started emerging. To divide them, carefully dig up the tuber and then use a sharp knife or shovel to cut it into smaller pieces, making sure each piece has some root system. Transplant the pieces right away, or wrap them in moist paper towels and store them in a cool place until you are ready to plant them.
Can you store Alocasia corms?
Yes, Alocasia corms can be stored for future use. To store Alocasia corms, it is best to keep them in a cool, dark, and dry place, such as a basement or a garage. The corms should be placed in a paper bag or a container filled with peat moss. Make sure that the container is well-ventilated and keep it away from direct sunlight.
It is also important to monitor the moisture levels in the container and make sure that the corms are not exposed to too much humidity. Additionally, it is important to check the corms regularly to ensure that they are not rotting or developing signs of disease. If any corms show signs of decay, they should be discarded and replaced with fresh corms.
When to plant Alocasia corms?
Alocasia corms should be planted in the spring, when soil temperatures are consistently above 60°F (15°C). Planting in the fall is not recommended, as the corms may not have enough time to develop a strong root system before cold temperatures set in.
When planting, choose a well-draining potting soil and a pot that is at least 10 inches (25 cm) deep, as alocasia corms require a deep pot in order to grow. Place the corm in the soil, making sure that the top of the corm is slightly above the soil line. Water the soil thoroughly and keep it moist. The corms should begin to sprout within a few weeks. Once the sprouts appear, be sure to keep the soil moist and fertilize the alocasia corms with a balanced fertilizer once a month.
Will Alocasia corms grow on their own?
No, Alocasia corms will not grow on their own. In order for them to grow and thrive, they need to be planted in well-draining soil, watered regularly and fertilized every two weeks during the growing season. Additionally, they need plenty of sunlight and warmth to encourage growth. Alocasia corms are often grown in containers indoors, as they do not tolerate cold temperatures well and can be very sensitive to frost.
If they are planted outdoors, they should be grown in a sheltered spot that receives partial shade and is protected from wind and rain. It’s important to keep the soil moist, but not overly wet, as too much water can cause the corms to rot. Finally, Alocasia corms should be divided every two to three years to ensure healthy growth and prevent overcrowding. With the right care, Alocasia corms can be an eye-catching addition to any garden.
Can Alocasia corms grow in water?
No, Alocasia corms cannot grow in water. They need soil that is well-draining, moisture-retentive, and slightly acidic to grow properly. The soil should be loose and have good aeration and drainage. When planted in the ground, Alocasia corms should be planted with the top of the corm just barely below the soil surface. Additionally, it is important to provide the plant with plenty of indirect, bright light and moderate temperatures.
The plant also requires regular watering and fertilization to help promote healthy growth. A thick layer of mulch around the plant is also beneficial for preventing weeds and retaining moisture. With the right care and environment, Alocasia corms can provide a beautiful and unique addition to any garden.
How do you propagate Alocasia corms in sphagnum moss?

To propagate Alocasia corms in sphagnum moss, begin by sterilizing the sphagnum moss. To do this, place the moss in a pot or bowl and cover it with boiling water. Allow the moss to steep for a few minutes, then drain and rinse with cold water. Once the moss is clean, spread it out in a shallow tray or pot and moisten it.
Next, place the Alocasia corms on top of the sphagnum moss. Make sure to leave some space between the corms so that they have room to grow. Then, cover the corms with a thin layer of sphagnum moss and lightly press the moss down so that the corms are securely covered.
The last step is to water the moss. Make sure to use a spray bottle or mister to lightly mist the moss with water, as Alocasia corms require moist, but not soggy, conditions to thrive. Once the moss is moist, place the tray or pot in an area with bright indirect sunlight and keep the moss moist. The corms should begin to sprout in a few weeks.
How deep should I plant Alocasia bulbs?
Alocasia bulbs should be planted at a depth of approximately 4–6 inches (10–15 cm). In general, the bulb should be planted at a depth that is at least twice its height. When planting, be sure to place the bulb in the soil with the root end facing down. After planting, be sure to water and monitor the soil to ensure it is kept moist.
Once the bulb is established, it will not need to be watered as frequently but should still be monitored. Alocasia is a tropical plant and will require regular fertilization throughout the growing season to ensure healthy and vigorous growth. Additionally, the soil should be amended with organic matter to ensure optimal results.
Conclusion
In conclusion, propagating Alocasia corms can be a rewarding experience. It’s surprisingly easy to do and doesn’t require much time or effort. With a little patience and the right knowledge, you can have beautiful plants in your home in no time! The average growth rate of an Alocasia corm is 6–12 inches per year, so it won’t take long for them to reach full size.
Overall, Alocasia corm propagation is worth the effort. In addition to being aesthetically pleasing, they’re also low maintenance and don’t require any special care. Plus, if cared for properly, one Alocasia corm can live up to 25 years—that’s more than double the life expectancy of other plants!
So why not give propagating Alocasia corms a try? All you need are some corms and basic gardening supplies like soil, water and fertilizer. You’ll soon find out just how fun (and successful!) this project can be!