It is natural for some plants to climb trees and then hold on to the bark. To mimic this in your living room, you need a moss pole or plant support for your climbing plant, for example, a Philodendron Birkin. This blog post aims to give you some Philodendron Birkin moss pole tips.

Contents
Does Philodendron Birkin Need a Moss Pole?
Since plants in tropical rainforests need to grow upwards to get a bit of sunlight under all those trees, many of them are climbers. It is also common for Philodendron Birkin to grow upward, so if you don’t use any tools, your plant will look very unsightly when it becomes top-heavy.
Climbing plants can be recognized by aerial roots and nodes, the brown points from which roots grow. These roots attach to trees or moss poles for the plant to climb.
What Types of Moss Poles are Available?
Most moss poles that you see in garden centers or online shops are not made of real moss, but of plastic pipe with coconut fiber around it. This is actually a coco fiber pole. You can buy ready-made coco fiber poles in a variety of sizes and lengths, and some can also be extended by adding an additional pole to the top.

In spite of their attractive appearance, coco fiber poles do not suit plants! I ordered some coco fiber poles online because I couldn’t find any suitable ones at my local garden center, but I found out that coco fiber repels water instead of retaining moisture. You have to tie the aerial roots to the support because they refuse to hold on. I was disappointed!
After that, I tried another stake, which was covered with “preserved moss” (dead moss that had been soaked in glycerin and dyed green). Unfortunately, it did not work: the moss would not moisten and so the roots would not penetrate.
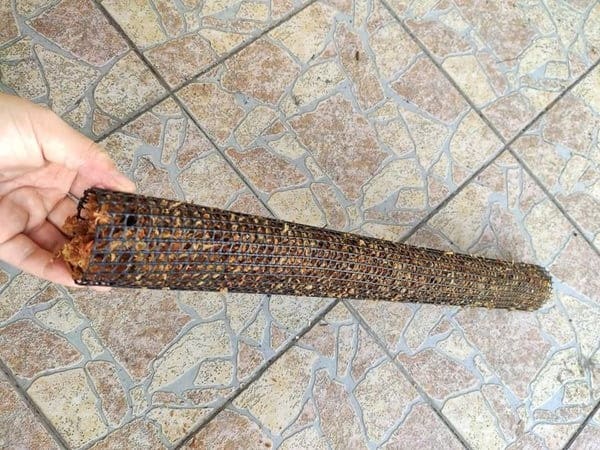
As a result, I created my own moss poles, based on a model I saw online, using florist wire (or fishing line) to bind the sphagnum moss to a PVC pipe (or any rigid plastic pole). Those plants rooted directly into the moss and retained moisture easily. I was thrilled!
The problem was wrapping the moss around the pole. Sphagnum moss does not hold together, so wrapping it around a pole requires a lot of florist wire (or fishing line), a lot of skill, and a lot of time. It was frustrating because as the moss slipped down over time, the pole was stripped.
How-To Guide for Philodendron Birkin Moss Pole

As an alternative, I have learned to make my own moss stakes very easily and quickly. Here are the steps:
- Gather the following materials:
- wire mesh 60 to 90 cm wide (available at any hardware store);
- sphagnum moss;
- wire cutter;
- florist wire or cable ties;
- pliers;
- work gloves;
- bamboo stake or other long object;
- soil for philodendron;
- large pot;
- Philodendron Birkin plant
- Soak the sphagnum moss in a bucket of warm water.
- Wearing gloves (to avoid injury from the cut wire), cut a mesh 20-25 cm wide with the wire cutter.
- Roll the mesh into a cylinder, using florist wire or cable ties to secure it.
- Use a pair of pliers to tuck the cut ends of the wire mesh into the cylinder to avoid the risk of cutting yourself in the future.
- Remove the moss from the water and drain it.
- Fill the cylinder with moist sphagnum moss, packing it tightly. Use a bamboo stake (or other long object) to help push it into the center of the cylinder.
- Place the moss pole upright in the pot.
- Fill the bottom of the pot with moist soil and tamp it down so the moss pole stands upright.
- Remove the Philodendron Birkin plant and place it in the pot next to the moss pole.
- Fill all the way around the root ball of the plant and moss pole with moist potting soil, tamping down well to make the moss pole stable.
- Secure the plant’s stems to the moss pole with cable ties or florist wire. (They can be removed later when the plant is well-rooted in the moss pole).
- When you water the plant in the future, be sure to moisten the moss pole as well as the soil.

As the plant grows, the aerial roots that form at the nodes of the stems will be attracted to the moss pole’s humidity and will adhere to it, allowing the plant to climb without your assistance.
Isn’t it easy? Perfect for a rainy afternoon project, right?
